Dreamy Room Level 1
Level 1 guide walkthrough, helping players solve puzzles and explore the wonderful world of Dreamy Room.
Dreamy Room Level 1 Walkthrough Guide
Room Story
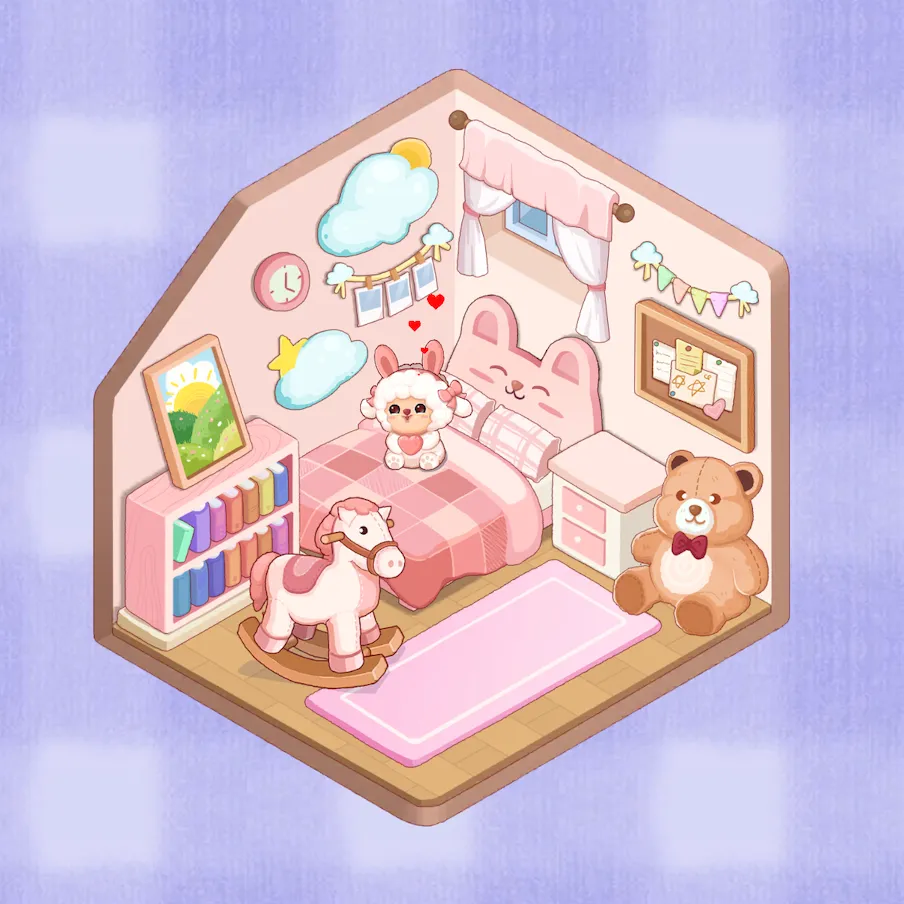
Little Amy says goodnight to her furry friends every night - first the little sheep on the bed, and then the teddy bear with a bow on the floor. The clouds on the ceiling, the sun, and stars silently guard her beautiful dreams, while countless fairy tales are hidden under the pink checkered sheets. The colorful children's books on the bookshelf witness her daily growth, while the pink wooden horse carries her dream of galloping on the grassland. In this loving little world, every item has a warmth, and every corner has a story, forming the most beautiful childhood memory palace.
Step-by-Step Walkthrough
Important Notice
Due to frequent level number changes in Dreamy Room and differences between platforms (Android/iOS), this walkthrough content may not completely match your current level. Please refer to the actual display in the game.
Step 1: Hang the Cloud Sun Decoration Above the Room
First in Dreamy Room Level 1, hang the adorable Cloud Sun decoration in the upper left area of the room's ceiling. This soft blue-white cloud paired with a bright yellow sun creates a dreamy sky atmosphere for the entire room. Make sure the position doesn't conflict with other hanging decorations.
Step 2: Add Cloud Stars Decoration to the Center of the Ceiling
Next, place the Cloud Stars decoration with small stars in the center-right position of the ceiling. In Dreamy Room Level 1, this decoration perfectly echoes the sun cloud, filling the ceiling area with childlike wonder and imagination.
Step 3: Install the Note Board on the Right Wall
Hang the round pink Note board on the right wall at medium height. In Dreamy Room Level 1, this note board not only serves as decoration but also reflects the room's practicality for posting notes and small papers.
Step 4: Hang the Colorful Triangle Flag Banner
Stretch the colorful from the left wall to the right wall, creating a beautiful arc. In Dreamy Room Level 1, these small flags add a festive, cheerful atmosphere to the room, with colors harmonizing with the overall pink tone.
Step 5: Arrange the Photo Garland Decoration
Add the Photo Garland decoration to the upper wall area, which is a beautiful garland connecting small photos or cards. In Dreamy Room Level 1, arrange it below the triangle flags to create a richly layered wall decoration effect.
Step 6: Install the Window and Curtains
Install a lovely Window with pink curtains on the right wall. In Dreamy Room Level 1, the window should be positioned appropriately with curtains falling naturally, bringing a warm home feeling and good lighting to the room.
Step 7: Hang the Pink Round Clock
Hang the pink round Clock on the left wall at a height similar to the note board. In Dreamy Room Level 1, this clock is not only practical but its soft pink color perfectly integrates with the room's overall color scheme.
Step 8: Place the Main Large Bed in the Room Center
Position the pink-white checkered Large Bed in the center-back area of the room, with the headboard near the back wall. In Dreamy Room Level 1, this bed is the core furniture of the room, with a checkered pattern design that's both cute and classic.
Step 9: Add a White Bedside Table Next to the Bed
Place an elegant white Bedside Table on the right side of the large bed. In Dreamy Room Level 1, the bedside table's height should coordinate with the bed surface, providing practical storage and display space for the room.
Step 10: Install the Colorful Bookshelf on the Left Wall
Place the Bookshelf filled with various colored books against the left wall. In Dreamy Room Level 1, the books on the shelf should be richly colored, creating a knowledge-rich environment full of learning atmosphere.
Step 11: Place the Little Sheep Rocking Doll
Place the pink-white Little Sheep Doll on the left front floor of the room. In Dreamy Room Level 1, this adorable toy adds childlike gaming elements to the room, with enough space left for rocking motion.
Step 12: Lay the Comfortable Mattress
Ensure there's a soft, comfortable Mattress on the bed that fits perfectly with the bed frame. In Dreamy Room Level 1, the mattress thickness and softness should reflect a comfortable sleeping environment.
Step 13: Install Matching Curtains
Besides the window's own curtains, ensure all Curtains in the room are pink-toned and fall naturally. In Dreamy Room Level 1, the curtain material should look light and flowing, enhancing the room's cozy feeling.
Step 14: Place the First Pillow
Place a pink square Pillow 1 on the left side of the bed. In Dreamy Room Level 1, the pillow should be soft and shapely, with colors coordinating with the bedding.
Step 15: Add the Second Pillow
Place another Pillow 2 next to the first pillow, which can be slightly different in shape or pattern. In Dreamy Room Level 1, the combination of two pillows should create a comfortable sleeping area.
Step 16: Spread the Warm Blanket
Neatly spread the pink Blanket on the bed, with some areas naturally wrinkled. In Dreamy Room Level 1, the blanket should look soft and warm, inviting people to lie down and rest.
Step 17: Place the Little Sheep Doll on the Bed
Place the adorable Little Sheep Doll in the center of the bed as the main decoration. In Dreamy Room Level 1, this little sheep doll should become the focal point of the bed with a cute and charming expression.
Step 18: Position the Teddy Bear Doll in the Corner
Place the brown Teddy Bear Doll with a red bow tie in the lower right corner of the room. In Dreamy Room Level 1, the teddy bear should sit upright, becoming an important part of the room's cozy atmosphere.
Step 19: Hang the Landscape Painting
Hang a warm Painting depicting sunny fields above the bookshelf or on the left wall. In Dreamy Room Level 1, the painting's content should echo the room's natural, cozy theme.
Step 20: Finally Lay the Pink Carpet
Spread the rectangular pink Carpet on the floor in front of the bed, covering the central area of the room. In Dreamy Room Level 1, the carpet should lie flat against the floor, providing soft footing and visual completeness for the entire room.
Tips and Tricks
- Creating a warm and dreamy atmosphere through the use of pink gradient combinations
- Placing the bookshelf near the window allows for natural light to be used for reading
- The combination of multiple plush toys can create a rich sense of companionship