Dreamy Room Level 8
Level 8 guide walkthrough, helping players solve puzzles and explore the wonderful world of Dreamy Room.
Dreamy Room Level 8 Walkthrough Guide
Dreamy Room Level 8 Room Story
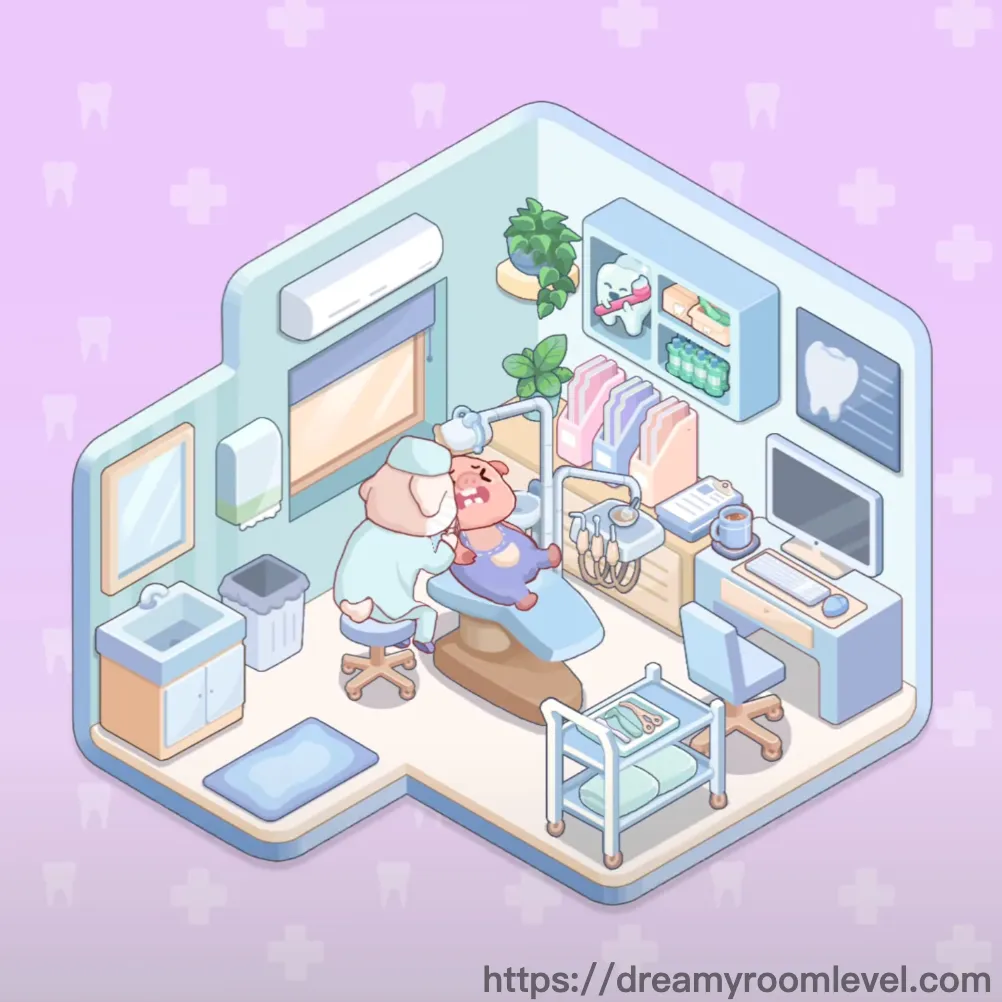
Dr. Bunny's dental clinic opens every morning with warm sunlight streaming through the windows. Today is special - Kirby has arrived for a check-up in Dreamy Room Level 8. The cozy clinic combines professional care with a homey atmosphere. Soft pastel colors and friendly decorations help patients feel at ease. Dr. Bunny arranges the dental tools while Kirby waits patiently in the comfortable chair, creating a perfect harmony in this healing space.
Dreamy Room Level 8 Step-by-Step Placement Guide
Step 1. Position the Window Frame
Place the window on the upper left wall area, aligned with the wall edge. The window should snap into the pre-marked wall opening for natural light in Dreamy Room Level 8.
Step 2. Install Ceiling Light in Dreamy Room Level 8
Mount the ceiling light directly above the room center. Look for the ceiling attachment point and drag upward until it locks into place.
Step 3. Place Blue Floor Mat
Position the blue floor mat in the lower left corner of the floor. Align it parallel to the wall edges, creating a defined entrance area for Dreamy Room Level 8.
Step 4. Set Up Dental Chair
Place the dental chair in the room's center-right area. The chair base should align with floor markers, facing slightly left toward the equipment.
Step 5. Position Computer Monitor in Dreamy Room Level 8
Mount the computer monitor on the right wall desk area. Ensure the screen faces the dental chair for easy viewing during procedures.
Step 6. Install Wall Shelf
Attach the wall shelf to the upper left wall section. Position it below the ceiling light but above head height in this Dreamy Room Level 8 setup.
Step 7. Mount Tooth X-ray Display
Place the tooth x-ray display on the right wall above the monitor. Align it centrally for optimal viewing angle in Dreamy Room Level 8.
Step 8. Position Storage Cabinet
Place the storage cabinet along the back wall center area. Push it flush against the wall with doors facing forward.
Step 9. Set Up Clothing Rack in Dreamy Room Level 8
Position the clothing rack next to the storage cabinet. Keep it parallel to the back wall for organized coat storage.
Step 10. Hang Pink Coat
Drape the pink coat on the left hook of the clothing rack. Let it hang naturally without overlapping other items in Dreamy Room Level 8.
Step 11. Add Purple Coat
Place the purple coat on the middle hook position. Ensure even spacing between coats for a tidy appearance.
Step 12. Hang Blue Coat in Dreamy Room Level 8
Position the blue coat on the right hook of the rack. Maintain uniform hanging height with other coats.
Step 13. Place Medical Cart
Roll the medical cart to the lower right area near the dental chair. Angle it for easy access during Dreamy Room Level 8 procedures.
Step 14. Position Rolling Stool
Place the rolling stool beside the dental chair on the left side. Keep it at working height for the dentist character.
Step 15. Set Sink Unit in Dreamy Room Level 8
Install the sink unit against the left wall section. Connect it flush with the wall for proper water access.
Step 16. Place Trash Bin
Position the trash bin in the front left corner near the door area. Keep it accessible but not blocking the pathway in Dreamy Room Level 8.
Step 17. Add Succulent Plant
Place the succulent plant on the wall shelf left side. Center it on the shelf surface for balanced decoration.
Step 18. Position Potted Plant in Dreamy Room Level 8
Set the potted plant on the shelf right side. Leave space between plants for visual balance.
Step 19. Mount X-ray Viewer Board
Attach the x-ray viewer board on the upper right wall area. Position it at eye level for easy examination in Dreamy Room Level 8.
Step 20. Place Golden Storage Box
Position the golden storage box in the lower left floor corner. Tuck it neatly against the wall intersection.
Step 21. Set Medical Tray in Dreamy Room Level 8
Place the medical tray on top of the medical cart surface. Center it for stable placement during procedures.
Step 22. Arrange Dental Tools
Distribute dental tools across the medical tray systematically. Organize them by size for efficient access in Dreamy Room Level 8.
Step 23. Place Dental Instruments
Add dental instruments to remaining tray spaces. Keep sharp ends pointing inward for safety.
Step 24. Position Paper Towel Dispenser in Dreamy Room Level 8
Mount the paper towel dispenser above the sink unit. Align it centrally for convenient access.
Step 25. Set Blue Cup
Place the blue cup on the sink counter right side. Position it within easy reach for rinsing in Dreamy Room Level 8.
Step 26. Add Tooth Model
Position the tooth model on the cabinet top surface. Display it prominently for patient education.
Step 27. Hang Picture Frame in Dreamy Room Level 8
Mount the picture frame on the left wall above the sink. Center it for aesthetic balance.
Step 28. Install Wall Mirror
Attach the wall mirror on the back wall section. Position at face height for patient use in Dreamy Room Level 8.
Step 29. Organize Dental Cabinet Drawers
Ensure dental cabinet drawers are properly aligned in the storage unit. Close them flush for neat appearance.
Step 30. Place Tissue Box in Dreamy Room Level 8
Set the tissue box on the counter near the monitor. Keep it accessible for patient comfort.
Step 31. Arrange Dental Supplies
Organize dental supplies inside cabinet compartments. Group similar items together for efficiency in Dreamy Room Level 8.
Step 32. Position Toothbrush Holder
Place the toothbrush holder on the sink counter left side. Stand it upright for proper drainage.
Step 33. Set Rinse Cup in Dreamy Room Level 8
Position the rinse cup next to the toothbrush holder. Keep it within patient reach.
Step 34. Add Dental Floss
Place dental floss in the cabinet drawer or counter area. Store it visibly for patient reminders in Dreamy Room Level 8.
Step 35. Position Toothpaste
Set toothpaste beside the toothbrush holder. Keep the tube upright for easy dispensing.
Step 36. Place Mouthwash in Dreamy Room Level 8
Position mouthwash bottle on the counter back area. Ensure label faces forward for identification.
Step 37. Store Medical Gloves
Place medical gloves box in the cabinet or on the cart. Keep them easily accessible for Dreamy Room Level 8 procedures.
Step 38. Position Face Mask
Store face mask supply near the medical gloves. Maintain hygiene protocol organization.
Step 39. Place Dentist Character in Dreamy Room Level 8
Position the dentist character on the rolling stool beside the chair. Face them toward the patient area.
Step 40. Set Kirby Patient
Finally, place Kirby patient in the dental chair. Center them comfortably for the examination in Dreamy Room Level 8.
Important Notes and Tips
Important Notes
- The dental chair must be placed before positioning Kirby to avoid placement conflicts
- Small dental tools on the tray require precise finger placement to avoid scattering
- The coat rack items overlap slightly - place them in order from left to right
- Cabinet drawers may block other items if not properly closed first
- Wall-mounted items like x-ray displays need exact vertical alignment
Practical Tips
- Start with large furniture pieces to establish the room layout in Dreamy Room Level 8
- Use zoom function for placing tiny dental instruments on the medical tray
- Drag items from bottom edge when placing on high shelves for better control
- Group similar medical supplies together before placing for organized appearance
- Position all wall items before floor decorations to prevent blocking issues
- Complete Dreamy Room Level 8 efficiently by following the furniture-to-details sequence