Dreamy Room Level 126
Level 126 guide walkthrough, helping players solve puzzles and explore the wonderful world of Dreamy Room.
Dreamy Room Level 126 Walkthrough Guide
Dreamy Room Level 126: Room Story
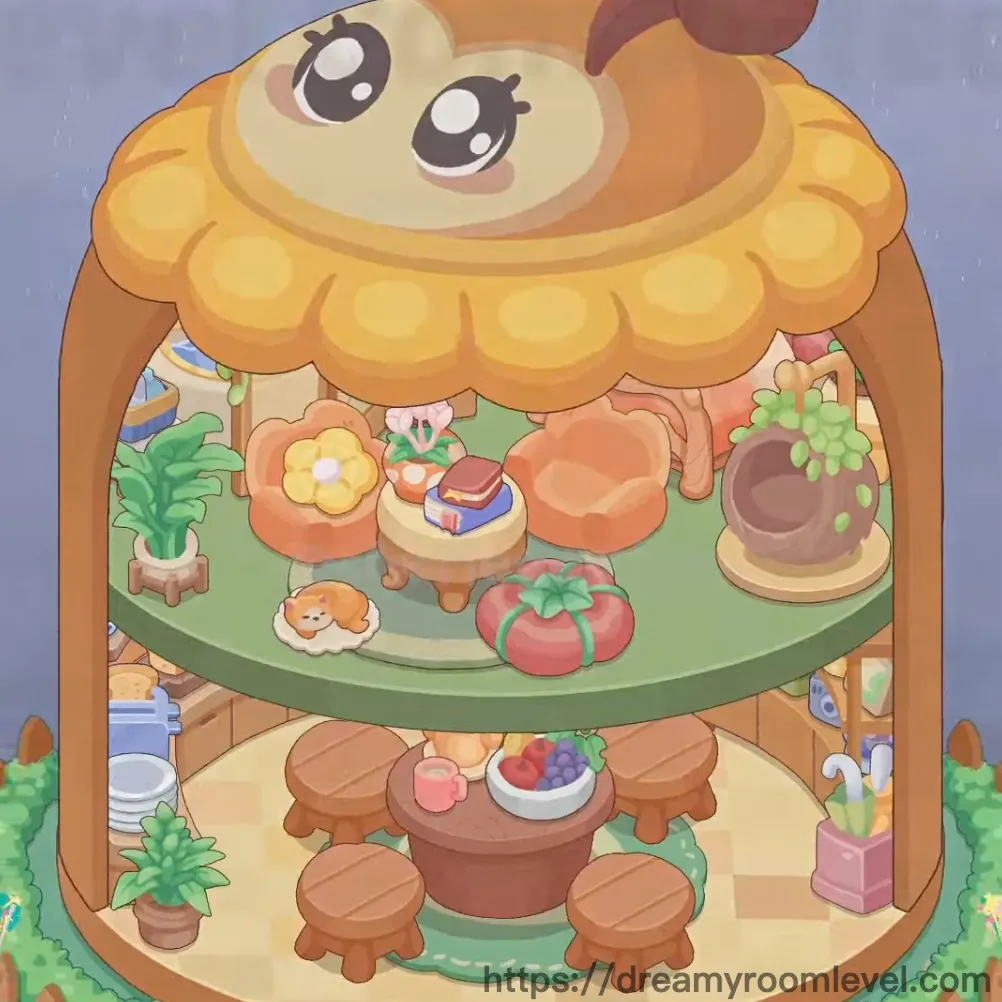
In a whimsical corner of the dreamscape, there lived a cheerful bear mascot who dreamed of creating the perfect cozy home. The warm orange walls embrace visitors like a gentle hug, while colorful furnishings scattered across multiple floors tell stories of joyful days. Downstairs, the kitchen welcomes friends with fresh-baked cakes and fruit baskets. Upstairs, a peaceful bedroom retreat features soft beds and a relaxing bath area where the mascot unwinds after greeting guests. Every vine decoration and flower wreath was carefully chosen to bring nature's warmth indoors, creating a sanctuary where comfort meets charm in Dreamy Room Level 126.
Dreamy Room Level 126: Step-by-Step Placement Guide
Step 1. Place the Wooden Table in the Center of Lower Floor
Position the wooden table at the center of the ground floor dining area. This round table serves as the focal point for the kitchen space in Dreamy Room Level 126, providing the foundation for meal arrangements.
Step 2. Arrange Wooden Stools Around the Table
Place three wooden stools evenly around the table perimeter. Position them to create balanced seating arrangements, ensuring guests can comfortably gather for meals in this level.
Step 3. Position Yellow Cabinet on the Left Side
Set the yellow cabinet against the left wall of the lower floor. This storage unit should align with the wall edge, featuring papers visible on its surface for Dreamy Room Level 126's organized kitchen aesthetic.
Step 4. Install the Oven with Cake Display
Place the oven in the central back area between decorative elements. Position the cake inside the oven's display window, showcasing the freshly baked treat that defines this level's warm hospitality.
Step 5. Mount Shelf on the Right Wall
Attach the shelf to the right wall of the lower floor. This display area will hold various items including blue item, green item, and yellow item, creating a colorful storage solution in Dreamy Room Level 126.
Step 6. Add Green Plant Decorations
Position the green plant on top of the yellow cabinet. Place the potted plant near the left corner of the ground floor, bringing natural elements indoors according to Dreamy Room Level 126 design principles.
Step 7. Set Wooden Barrel with Red Fruits
Place the wooden barrel on the yellow cabinet surface. Fill it with red fruits, creating an appetizing display that enhances the kitchen atmosphere of this level.
Step 8. Position Purple Jar and Teapot on Cabinet
Arrange the purple jar on the cabinet near the back wall. Place the teapot on the circular wooden platform beside other kitchenware, completing the beverage station in Dreamy Room Level 126.
Step 9. Install Round Window with Flower Wreath
Mount the round window on the upper back wall of the ground floor. Decorate it with a flower wreath featuring yellow flowers and white flowers, adding charm to Dreamy Room Level 126.
Step 10. Add Climbing Vine Decorations
Drape vine decorations along the walls and window frame. Extend climbing vines with green leaves and leaves throughout the space, creating a natural garden feel in this level.
Step 11. Set Up Umbrella Stand with Umbrellas
Position the umbrella stand in the bottom right corner of the ground floor. Place the candy cane umbrella and striped umbrella inside, providing both function and whimsy to Dreamy Room Level 126.
Step 12. Arrange Fruit Bowl on Table in Dreamy Room Level 126
Center the fruit bowl on the wooden table. Fill it with red berries and purple grapes, creating an inviting centerpiece that showcases fresh produce for this level's dining area.
Step 13. Lay Green Rug on Lower Floor
Spread the green rug beneath the table and stools on the ground level. This scalloped rug defines the dining zone with its decorative edge pattern in Dreamy Room Level 126.
Step 14. Place Papers on Yellow Cabinet
Arrange the papers neatly on the yellow cabinet surface. These documents add a lived-in detail to the kitchen workspace, showing the organizational aspect of this level.
Step 15. Position Bed on Middle Floor
Set the bed in the center-left area of the middle floor. This is the main sleeping furniture that anchors the bedroom section of Dreamy Room Level 126's multi-level design.
Step 16. Add White Pillow and Pink Cloud to Bed
Place the white pillow on the bed's surface. Position the pink cloud decorative pillow beside it, creating a dreamy sleeping arrangement in this level.
Step 17. Arrange Orange Chairs with Cushions
Position the first orange chair with its orange cushion on the left side of the middle floor. Place the yellow chair with its yellow cushion on the right, creating colorful seating in Dreamy Room Level 126.
Step 18. Install Pink and Green Mushroom Lamps
Set the pink mushroom lamp on the right side of the middle floor. Position the green mushroom lamp on the left corner, providing whimsical lighting that illuminates this level's bedroom area.
Step 19. Set Up Sink and Faucet on Middle Floor
Install the sink on the right rear section of the middle floor. Attach the faucet above it, creating a functional washing station in Dreamy Room Level 126's bathroom zone.
Step 20. Mount Gold Mirror Above Sink
Hang the gold mirror on the wall directly above the sink area. This decorative element adds elegance while providing practical function for the bathroom section of this level.
Step 21. Position Blue Bathtub on Middle Floor
Place the blue bathtub in the left rear corner of the middle floor. The blue pool area provides a relaxing bathing space in Dreamy Room Level 126's upper living area.
Step 22. Add Tomato Pillow to Seating Area
Set the tomato pillow on one of the chairs or near the bed. This playful cushion adds a fun vegetable-themed accent to the middle floor of this level.
Step 23. Place Sleeping Cat on Middle Floor
Position the sleeping cat on the orange chair or bed area. This adorable pet brings life and warmth to the bedroom section of Dreamy Room Level 126.
Step 24. Arrange Colorful Fruit Bowl on Table
Set the colorful fruit bowl on the center table of the middle floor. Fill it with red apple and peach, creating a healthy snack display in this level.
Step 25. Add Books to Middle Floor
Place the book on the center table surface. Set the stack of books nearby on furniture, adding an intellectual touch to Dreamy Room Level 126's bedroom area.
Step 26. Position Flower Pot on Middle Floor
Set the flower pot in the left front corner of the middle floor near the green mushroom lamp. This brings additional greenery to the upper living space of this level.
Step 27. Lay Pink Rug on Middle Floor
Spread the pink rug under the center table and chairs on the middle floor. This soft flooring defines the sitting area in Dreamy Room Level 126's bedroom zone.
Step 28. Install Mascot Head at Top
Position the mascot head as the roof structure of the entire building. Add the brown ears on top, creating the signature bear character that defines this level's exterior.
Step 29. Place Wooden Fence Around Base in Dreamy Room Level 126
Arrange the wooden fence sections around the exterior base of the structure. This creates a protective boundary and enhances the cottage aesthetic of this level.
Step 30. Add Green Bush Decorations
Position green bush elements along the exterior fence line. These landscaping features complete the outdoor appearance of Dreamy Room Level 126.
Step 31. Apply Orange Wall Texture
Ensure the orange walls are consistently applied throughout both floors. This warm color creates the cozy atmosphere that defines this level's interior design.
Step 32. Set Tiled Floor on Lower Level
Apply the tiled floor pattern across the ground floor kitchen area. This durable flooring is perfect for the cooking and dining space in Dreamy Room Level 126.
Step 33. Install Green Floor on Middle Level
Apply the green floor across the middle level bedroom area. This soft flooring color complements the bedroom and bathroom sections of this level.
Step 34. Add Wood Texture Details
Apply wood texture to furniture surfaces, including the table, stools, cabinet, and barrel. These natural wood finishes enhance the rustic charm of Dreamy Room Level 126.
Step 35. Frame Round Window
Install the window frame around the round window opening. This structural element completes the window installation on the ground floor of this level.
Step 36. Final Check of Lower Floor Layout
Review the ground floor arrangement ensuring all kitchen elements are properly positioned. Verify that the table, stools, cabinet, oven, shelf, and plants create a functional cooking and dining space in Dreamy Room Level 126.
Step 37. Final Check of Middle Floor Layout
Inspect the middle floor bedroom setup, confirming that the bed, chairs, bathroom fixtures, and decorative items are correctly placed. This level's sleeping area should feel complete and inviting.
Step 38. Verify All Decorative Elements
Confirm that all vine decorations, flower wreaths, and plant elements are securely attached. These natural touches are essential to achieving Dreamy Room Level 126's garden cottage aesthetic.
Step 39. Complete Exterior Decoration
Ensure the mascot head, wooden fence, and green bushes are properly positioned around the structure's exterior. This creates the distinctive appearance of this level.
Step 40. Final Walkthrough of Dreamy Room Level 126
Perform a complete review of all three levels from bottom to top, ensuring every element from the array is placed. Check that the kitchen, bedroom, bathroom, and exterior all reflect the cozy bear cottage theme perfectly.
Tips and Precautions
Precautions
- Hidden items like the sleeping cat and small books can be easily overlooked behind larger furniture pieces, so check all surfaces carefully before completing Dreamy Room Level 126.
- The overlapping area where vine decorations meet the window frame requires precise placement to avoid blocking the round window's visibility.
- The similar orange and yellow chairs with their matching cushions must be placed in their correct positions to maintain the level's color balance.
- Large furniture like the bed and bathtub can obstruct placement of smaller items such as pillows and the fruit bowl, so place large items first.
- The teapot and purple jar require specific positioning on the yellow cabinet's circular platform, following a particular sequence for successful placement.
Useful Tips
- For tight spaces around the sink and bathtub area, drag items from a slightly elevated angle to ensure they snap into the correct bathroom zone positions.
- When placing overlapping decorations like vines and flower wreaths, approach from the window center outward to utilize the natural snap mechanism of Dreamy Room Level 126.
- Quickly locate optimal placement by looking for visual markers: darker floor tiles indicate the kitchen zone, lighter green flooring marks the bedroom area.
- To prevent items from bouncing back, hold each piece steady for one second after placement before releasing, especially for small decorative objects.
- For dense arrangements like the fruit-filled bowls and barrel, place larger container items first, then add smaller food items in sequence from back to front.
- Master Dreamy Room Level 126 by utilizing the item magnetism feature—when you're within the correct placement radius, you'll feel a subtle pull guiding your item home.