Dreamy Room Level 134
Level 134 guide walkthrough, helping players solve puzzles and explore the wonderful world of Dreamy Room.
Dreamy Room Level 134 Walkthrough Guide
Dreamy Room Level 134 Room Story
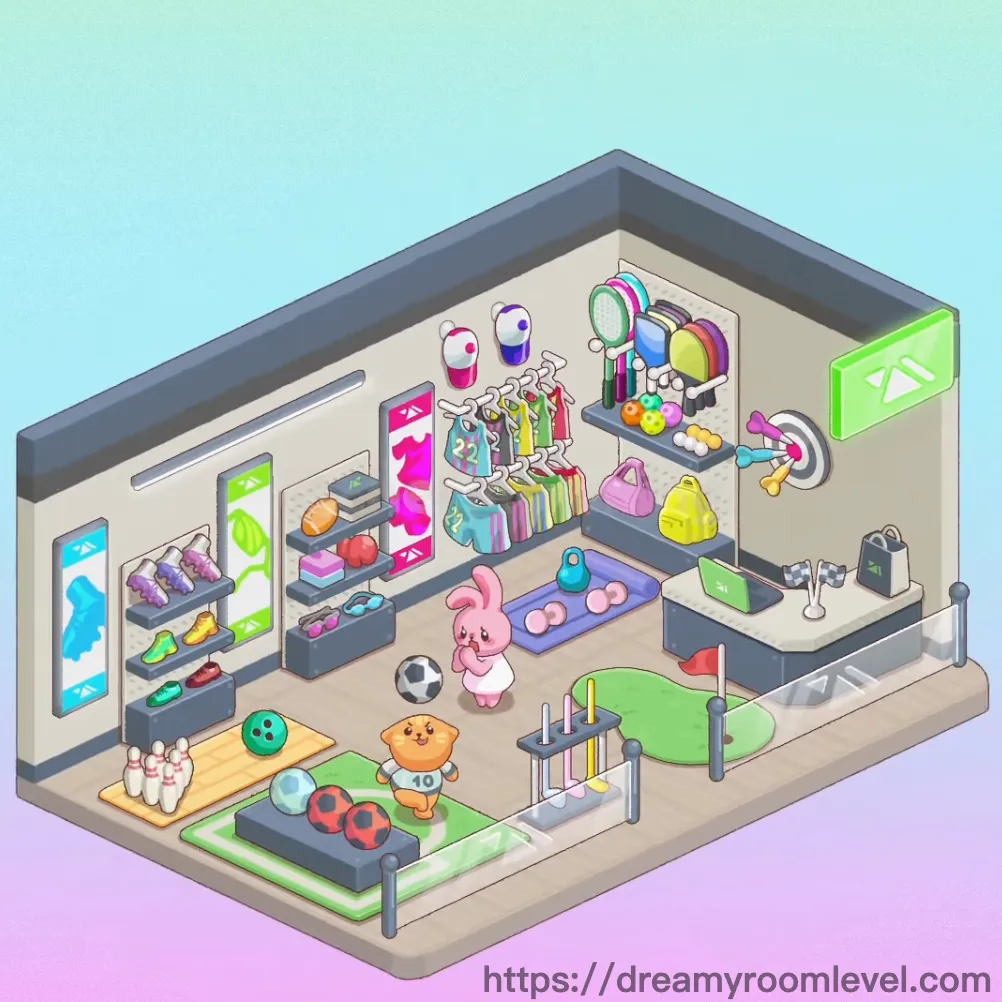
Welcome to Sarah's vibrant sports boutique, where fitness meets fashion in Dreamy Room Level 134! This cheerful pink bunny manages the most colorful athletic store in town, combining workout gear with trendy accessories. Colorful sneakers line the shelves, rainbow hats brighten the displays, and a mini gym corner invites customers to test equipment. The space radiates energy and joy, making every visit feel like stepping into a wellness wonderland.
Dreamy Room Level 134: Step-by-Step Placement Guide
Step 1. Position Window Displays and Wall Decorations
Start by placing the window displays on the left wall, featuring the blue arrow sign pointing left. Add the blue arrow sign above the leftmost window. These elements establish the store's front entrance area in Dreamy Room Level 134.
Step 2. Install Green Arrow Signs
Mount the green arrow signs on the right wall and above the right corner. These directional signs guide customers through the Dreamy Room Level 134 shopping layout and create visual balance.
Step 3. Set Up Main Display Shelf Units
Place the primary display shelves and shelf units along the left wall. These multi-tiered shelves will hold the shoe collection. Position them at equal intervals following Dreamy Room Level 134 retail standards.
Step 4. Install Shoe Rack Display
Position the dedicated shoe rack on the lower left shelf area. This specialized rack showcases premium footwear at eye level for Dreamy Room Level 134 customers.
Step 5. Arrange Sneakers Collection
Place the sneakers on the bottom shelf of the left display. Position the green shoes on the middle shelf, followed by yellow shoes on the upper section. Add purple shoes and red shoes to complete the rainbow collection in Dreamy Room Level 134.
Step 6. Install Central Clothing Rack
Set up the clothing rack in the center-back area of the store. This hanging display will showcase the apparel collection according to Dreamy Room Level 134 merchandising principles.
Step 7. Hang Colorful Clothes Collection
Arrange the colorful clothes on the central rack from left to right. Place the red shirt, green shirt, striped shirt, and yellow shirt in sequence, creating a vibrant display essential for Dreamy Room Level 134 success.
Step 8. Mount Pink Poster Display
Install the pink poster on the back wall above the clothing rack. This promotional poster adds brand identity to the Dreamy Room Level 134 retail environment.
Step 9. Set Up Mirror and Accessory Display Area
Position the mirror on the right side wall for customers to try accessories. Install the accessory display and hat display nearby, completing the Dreamy Room Level 134 fitting area.
Step 10. Arrange Hat Collection
Place the striped hat on the top tier, followed by the blue hat and purple hat on the middle shelf. Position the yellow hat and stunning rainbow hat on the display, creating an eye-catching arrangement in Dreamy Room Level 134.
Step 11. Display Handbag Collection
Arrange the pink handbag, yellow bag, and blue bag on the accessory shelf below the hat display. These bags should be positioned at accessible height for Dreamy Room Level 134 shoppers.
Step 12. Install Storage Rack System
Set up the storage rack along the right wall to organize additional inventory and create the Dreamy Room Level 134 retail store setup foundation.
Step 13. Position Checkout Counter
Place the counter and checkout desk in the right corner of the store. Install the cash register on top, establishing the transaction area according to Dreamy Room Level 134 layout requirements.
Step 14. Add Backpack Display
Position the backpack and gray backpack on the shelf behind the checkout counter, offering last-minute purchase options in Dreamy Room Level 134.
Step 15. Place Water Bottle
Set the water bottle on the checkout counter display area, adding a practical hydration option for customers completing Dreamy Room Level 134.
Step 16. Install Ping Pong Table
Position the ping pong table and table tennis setup in the lower left corner, creating an interactive demo area in Dreamy Room Level 134.
Step 17. Set Up Bowling Alley Section
Place the bowling pins on the wooden platform in the front left corner. Position the bowling ball nearby, adding a fun activity zone to Dreamy Room Level 134.
Step 18. Install Basketball Hoop
Mount the basketball hoop above the lower center area, creating a shooting challenge station essential for Dreamy Room Level 134 customer engagement.
Step 19. Position Basketball
Place the basketball on the display stand beneath the hoop, ready for customers to test their shooting skills in Dreamy Room Level 134.
Step 20. Set Up Weight Bench Area
Install the weight bench in the lower right section of the store, establishing the strength training zone according to Dreamy Room Level 134 design principles.
Step 21. Position Barbell Rack
Place the barbell rack next to the weight bench with bars properly secured, completing the weightlifting station in Dreamy Room Level 134.
Step 22. Arrange Dumbbells Display
Position the dumbbells rack near the exercise area. Place the pink dumbbells and yellow dumbbells in their designated slots, providing weight options for Dreamy Room Level 134 fitness enthusiasts.
Step 23. Add Exercise Equipment Collection
Arrange the remaining exercise equipment around the fitness zone, ensuring all equipment is accessible following Dreamy Room Level 134 safety standards.
Step 24. Position Fitness Balls
Place the fitness balls including the orange ball, red ball, and yellow ball on the display shelf near the exercise area, completing the Dreamy Room Level 134 workout accessories.
Step 25. Install Floor Mat
Lay down the floor mat and green mat in the center exercise zone, defining the workout space in Dreamy Room Level 134.
Step 26. Position Soccer Equipment
Place the soccer ball and football on the lower shelf near the exercise area, adding team sports options to Dreamy Room Level 134.
Step 27. Arrange Sports Equipment Collection
Organize the remaining sports equipment throughout the store, ensuring all items are displayed according to Dreamy Room Level 134 merchandising guidelines.
Step 28. Position Pink Rabbit Character
Place the adorable pink rabbit and bunny character in the center of the store floor, serving as the friendly mascot for Dreamy Room Level 134.
Step 29. Add Teddy Bear Display
Position the teddy bear and bear character on the lower display shelf near the entrance, adding charm to the Dreamy Room Level 134 atmosphere.
Step 30. Complete Clothing Display Setup
Finalize the clothing display arrangement by ensuring all garments are evenly spaced and clearly visible, maintaining the professional appearance required in Dreamy Room Level 134.
Step 31. Organize Wall Decorations
Arrange any remaining wall decorations on empty wall spaces, adding personality and visual interest to complete the Dreamy Room Level 134 design.
Step 32. Finalize Retail Store Setup
Review the overall retail store setup to ensure optimal traffic flow and product visibility throughout Dreamy Room Level 134.
Step 33. Final Check - Left Wall Display
Verify that all shoes are properly aligned on the left shelves, with each color creating a rainbow effect that defines the Dreamy Room Level 134 signature style.
Step 34. Final Check - Central Clothing Area
Ensure the clothing rack items hang evenly and the poster is centered, maintaining the professional presentation expected in Dreamy Room Level 134.
Step 35. Final Check - Accessory Corner
Confirm all hats, bags, and accessories are neatly arranged on the right wall display, completing the fashion section of Dreamy Room Level 134.
Step 36. Final Check - Fitness Zone
Verify all exercise equipment is stable and properly positioned, ensuring safety standards are met in Dreamy Room Level 134.
Step 37. Final Check - Sports Activity Area
Ensure bowling pins, basketball hoop, and ping pong table are correctly placed for customer interaction in Dreamy Room Level 134.
Step 38. Final Check - Checkout Area
Confirm the cash register, backpacks, and water bottle are properly arranged for efficient transactions in Dreamy Room Level 134.
Step 39. Final Check - Character Placement
Verify the pink bunny and teddy bear mascots are positioned to welcome customers throughout Dreamy Room Level 134.
Step 40. Overall Store Completion
Review the entire layout ensuring vibrant colors, organized displays, and welcoming atmosphere perfectly capture the spirit of Dreamy Room Level 134.
Tips and Precautions
Precautions
- Small accessories like hats and bags can be easily missed behind larger displays, carefully check the right wall corner
- The bowling pins require precise vertical alignment on the wooden platform to avoid them rolling away
- Exercise equipment pieces overlap in the fitness zone, ensure each item clicks into place before moving to the next
- The pink bunny character may block placement of floor items, position it last after completing ground-level equipment
- Window displays and arrow signs need specific wall attachment points that aren't immediately visible in Dreamy Room Level 134
Practical Tips
- Start with wall-mounted items (shelves, signs, posters) before placing floor inventory to avoid obstruction
- Group similar colored items together (shoes by color, balls by type) for faster sequential placement
- Use the mirror as a reference point when arranging the right-side accessory displays in Dreamy Room Level 134
- Drag exercise equipment from the edges toward the center mat to prevent placement conflicts
- Place small balls and dumbbells using a slight downward drag motion to trigger the snap-to-position mechanism
- Complete one section entirely before moving to the next to maintain organization and track progress through Dreamy Room Level 134