Dreamy Room Level 100
Level 100 guide walkthrough, helping players solve puzzles and explore the wonderful world of Dreamy Room.
Dreamy Room Level 100 Walkthrough Guide
Dreamy Room Level 100 Room Story
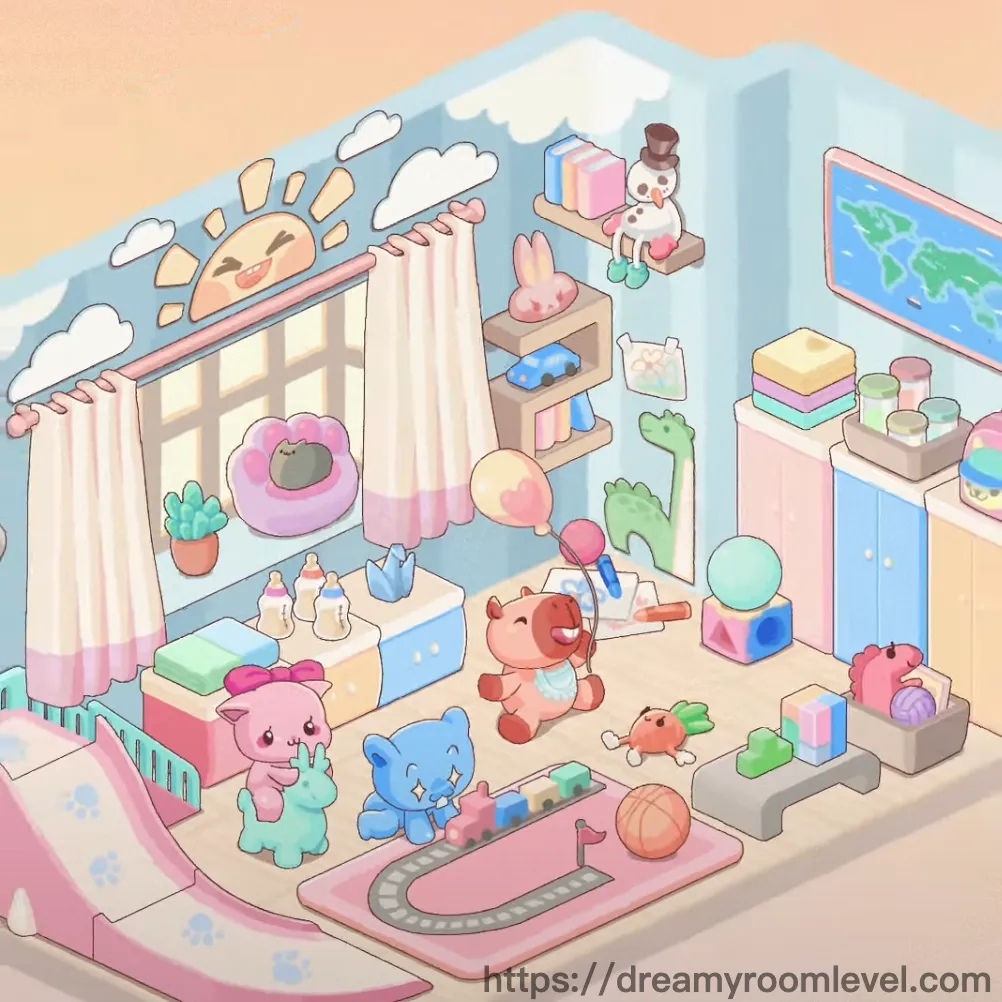
Little Emma's nursery is a wonderland of pastel dreams and childhood joy. Soft pink and blue tones blend harmoniously as sunlight filters through striped curtains, casting gentle shadows on plush toys scattered across the floor. Each carefully chosen element in Dreamy Room Level 100 tells a story of love and care - from the cheerful sun decoration smiling down at playtime, to the cozy cradle where sweet dreams begin. This enchanting space captures the essence of innocent happiness and nurturing warmth.
Dreamy Room Level 100: Step-by-Step Placement Guide
Step 1. Mount the Sun Decoration on Upper Left Wall
Position the sun decoration in the upper left corner of the back wall, just below the ceiling edge. This cheerful sun face should align with the left window frame, creating a welcoming focal point that brightens the entire nursery in Dreamy Room Level 100.
Step 2. Add Cloud Decorations to the Sky Area
Place the cloud decorations near the sun on the upper wall section. Arrange multiple clouds floating around the sun decoration, spacing them naturally across the top portion of the walls to create a dreamy sky atmosphere.
Step 3. Install the Striped Curtain in Dreamy Room Level 100
Hang the striped curtain on the left wall window area. This pink and white striped fabric should drape from the top window frame down to floor level, with the decorative garland adorning its top edge.
Step 4. Position the Pink Cradle as Central Furniture
Place the pink cradle against the left wall, beneath the window and curtain. This is a key furniture piece in Dreamy Room Level 100, serving as the nursery's focal sleeping area.
Step 5. Set Up the Wooden Shelf System
Mount the wooden shelf on the back wall, slightly right of center. This three-tier shelf should be positioned at mid-wall height, providing essential storage space for toys and accessories throughout Dreamy Room Level 100.
Step 6. Install the Storage Cabinet in Dreamy Room Level 100
Position the storage cabinet on the floor against the back wall, below the wooden shelf. Align it centrally to create a cohesive storage zone.
Step 7. Place the Dresser on Right Side
Set the dresser against the right wall, creating a balanced furniture arrangement. This multi-colored drawer unit serves as both storage and display surface in Dreamy Room Level 100.
Step 8. Lay Down the Pink Rug in Center
Position the pink rug in the center floor area, creating a soft play zone. The rug should be placed where it covers the main activity space, anchoring the room's layout in Dreamy Room Level 100.
Step 9. Add the Floor Mat Near Front
Place the floor mat on the lower floor area, slightly forward from the pink rug. This creates a layered flooring effect with the decorative track pattern visible.
Step 10. Position Baby Accessories on Chair in Dreamy Room Level 100
Set the doll on chair in the upper right area near the wooden shelf. Place the baby accessories nearby to complete this nursery care station.
Step 11. Arrange Plush Toys on Pink Rug
Place the blue elephant plush and pink bear plush on the left side of the pink rug. Position them sitting upright as if engaged in playtime.
Step 12. Add Bunny Toys to Play Area in Dreamy Room Level 100
Set the pink bunny on the wooden shelf's top tier, and place the orange bunny on the middle shelf level or nearby surface.
Step 13. Position the Green Dinosaur
Place the green dinosaur plush on the floor near the center play area. This adds variety to the stuffed animal collection in Dreamy Room Level 100.
Step 14. Set Up the Cat Donut Bed
Position the cat donut bed on the left side of the room, near the pink cradle. This pink circular pet bed adds a cozy touch to the nursery floor.
Step 15. Place Rainbow Backpack in Dreamy Room Level 100
Set the rainbow backpack on the dresser top or against the right wall. This colorful accessory should be easily visible and accessible.
Step 16. Position Vehicle Toys on Floor
Place the blue toy car on the wooden shelf's middle tier, tucked between other items for a natural storage look in Dreamy Room Level 100.
Step 17. Add Small Animal Toys
Position the pig toy on the floor near the center area, and place the bird toy on a shelf or nearby surface.
Step 18. Arrange Baby Bottles in Dreamy Room Level 100
Set the baby bottles on the storage cabinet surface below the wooden shelf. Also position the milk bottles in this same feeding station area.
Step 19. Add Greenery with Plants
Place the cactus plant on the left side near the window area, and set the potted plant in another corner to bring natural elements into Dreamy Room Level 100.
Step 20. Position Building Blocks in Play Zone
Arrange the colorful blocks scattered on the pink rug or floor mat. Add the green blocks nearby to create a building play area in Dreamy Room Level 100.
Step 21. Set Up Rainbow Stacking Toy
Place the rainbow stacking toy on the dresser top or on a shelf. This educational toy should be prominently displayed.
Step 22. Position Sports Balls in Dreamy Room Level 100
Set the basketball on the floor near the right wall, and place the rainbow ball nearby to create a mini sports corner.
Step 23. Add Sweet Themed Toys
Position the lollipop toy on the floor in the play area. This candy-themed decoration adds whimsy to Dreamy Room Level 100.
Step 24. Place Baby Rattle Accessory
Set the rattle on the floor mat or near other baby toys. This classic infant toy completes the developmental toy collection in Dreamy Room Level 100.
Step 25. Install the Toy Track System
Position the toy track on the floor mat surface, creating a circular racing path. This interactive element should be clearly visible on the lower floor area.
Step 26. Add Flag Decoration in Dreamy Room Level 100
Place the flag on the toy track or nearby floor area. This small decorative element adds playful detail to the racing zone.
Step 27. Mount the World Map
Hang the world map on the right wall at mid-height. This educational poster should be positioned where it's easily visible from the play area in Dreamy Room Level 100.
Step 28. Position Shopping and Gift Bags
Set the shopping bag near the wooden shelf area, and place the gift bag on the dresser or nearby surface.
Step 29. Arrange Baby Cups and Tumbler in Dreamy Room Level 100
Place the baby cups on the storage cabinet or shelf, and position the tumbler nearby to create a coordinated feeding accessories display.
Step 30. Add Pillow Cushion for Comfort
Set the pillow cushion in the cradle or on the floor near seating areas. This soft element enhances the cozy atmosphere of Dreamy Room Level 100.
Step 31. Position the Toy Box
Place the toy box on the floor against a wall or in a corner. This essential storage container helps organize the numerous toys in Dreamy Room Level 100.
Step 32. Add Carrot Toy Accessory
Position the carrot toy on the floor near the bunny toys or in the vegetable play section. This adds to the pretend-play food collection.
Step 33. Install Picture Frame on Wall in Dreamy Room Level 100
Hang the picture frame on the back wall near other decorations. This should be positioned at a height that complements the overall wall design.
Step 34. Apply Wall Stickers as Final Touches
Add the wall stickers to various wall sections, filling empty spaces with playful designs. These should complement the cloud and sun decorations throughout Dreamy Room Level 100.
Step 35. Set Up Toy Organizer System
Position the toy organizer on a shelf or against the wall. This helps maintain order among the diverse toy collection in Dreamy Room Level 100.
Step 36. Arrange Additional Stuffed Animals
Distribute the remaining stuffed animals throughout the room - on shelves, in the cradle, or on the floor to create a lived-in, playful atmosphere.
Step 37. Position Storage Boxes in Dreamy Room Level 100
Place the storage boxes on shelves or in corners. These should be stacked or arranged to maximize storage efficiency while maintaining the room's aesthetic.
Step 38. Set Up the Play Tent
Position the play tent in an open floor area, creating a special hideaway space. This freestanding structure should have enough clearance in Dreamy Room Level 100.
Step 39. Final Adjustments and Balance Check
Review all placed elements ensuring proper spacing and balance. Adjust any items that overlap awkwardly or block important play areas in Dreamy Room Level 100.
Step 40. Complete Final Details
Make final tweaks to small accessories, ensuring everything is secure and aesthetically pleasing. Confirm all 49 elements are properly placed to successfully complete Dreamy Room Level 100.
Tips and Tricks
Common Mistakes
- Players often overlook the small wall stickers that need placement in upper corners and around the map area
- The toy track on the floor mat can be difficult to spot due to its similar pink coloring - look carefully at the lower floor section
- Multiple similar plush toys may be confused - pay attention to color differences between the pink bear, blue elephant, and various bunnies
- Baby bottles and milk bottles are separate items that both need placement near the feeding station
- The decorative garland above the curtain is easy to miss as it blends with the curtain's top edge
Placement Strategies
- Start with wall decorations first (sun, clouds, map) to establish the room's boundaries before adding furniture in Dreamy Room Level 100
- Place large furniture pieces (cradle, dresser, shelves) before smaller items to avoid repositioning issues
- Group related items together - put all feeding accessories near the storage cabinet, all plush toys in the play zone
- Use the "snap-to-grid" feeling when placing items on shelves - the game provides subtle guidance when you're in the correct position
- For densely packed areas like the wooden shelf, place larger items first then fill gaps with smaller accessories to prevent overlap problems in Dreamy Room Level 100