Dreamy Room Level 66
Level 66 guide walkthrough, helping players solve puzzles and explore the wonderful world of Dreamy Room.
Dreamy Room Level 66 Walkthrough Guide
Dreamy Room Level 66 Room Story
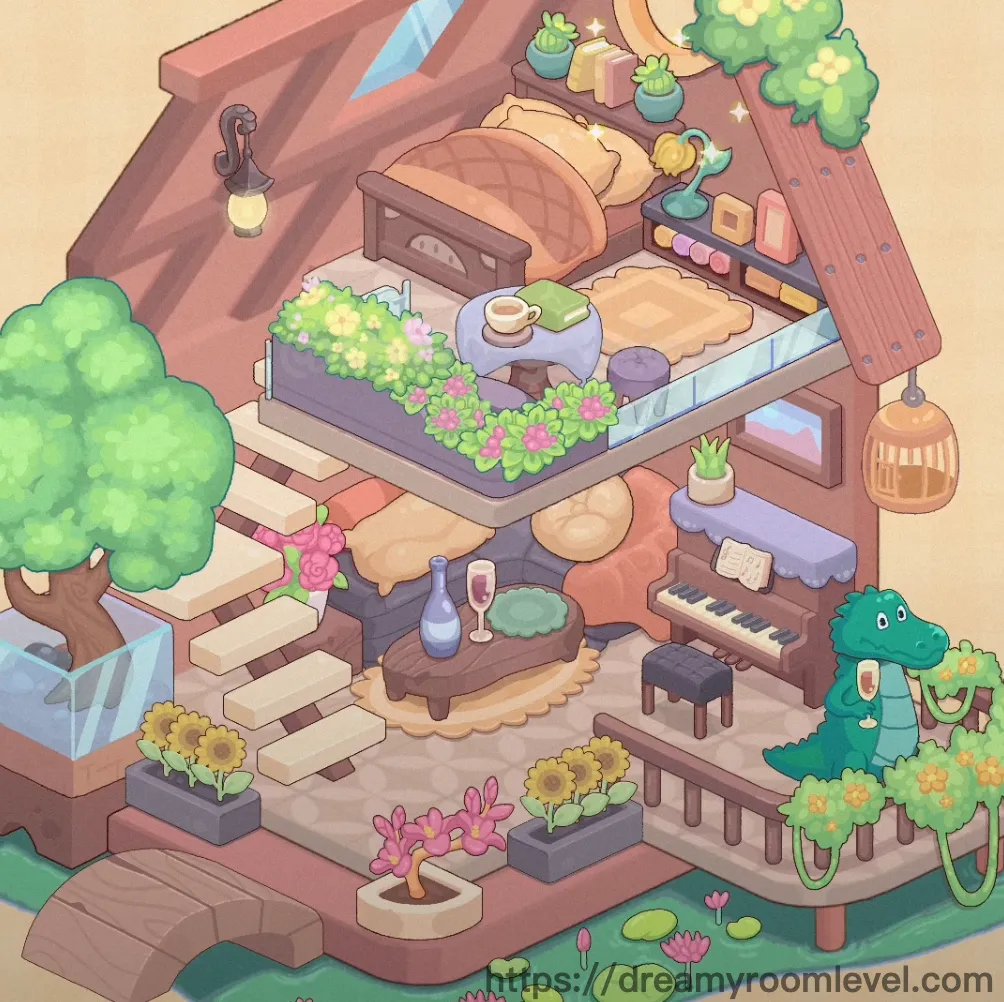
In a cozy attic nestled beneath wooden beams, a creative soul has transformed their sanctuary into a botanical haven. Soft morning light streams through the skylight as they play piano melodies, surrounded by blooming trees and flowering plants. The balcony overlooks a serene pond where lotus flowers float peacefully, while a friendly dinosaur companion sits nearby. This magical space in Dreamy Room Level 66 perfectly blends artistic expression with nature's tranquility.
Dreamy Room Level 66 Walkthrough Guide
Step 1. Install Roof Structure
Place the roof framework at the top of the structure. The slanted roofing should align with the attic design, creating the characteristic A-frame shape that defines this cozy space.
Step 2. Build Wall Foundations in Dreamy Room Level 66
Position the wall panels to form the main structure. The walls should connect seamlessly with the roof, creating the enclosed attic atmosphere with proper support for the floor above.
Step 3. Lay Down Floor Base
Install the floor with its checkered pattern across the entire room area. The flooring should cover from the main room to the balcony section, providing a stable base for all furniture placement.
Step 4. Mount Skylight Window
Attach the skylight to the left side of the roof. This triangular window should be positioned at an angle, allowing natural light to illuminate the interior space beautifully.
Step 5. Add Round Window Detail
Place the round window on the right wall near the top. This circular window adds a charming architectural detail and provides additional natural light to brighten the room.
Step 6. Install Wooden Beams Structure in Dreamy Room Level 66
Position the wooden beams along the interior roof structure. These decorative beams should run diagonally, creating an authentic attic aesthetic and adding depth to the ceiling design.
Step 7. Build Stairs and Balcony System
Construct the stairs leading up to the balcony platform. The stairs should be positioned on the left side, connecting the ground level to the elevated sleeping area. Install the railing along the balcony edge for safety and visual appeal.
Step 8. Position Bed on Upper Level
Place the large bed on the balcony platform in the center-right area. The bed should face outward, providing a perfect view of the entire room below and the surrounding nature.
Step 9. Arrange Bed Linens in Dreamy Room Level 66
Add the pillow at the head of the bed, then drape the blanket across the bed surface. The bedding creates a cozy, inviting sleeping space in the loft area.
Step 10. Set Nightstand Beside Bed
Position the nightstand to the left of the bed on the balcony. This small table should be within easy reach from the bed, providing a functional surface for bedtime essentials.
Step 11. Place Piano and Stool
Install the piano on the lower right area of the room, beneath the balcony. Position the piano stool directly in front of the piano keys, creating a complete musical corner.
Step 12. Install Shelf Above Piano in Dreamy Room Level 66
Mount the shelf on the wall above the piano. This shelf should be positioned at eye level when standing, perfect for displaying decorative items and creating vertical visual interest.
Step 13. Arrange Tables and Seating
Place the small table in the center-left area of the lower floor. Set the balcony table on the upper balcony near the bed. Position the bench near the stairs for additional seating.
Step 14. Create Pond Water Feature
Install the pond at the bottom right corner of the room. Add the waterfall feature at the pond's edge, creating a soothing water element. Float the lily pad on the water surface, then place the lotus flower blooming beautifully on top.
Step 15. Plant Large Tree Feature in Dreamy Room Level 66
Position the large tree at the top right corner of the balcony. This magnificent tree with yellow flowers should extend upward, becoming the room's most prominent natural element.
Step 16. Add Flowering Tree Centerpiece
Place the flowering tree behind the bed on the balcony. This lush green tree with cream-colored blooms should create a natural canopy above the sleeping area.
Step 17. Position Small Trees
Add the small tree specimens on the lower left area near the stairs. These smaller green trees provide additional botanical elements without overwhelming the space.
Step 18. Arrange Potted Plants in Dreamy Room Level 66
Place the potted plant blue on the balcony railing near the bed. Position the potted plant green on the shelf above the piano, adding greenery to multiple levels.
Step 19. Display Sunflower and Flower Arrangements
Set the sunflower pot at the base of the stairs on the left. Arrange the pink flowers in planters near the pond and stairs. Place the purple flowers in the lower left corner and in hanging planters.
Step 20. Install Flower Box and Wood Planter
Mount the flower box on the balcony railing, filled with colorful blooms. Position the wood planter at the base of the stairs, creating a layered garden effect.
Step 21. Hang Vine Garland Decoration in Dreamy Room Level 66
Drape the vine garland from the large tree, letting it cascade naturally downward. This green vine with leaves should create a flowing, organic connection between vertical elements.
Step 22. Install Hanging Lantern
Suspend the hanging lantern from the roof beam on the left side. This warm-glowing lamp should hang at eye level, providing ambient lighting for the lower floor area.
Step 23. Position Table Lamp
Place the lamp on the nightstand beside the bed. This small light source should provide reading light for the sleeping area in Dreamy Room Level 66.
Step 24. Add Cushions for Comfort
Position the green cushion on the small table surface. Place the purple cushion on the bench near the stairs, adding comfortable seating options throughout the space.
Step 25. Display Dinosaur Toy in Dreamy Room Level 66
Set the adorable dinosaur toy on the right side of the lower floor. This green character should be positioned near the pond, adding a playful element to the natural setting.
Step 26. Arrange Wine Service Set
Place the wine bottle on the small table in the center-left area. Position the wine glass beside the bottle, creating an elegant refreshment station.
Step 27. Set Coffee Cup Display
Position the coffee cup on the balcony table near the bed. This morning beverage setup adds a cozy, lived-in feeling to the sleeping area.
Step 28. Add Decorative Stars and Text in Dreamy Room Level 66
Place the decorative stars floating above the shelf area. Position the text beautiful display prominently near the stars, creating an inspirational focal point.
Step 29. Hang Colorful Decorations
Arrange the pink decoration on the shelf above the piano. Place the blue decoration on the balcony railing. Position the yellow decoration near the shelf. Set the orange decoration on the upper balcony area, creating a cheerful color palette throughout.
Step 30. Place Candle for Ambiance
Set the candle on the nightstand beside the lamp. This warm lighting element should create a romantic atmosphere for the sleeping area in Dreamy Room Level 66.
Step 31. Add Storage Basket
Position the basket near the piano on the lower floor. This woven container should provide practical storage while maintaining the room's natural aesthetic.
Step 32. Display Books Collection
Arrange the books on the shelf above the piano. These reading materials should be stacked attractively, adding an intellectual touch to complete this Dreamy Room Level 66 botanical sanctuary.
Tips and Tricks
Common Mistakes
- Players often miss the small lotus flower on the lily pad in the pond area, as it blends with the water feature and can be overlooked among larger decorative elements.
- The round window on the right wall is frequently placed incorrectly because its position near the roof line makes it difficult to align properly with the wall structure.
- Many users struggle with the vine garland placement, as it needs to drape naturally from the large tree but can easily clip through other objects if not angled correctly.
- The colorful decorations (pink, blue, yellow, orange) are easily confused with each other, leading players to place them in wrong locations throughout the room.
- The balcony table and small table are similar in appearance, causing players to swap their positions and disrupt the intended room layout.
Placement Strategies
- Start with the large tree and flowering tree first, as these anchor points help establish the overall spatial layout and make it easier to position surrounding smaller items.
- When placing the pond and waterfall system, drag from a higher angle to ensure the waterfall effect aligns properly with the pond's edge for the best visual flow.
- For the piano area, position the piano stool slightly forward from the keys to create realistic playing space and avoid collision with the piano body.
- The hanging lantern has a specific attachment point on the wooden beam - look for a subtle highlight or glow when hovering near the correct mounting location in Dreamy Room Level 66.
- Place all floor-level plants (sunflowers, purple flowers, pink flowers) before adding elevated decorations, as they establish the ground layer and prevent overlapping issues.
- Use the stairs as a reference point for the left side of the room - most items on that side should align with the staircase's vertical position for balanced composition.