Dreamy Room Level 128
Level 128 guide walkthrough, helping players solve puzzles and explore the wonderful world of Dreamy Room.
Dreamy Room Level 128 Walkthrough Guide
Room Story
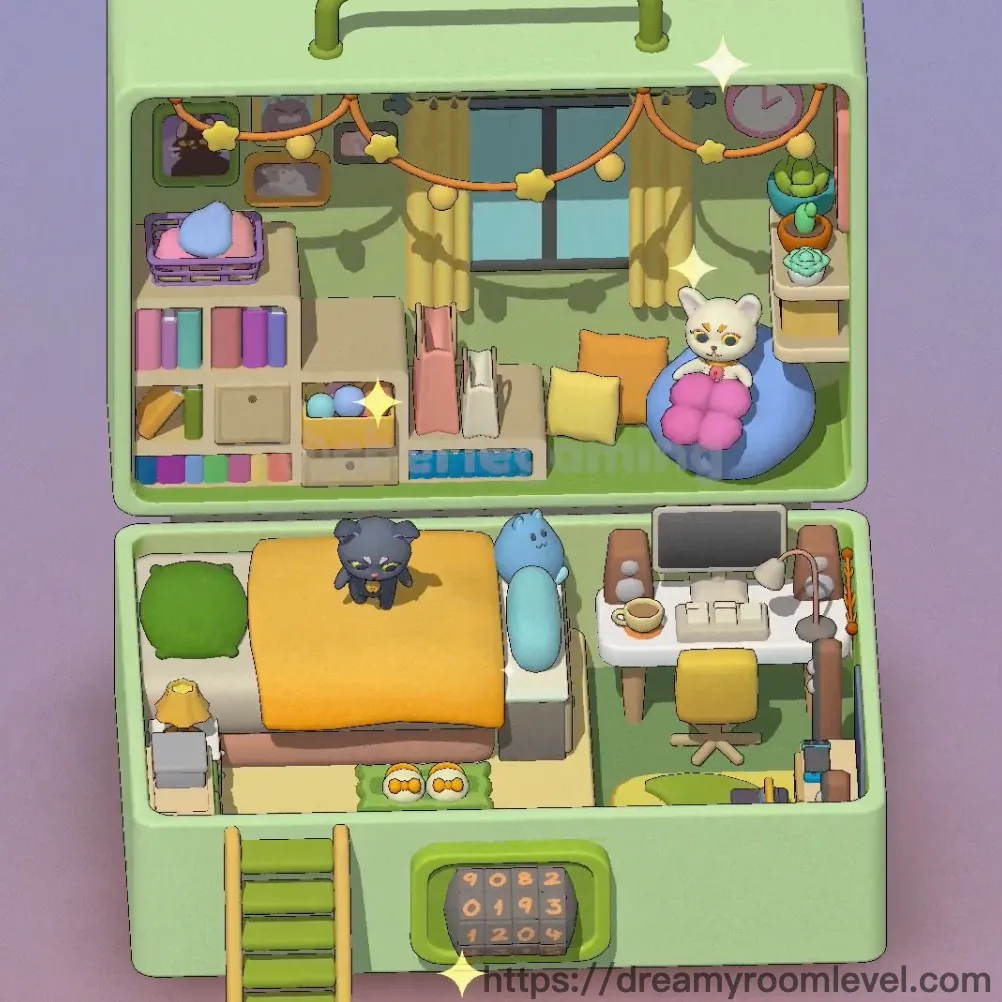
This charming space in Dreamy Room Level 128 belongs to a young designer who adores cats. Inside this mint-green suitcase hideaway, two adorable cat companions watch over their owner's creative sanctuary. The room blends work and comfort perfectly, featuring a cozy workspace with warm lighting, a plush bed adorned with colorful pillows, and playful cat toys scattered across the soft carpet. Every corner radiates warmth and personality, from the twinkling star garland to the cheerful plants bringing life to this miniature paradise.
Dreamy Room Level 128: Step-by-Step Placement Guide
Step 1. Set Up the Suitcase Foundation
Position the green suitcase box as the main container with the lid fully open. Attach the handle on top of the lid, centering it along the hinge line. Install the number lock on the front lower panel and place the sticky note beside it. Position the ladder on the left exterior side, leaning against the edge.
Step 2. Add Cat Guardians on the Lid in Dreamy Room Level 128
Place the black cat plush on the left side of the lid's top edge and the white cat plush on the right side. These adorable companions should sit facing forward, overlooking the entire room setup.
Step 3. Hang Festive Garland Across the Wall
Drape the decorative garland along the back wall in a gentle wave pattern. The star ornaments should be evenly distributed along the orange string, creating a festive atmosphere for Dreamy Room Level 128.
Step 4. Install Window with Curtains
Mount the window on the upper back wall, centered between decorative elements. Hang the yellow curtains on both sides of the window frame, allowing them to drape elegantly downward for natural light filtering.
Step 5. Arrange Wall Picture Frames in Dreamy Room Level 128
Hang the picture frame pink on the left wall section displaying a cute cat image. Position the picture frame yellow near the garland on the upper left area. Add wall decorations throughout the wall space for personality.
Step 6. Mount the Clock
Place the clock on the upper right wall corner, ensuring it's visible from any angle in the room. This helps keep track of time while enjoying Dreamy Room Level 128.
Step 7. Set Up the Bed Structure
Position the bed in the lower center section of the room. Place the bed frame as the base structure, then lay the mattress on top, creating the main sleeping area.
Step 8. Arrange Colorful Pillows on the Bed in Dreamy Room Level 128
Place the yellow pillow on the left side of the bed near the headboard. Add the orange pillow in the center area. Position the blue pillow on the right side and the pink pillow as an accent pillow. This creates a vibrant, comfortable sleeping space.
Step 9. Install the Bookshelf Unit
Place the bookshelf against the left wall near the window. This three-tier unit serves as both storage and decoration for Dreamy Room Level 128's literary collection.
Step 10. Organize Books on All Shelves in Dreamy Room Level 128
Arrange books on shelf top with colorful spines facing outward. Place books on shelf middle with mixed heights for visual interest. Stack books on shelf bottom neatly. Add the colorful books throughout all levels for a vibrant library display.
Step 11. Position the Desk
Place the desk in the lower right section of the room, creating a dedicated workspace. The desk should face forward, allowing comfortable access to all work materials in Dreamy Room Level 128.
Step 12. Add the Office Chair
Position the office chair yellow directly in front of the desk. The chair's yellow color adds a cheerful pop to the workspace area in Dreamy Room Level 128.
Step 13. Set Up Computer Equipment in Dreamy Room Level 128
Place the computer monitor on the desk's back edge, centered for optimal viewing. Position the keyboard directly in front of the monitor at a comfortable typing angle.
Step 14. Add Desk Lighting and Accessories
Place the desk lamp on the right side of the desk for task lighting. Add the coffee cup on the left side for a cozy touch. Position the pen holder near the keyboard for easy access to writing tools in Dreamy Room Level 128.
Step 15. Place Tissue Box on Desk
Add the tissue box on the desk surface, positioning it near the back edge for convenient reach. This practical item completes the functional workspace setup.
Step 16. Set Up the Blue Bean Bag Chair in Dreamy Room Level 128
Position the blue bean bag chair in the upper right area near the bookshelf. The flower pattern on bean bag should face forward, adding decorative charm to the seating area.
Step 17. Add Comfortable Cushions
Place the green cushion on the left side of the room near the bed area. Position the pink cushion near the bean bag chair, creating additional comfortable seating options throughout Dreamy Room Level 128.
Step 18. Install Cat Tower in Dreamy Room Level 128
Place the cat tower in the upper area between the bookshelf and window. This multi-level structure provides climbing and scratching space for the room's feline friends.
Step 19. Arrange Potted Cactus
Position the cactus in its blue plant pot on the right side shelf or surface. This low-maintenance plant adds a desert touch to Dreamy Room Level 128's greenery collection.
Step 20. Add Succulent Plant in Dreamy Room Level 128
Place the succulent in the orange plant pot on the upper right shelf area. This small plant adds vibrant color and life to the room's decoration.
Step 21. Position Green Plant Pot
Add another plant in the green plant pot on the right side shelving area. This creates a balanced trio of plants throughout Dreamy Room Level 128's space.
Step 22. Place Cardboard Box with Toys in Dreamy Room Level 128
Position the cardboard box on the floor near the center-left area. Fill it with colorful balls for playful decoration and cat entertainment.
Step 23. Add White Cat Plushie
Place the sitting cat plush white on the floor near the bookshelf area. This adorable companion adds to the cat-themed decor of Dreamy Room Level 128.
Step 24. Position Blue Cat Plushie
Add the sitting cat plush blue in the lower area near the desk. This creates a balanced distribution of cat decorations throughout the room.
Step 25. Add Duck Toy in Dreamy Room Level 128
Place the duck toy yellow on the floor or low shelf area. This cheerful toy adds whimsical charm to the cat-friendly environment.
Step 26. Arrange Egg Decorations
Position the egg decorations on the floor near the bed or desk area. These small decorative items add playful details to Dreamy Room Level 128's floor space.
Step 27. Place Slippers by the Bed in Dreamy Room Level 128
Position the slippers on the floor near the bed's foot area. These cozy footwear items should be easily accessible for comfortable indoor wear.
Step 28. Lay Floor Mat Near Entrance
Place the floor mat beige near the bottom edge of the suitcase interior. This creates a welcoming entryway feel in Dreamy Room Level 128.
Step 29. Add Green Carpet in Dreamy Room Level 128
Lay the carpet green covering the main floor area throughout the room. This provides a soft, comfortable walking surface and ties the color scheme together.
Step 30. Place Small Yellow Lamp
Position the small lamp yellow on the left side nightstand or floor area near the bed. This provides ambient lighting for a cozy atmosphere in Dreamy Room Level 128.
Tips and Tricks
Common Mistakes to Avoid
- Don't overlook the small wall decorations hidden behind larger furniture pieces, as Dreamy Room Level 128 requires all elements to be visible
- Avoid placing the cat tower too close to the window, which blocks natural light and makes placement difficult
- The number lock and sticky note are easy to miss on the suitcase exterior during initial setup
- Be careful not to cover the colorful balls completely inside the cardboard box, they should remain partially visible
- Don't rush placing the three different book sections on the shelf, each tier has specific book arrangements
Helpful Placement Strategies
- Start with large furniture items like the bed and desk before adding smaller decorative pieces in Dreamy Room Level 128
- Use the "snap-to-grid" feeling when placing items on shelves, they'll lock into position when correctly aligned
- Place all potted plants on elevated surfaces first, then arrange floor items to avoid placement conflicts
- Group similar items together like pillows and cushions, dragging them in sequence saves time
- For items behind furniture, rotate your view angle slightly to access hard-to-reach placement points, making Dreamy Room Level 128 completion smoother
- The carpet and floor mat should be placed before positioning floor-level decorations for easier arrangement
- When placing the garland, start from the left side and drag across to ensure even draping throughout Dreamy Room Level 128