Dreamy Room Level 502
Level 502 guide walkthrough, helping players solve puzzles and explore the wonderful world of Dreamy Room.
Dreamy Room Level 502 Walkthrough Guide
Dreamy Room Level 502 Room Story
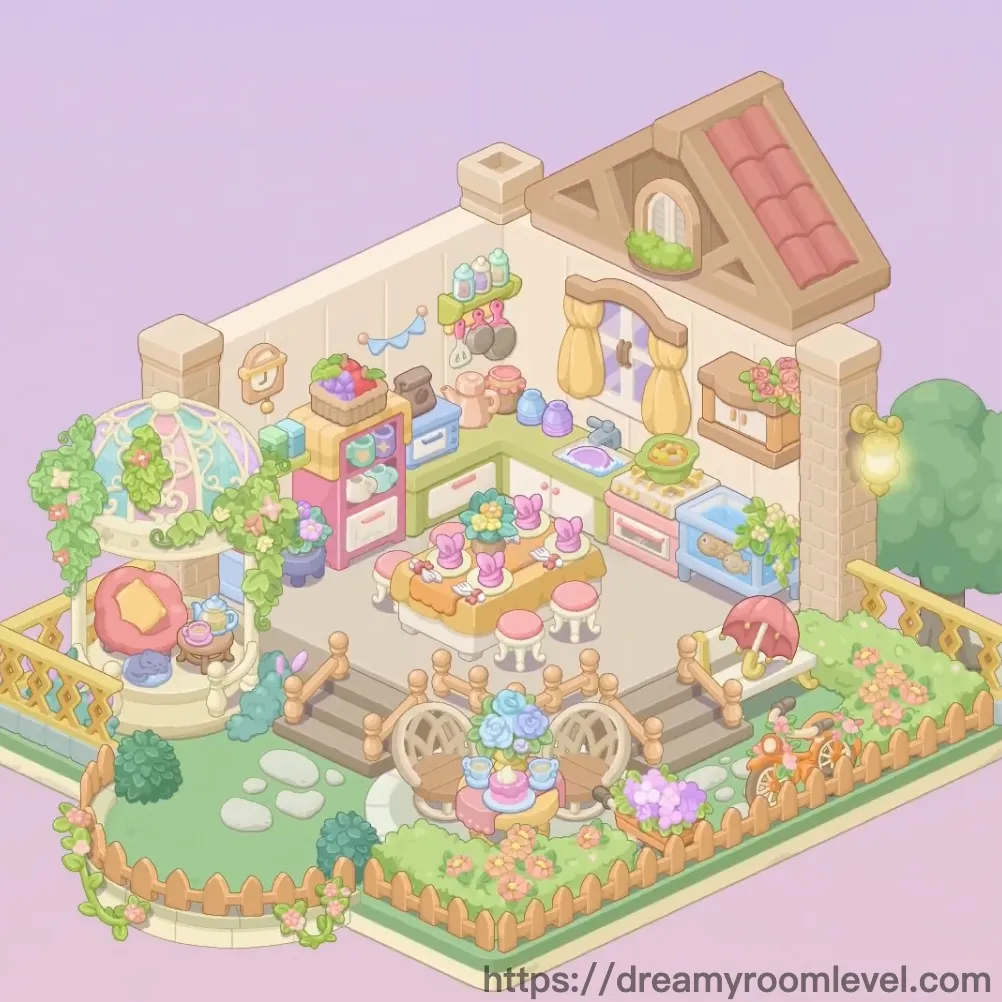
In a charming corner of a peaceful village stands a delightful sweet cafe surrounded by blooming gardens. Inside, pink stools circle a warm dining table where friends gather for afternoon tea and freshly baked treats. The kitchen gleams with a blue oven and colorful storage, while outside, a magical fountain flows beside a cozy greenhouse filled with flowers. This is Dreamy Room Level 502, where every detail celebrates the joy of sweet moments and the beauty of nature in perfect harmony.
Dreamy Room Level 502: Step-by-Step Placement Guide
Step 1. Install Pink Roof Tiles and Chimney
Position the pink roof tiles covering the entire rooftop in a sloped pattern. Place the chimney on the left section of the roof for ventilation in Dreamy Room Level 502.
Step 2. Build Interior Wall Panels and Floor
Construct the wall panels interior forming the cream-colored vertical striped walls. Lay the floor tiles interior in a beige pattern across the entire cafe floor.
Step 3. Add Ceiling Beams and Arched Window
Install the ceiling beams supporting the roof structure horizontally. Position the arched window upper on the back wall with its distinctive curved top design.
Step 4. Install Yellow Arch Entrance in Dreamy Room Level 502
Place the yellow arch entrance at the front of the cafe with its warm golden color, creating an inviting doorway framed by decorative wooden beams.
Step 5. Position Dining Table Center
Set the dining table center in the middle of the cafe floor. This wooden table serves as the main gathering spot for customers in Dreamy Room Level 502.
Step 6. Arrange Pink Stools Around Table
Place pink stool left, pink stool right, pink stool back left, and pink stool back right around the dining table creating comfortable seating.
Step 7. Add Tea Cups on Table
Position the tea cup pink, tea cup blue, and tea cup yellow on the table surface, ready for a delightful tea party.
Step 8. Install Cake Display Stand in Dreamy Room Level 502
Place the cake display stand on the left side of the room showcasing colorful desserts behind glass. This is a focal point for displaying sweet treats.
Step 9. Position Display Counter
Set up the display counter near the entrance area with its multi-colored panels, serving as the main service station for the cafe.
Step 10. Install Kitchen Cabinet and Oven
Place the kitchen cabinet pink against the back wall with storage compartments. Position the oven blue beside it for baking delicious treats in Dreamy Room Level 502.
Step 11. Add Refrigerator and Storage Shelves
Install the refrigerator in the kitchen area for keeping ingredients fresh. Mount the storage shelves on the wall above for organizing supplies.
Step 12. Hang Pots and Ceiling Lamp
Suspend the hanging pots from hooks near the kitchen area. Install the ceiling lamp hanging from the center beam to illuminate the dining space.
Step 13. Add Wall Clock and Decorations in Dreamy Room Level 502
Mount the wall clock on the interior wall showing the time. Place the rooftop decoration elements on the exterior peaks.
Step 14. Position Bread and Fruit Baskets
Set the bread basket on the counter filled with fresh baked goods. Place the fruit basket nearby displaying colorful produce.
Step 15. Arrange Cooking Pots and Kitchen Items
Position cooking pots on the stove and shelves. Add bottles on shelf, , and the tea set for complete kitchen functionality.
Step 16. Add Window Planter Box in Dreamy Room Level 502
Install the window planter box beneath the arched window with green plants and flowers, adding natural beauty to the interior space.
Step 17. Build Front Stairs and Base Platform
Construct the front stairs leading up to the cafe entrance. Lay the base platform green covering the entire outdoor ground area.
Step 18. Install Wooden Fences
Position the wooden fence left along the left garden boundary. Place the wooden fence right on the right side creating enclosed garden areas in Dreamy Room Level 502.
Step 19. Set Up Outdoor Table and Chairs
Place the outdoor table in the left garden section. Arrange the outdoor chair left and outdoor chair right around it for outdoor dining.
Step 20. Install Umbrella Pavilion
Position the umbrella pavilion covering the outdoor seating area with its colorful striped canopy, providing shade for garden guests.
Step 21. Build Center Fountain in Dreamy Room Level 502
Construct the fountain center in the front garden area. Add the tiered cake fountain on top with its multi-level design and flowing water feature.
Step 22. Lay Stepping Stones Path
Place the stepping stones creating a curved pathway through the garden connecting different areas of the outdoor space.
Step 23. Install Lamp Post
Position the lamp post in the garden area providing decorative lighting with its golden glow illuminating the pathways at night.
Step 24. Plant Green Tree and Bushes in Dreamy Room Level 502
Place the green tree left on the right side of the garden providing shade. Add multiple bushes green scattered throughout the landscape and decorative bushes around the fence.
Step 25. Create Flower Beds and Gardens
Position the flower bed pink and flower bed orange in the right garden section. Plant pink flowers, orange flowers, and purple flowers throughout the gardens.
Step 26. Build Greenhouse Dome
Construct the greenhouse dome on the left side with its transparent glass structure. Fill it with potted plants greenhouse for growing flowers and vegetables in Dreamy Room Level 502.
Step 27. Install Outdoor Railing
Add the outdoor railing along the terrace edges and stairs with decorative wooden posts, ensuring safety and aesthetic appeal.
Step 28. Add Final Garden Decorations
Place vines on fence climbing along the wooden barriers. Add the mushroom decoration in the garden and define the garden path with proper edging.
Step 29. Install Window Curtains
Hang the window curtains inside the arched window with their delicate fabric framing the view, completing the cozy cafe atmosphere in Dreamy Room Level 502.
Tips and Tricks
Important Notes
- The pink roof tiles must be aligned in perfect rows to create the sloped appearance, misalignment will cause visual gaps in Dreamy Room Level 502
- Pink stools around the dining table have specific positions that match the table's shape, ensure proper spacing for realistic seating
- The tiered cake fountain in the center requires the base fountain structure to be placed first before adding the decorative cake layers
- Small flower elements scattered throughout the garden are easy to overlook, carefully check all fence corners and pathway edges
- The greenhouse dome has transparent walls that must be positioned before adding interior potted plants to avoid items appearing outside
- Window planter boxes need precise alignment beneath windows to avoid floating appearance
Practical Tips
- Start with the roof and building structure working downward to the interior, then complete outdoor elements last to maintain proper layering
- When arranging the four pink stools, place them in a cross pattern around the table to ensure even distribution in Dreamy Room Level 502
- The wooden fences on left and right sides should be installed before planting bushes and vines to establish garden boundaries first
- Place the fountain base platform before adding water effects and decorative elements for stable construction
- When adding flowers to garden beds, start with larger flower clusters before filling gaps with smaller purple and pink blooms
- The outdoor umbrella pavilion has a specific rotation angle, drag from the table center and adjust until it aligns properly with the seating area in Dreamy Room Level 502