Dreamy Room Level 71
Level 71 guide walkthrough, helping players solve puzzles and explore the wonderful world of Dreamy Room.
Dreamy Room Level 71 Walkthrough Guide
Dreamy Room Level 71 Room Story
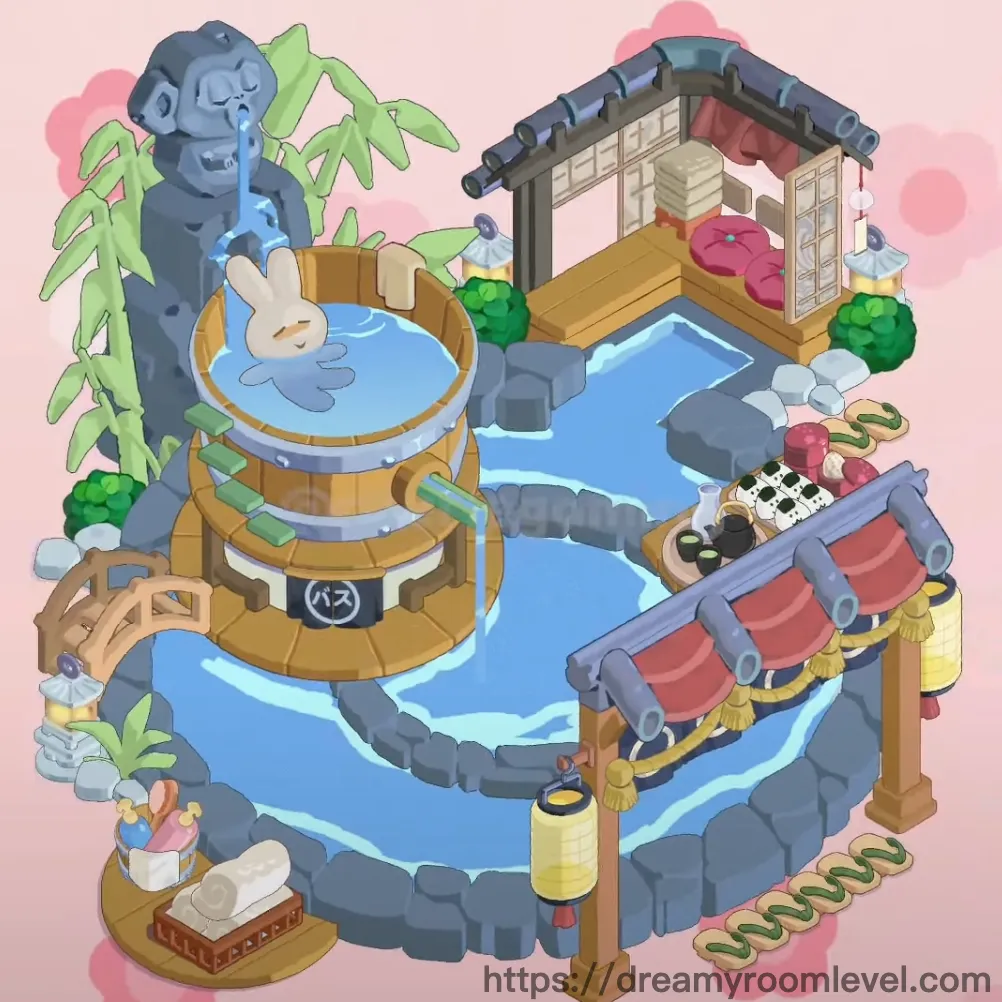
In a hidden corner of an ancient garden, a peaceful hot spring retreat awaits. Here, a gentle white bunny finds its daily sanctuary in the warm wooden tub, while a mystical blue stone statue watches over the sacred waters. Traditional paper lanterns cast soft glows across the rippling pool, and bamboo leaves whisper secrets to the steam rising into pink sunset clouds. This tranquil escape in Dreamy Room Level 71 offers the perfect blend of nature's beauty and Japanese zen tradition.
Dreamy Room Level 71: Step-by-Step Placement Guide
Step 1. Place Stone Platform and Stone Edge
Begin by positioning the stone platform as the foundation of your hot spring retreat. The stone edge and stone border should wrap around the perimeter, creating a circular base. Align these elements carefully to form the main structure that will hold all other components in Dreamy Room Level 71.
Step 2. Install Blue Water Pool and Water Surface
Drag the blue water pool into the center of the stone platform. The water surface should shimmer naturally across the pool area. Position this element to cover the majority of the stone base, leaving space around the edges for decorative items. The water ripples will appear automatically once placed correctly.
Step 3. Set Up Wooden Pavilion Structure
Place the wooden pavilion in the upper right section of the platform. The pavilion roof with blue roof tiles should sit securely on top. Add the roof support pillars and dark pillars beneath the roof structure, ensuring they align vertically for Dreamy Room Level 71 stability.
Step 4. Add Red Curtain and Hanging Decorations
Attach the red curtain as a hanging curtain to the right side of the pavilion. This fabric element should drape naturally from the roof edge. Position it where it can flow elegantly without obstructing the interior view of the pavilion space.
Step 5. Install Wooden Hot Tub in Upper Left Area
Position the wooden hot tub in the upper left quadrant of the water pool. This hot tub barrel or wooden barrel features metal bands around its circumference. Place the tub rim carefully to ensure the barrel sits level on the platform.
Step 6. Place White Rabbit in the Hot Tub
Drag the adorable bunny - your white rabbit - directly into the wooden hot tub you just positioned. This rabbit in tub should appear relaxed and centered within the barrel, creating the charming focal point of Dreamy Room Level 71.
Step 7. Position Blue Stone Statue on the Left
Place the stone statue - specifically the blue stone statue - on the far left side of the platform. This crying statue or water statue should stand tall beside the bamboo area, facing toward the center of the hot spring.
Step 8. Add Bamboo Tree and Foliage
Install the bamboo tree directly behind the blue stone statue on the left side. The bamboo plant should extend upward with green bamboo leaves and bamboo foliage spreading naturally. Position this element to create a natural backdrop following Dreamy Room Level 71 design principles.
Step 9. Construct Wooden Bridge Across the Pool
Place the wooden bridge or red bridge diagonally across the lower right section of the water pool. The bridge deck should connect two areas of the stone platform. Add the bridge railing along both sides and top with the bridge roof for an authentic covered bridge appearance.
Step 10. Attach Yellow Tassels to Bridge
Hang the yellow tassel decorations as gold tassel or decorative tassel elements along the bridge railing. Position these ornamental pieces at regular intervals on both sides of the bridge to enhance the traditional aesthetic in Dreamy Room Level 71.
Step 11. Install Towel Rack with White Towels
Place the towel rack or wooden towel stand in the lower left area near the stone edge. Stack white towels as folded towels or stacked towels neatly on top of the rack. This practical element should be easily accessible from the hot tub area.
Step 12. Add Pink Cushions Inside Pavilion
Drag the pink cushion into the wooden pavilion's interior floor space. This floor cushion or seating cushion should rest comfortably on the tatami pattern floor, providing a cozy seating area within the pavilion structure.
Step 13. Arrange Tea Items and Cups
Position the tea items near the pink cushion inside the pavilion. Place the cups on a small surface or directly on the tatami floor. These elements should be grouped together to create a traditional tea ceremony setting in Dreamy Room Level 71.
Step 14. Place Green Bushes Around the Platform
Add green bush elements as small bush or decorative plant pieces around the outer edges of the stone platform. These potted plant elements should be scattered naturally to create organic landscaping around the hot spring area.
Step 15. Position Rock Decorations and Stones
Scatter rock decoration elements including gray rocks, white stones, and small stones around the water's edge and platform borders. These natural elements should look randomly placed but strategically enhance the zen garden atmosphere.
Step 16. Add Pink Flowers for Color
Place pink flowers as flower decoration in small clusters around the platform edges and near the green bushes. These colorful accents should complement the pink cloud background and add vibrancy to completing Dreamy Room Level 71.
Step 17. Position Green Snake Near the Water
Carefully place the green snake as a decorative snake along the lower right edge of the platform or near the bridge. This element should appear natural and non-threatening, coiling near rocks or plants beside the water pool.
Step 18. Add Koi Fish to the Water Pool
Drop the koi fish into the blue water pool, including the distinctive spotted fish with cow pattern fish markings. These aquatic elements should appear to swim naturally throughout the water surface area.
Step 19. Install Paper Lanterns Above
Hang paper lantern elements as white lantern decorations from the pavilion roof or nearby structure. These traditional lighting fixtures should dangle at varying heights to create atmospheric illumination in Dreamy Room Level 71.
Step 20. Set Up Traditional Lantern Post
Place the traditional lantern post or yellow lantern post in the lower center area of the platform. This lantern pole should stand vertically beside the bridge or near the water's edge.
Step 21. Install Paper Screen Door in Pavilion
Position the paper screen as a sliding door or shoji screen at the back wall of the wooden pavilion. This wooden frame element should align with the pavilion's architecture and create an authentic Japanese interior.
Step 22. Add Wooden Platform Elements
Place additional wooden platform pieces to connect different areas or create small staging areas around the hot spring. These should integrate seamlessly with the existing wooden structures.
Step 23. Apply Tatami Pattern Flooring
Lay down the tatami pattern flooring inside the pavilion area and on any wooden platform surfaces. This traditional mat pattern should cover the entire interior floor space for authentic Japanese styling in Dreamy Room Level 71.
Step 24. Add Background Pink Clouds
Position the pink clouds as background clouds in the sky area behind all structures. These atmospheric elements should create a dreamy sunset ambiance surrounding the entire hot spring scene.
Step 25. Add Final Steam and Mist Effects
Complete the hot spring atmosphere by adding steam and mist effect rising from the hot tub and water pool surfaces. These atmospheric effects should appear naturally above the warm water areas, finishing your Dreamy Room Level 71 creation.
Tips and Tricks
Common Mistakes to Avoid
- Don't overlook the small decorative tassels on the bridge - they're easy to miss but essential for completion
- The koi fish can be difficult to spot in the water pool due to color similarity - look carefully at water surface areas
- Stone decorations along the platform edges are often forgotten - check all border areas thoroughly
- The paper screen inside the pavilion can be obscured by the roof structure - rotate your view to access it
- Tea items are small and easily missed inside the pavilion - zoom in on the cushion area to locate them
Placement Strategies
- Start with larger structural elements first - platform, pavilion, and bridge create the foundation for Dreamy Room Level 71
- Use the "snap-to" feature by dragging items slowly near their correct positions - you'll feel resistance when properly aligned
- For densely packed areas like the pavilion interior, place larger items first then fill in smaller decorations
- When positioning the bridge, ensure both ends touch the stone platform edges for proper anchoring
- The wooden hot tub requires precise centering in its water area - align it with the circular platform pattern
- Layer decorative elements from back to front - bamboo and statue first, then add plants and rocks in foreground