Dreamy Room Level 82
Level 82 guide walkthrough, helping players solve puzzles and explore the wonderful world of Dreamy Room.
Dreamy Room Level 82 Walkthrough Guide
Dreamy Room Level 82 Room Story
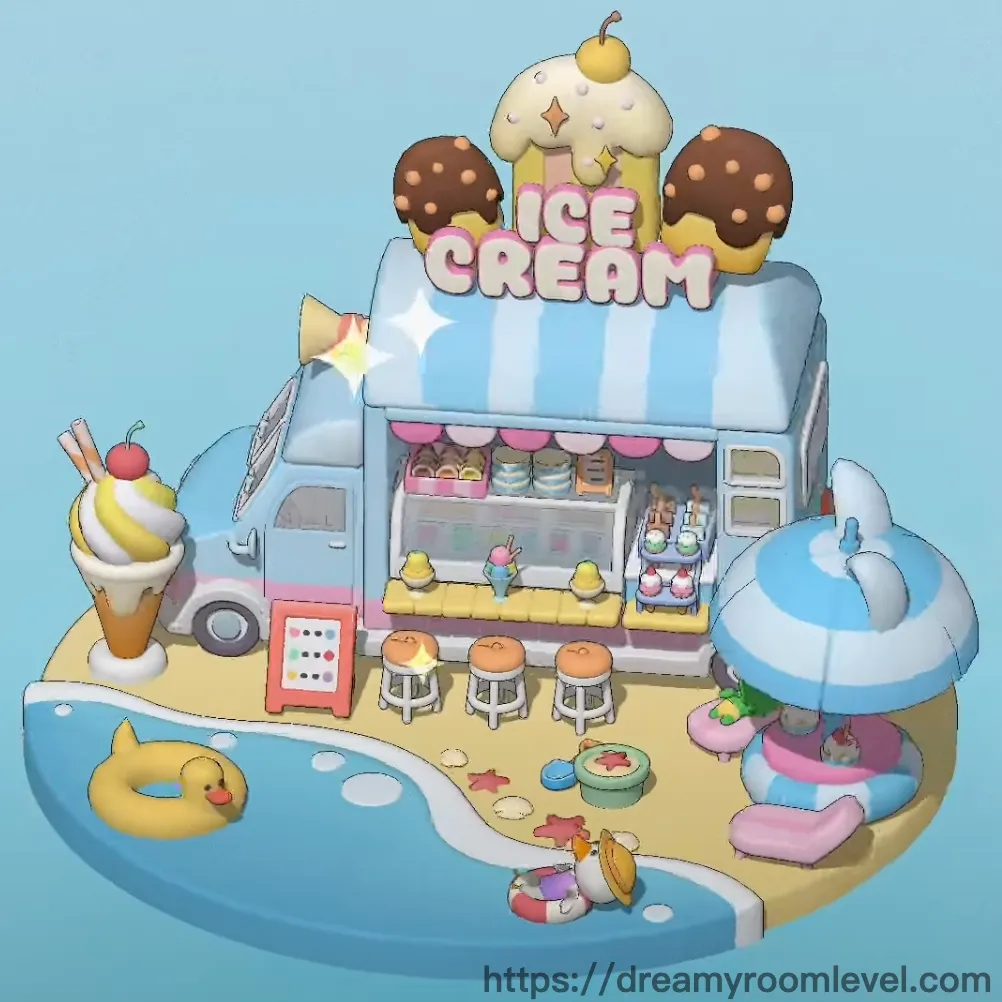
On a sun-drenched summer afternoon, Emma's beachside ice cream paradise comes alive. Her charming blue and white striped truck sits cheerfully on golden sand, where the aroma of fresh waffle cones mingles with salty sea breeze. Children's laughter echoes as they chase rubber ducks in the sparkling pool, while the carousel spins slowly under pastel umbrellas. This seaside haven in Dreamy Room Level 82 captures the essence of endless summer days, where every scoop tells a story of joy and sweet memories made by the shore.
Dreamy Room Level 82: Step-by-Step Placement Guide
Step 1. Position the Ice Cream Truck in Dreamy Room Level 82
Place the ice cream truck at the center-left area of the beach, ensuring it faces slightly toward the right. This blue and white striped vehicle serves as the focal point of Dreamy Room Level 82, so position it with enough space around for other elements. The truck should sit firmly on the sand texture with its wheels properly grounded.
Step 2. Install Truck Wheels and Awning
Attach the truck wheels to the bottom of the ice cream truck, ensuring they align with the vehicle's base. Then add the truck awning on top, creating the classic striped canopy. The awning should extend slightly forward to provide shade for the service area.
Step 3. Add Pink Scalloped Trim and Service Window
Decorate the truck's edge with pink scalloped trim, placing it along the bottom border of the awning. Position the service window in the center-front of the truck where customers can order. This window should be clearly visible and accessible in Dreamy Room Level 82.
Step 4. Mount the Ice Cream Sign in Dreamy Room Level 82
Place the large ice cream sign on top of the truck's roof, centered above the awning. The pink and white letters should be clearly visible from all angles. Add the megaphone speaker to the left side of the truck to announce daily specials.
Step 5. Set Up Giant Ice Cream Cone Decoration
Position the impressive giant ice cream cone decoration on the far left side of the beach. This towering yellow swirl cone with its cherry on top stands as a landmark. Place it near the water's edge to create visual balance in Dreamy Room Level 82.
Step 6. Install Ice Cream Display Case and Flavors
Inside the service window, place the ice cream display case showcasing various flavors. Arrange the ice cream flavors including chocolate ice cream and vanilla ice cream in neat rows. Add the ice cream scoops display beside them for easy access.
Step 7. Position Cone Rack and Waffle Cone Holder
Place the cone rack on the interior wall of the truck, keeping fresh cones organized. Position the waffle cone holder next to the display case in Dreamy Room Level 82, ensuring quick access during busy hours.
Step 8. Set Up Popsicle Stand and Frozen Treats
Add the popsicle stand inside the truck's storage area, stocked with colorful frozen treats. Position them where they're easily reachable but away from direct sunlight to prevent melting.
Step 9. Arrange Orange Menu Board in Dreamy Room Level 82
Place the on the sand in front of the truck, slightly to the right. This board should display today's flavors and specials, angled toward approaching customers for maximum visibility.
Step 10. Create Outdoor Seating Area
Establish the outdoor seating area in front of the truck. Place three wooden stools in a row on the sand, spacing them evenly. These stools serve as round table seats where customers can enjoy their treats while watching the waves.
Step 11. Position Poolside Furniture
Arrange the poolside furniture near the water's edge. The seating should face both the pool and the ocean, creating comfortable spots for guests to relax in Dreamy Room Level 82.
Step 12. Install Carousel Umbrella and Structure in Dreamy Room Level 82
Set up the stunning carousel umbrella on the right side of the beach. Place the blue and pink carousel structure beneath it, ensuring the rotating mechanism is properly centered. Position the carousel seats evenly around the carousel's perimeter for a balanced appearance.
Step 13. Create the Water Pool Area
Establish the water pool in the lower portion of the scene, filling it with clear blue water. The pool should curve naturally along the beach's edge in Dreamy Room Level 82, creating an inviting swimming area for visitors.
Step 14. Add Sand Texture and Beach Ball Pattern Ground
Spread the sand texture across the main beach area, creating a realistic sandy surface. Incorporate the beach ball pattern ground near the pool's edge, adding playful circular designs that enhance the summer atmosphere.
Step 15. Position Yellow Duck Float in Dreamy Room Level 82
Float the adorable yellow duck float in the water pool, placing it near the left edge. This cheerful rubber duck should bob naturally on the water's surface, adding whimsy to the scene.
Step 16. Add Inflatable Ring and Pool Toys
Place a colorful inflatable ring floating in the pool's center. Scatter various pool toys around the water, including a green frog toy near the pool's edge for children to play with.
Step 17. Position Corgi Dog Float in Dreamy Room Level 82
Float the delightful corgi dog float in the lower right section of the pool. This dog on floatie should appear relaxed, as if enjoying a lazy summer day on the water.
Step 18. Arrange Pink and Blue Floaties
Add the pink floatie near the carousel area of the pool, and place the blue floatie closer to the beach. These colorful inflatables should be distributed evenly across the water surface in Dreamy Room Level 82.
Step 19. Scatter Seashells and White Pebbles
Distribute seashells along the water's edge and across the sand, creating a natural beachside look. Sprinkle white pebbles near the pool's border, adding texture and visual interest to the shoreline.
Step 20. Add Starfish Decorations in Dreamy Room Level 82
Place multiple starfish decorations on the sand near the water line. Position them at various angles, some partially buried in sand, creating an authentic beach atmosphere.
Step 21. Position Beach Towel and Cooler Box
Lay out a beach towel on the sand near the seating area, as if someone just finished swimming. Place the cooler box beside it, filled with refreshments for hot summer days in Dreamy Room Level 82.
Step 22. Install Beach Umbrella Base
Set up the beach umbrella base near the towel area, providing shade for beachgoers. Ensure it's firmly planted in the sand for stability.
Step 23. Add Seaside Accessories in Dreamy Room Level 82
Scatter various seaside accessories throughout the scene, including beach bags, sunscreen bottles, and flip-flops. These items should look naturally placed, as if left by happy visitors.
Step 24. Arrange Summer Decorations
Add festive summer decorations around the truck and seating areas. Include colorful banners, beach balls, and tropical-themed ornaments that enhance the vacation atmosphere of Dreamy Room Level 82.
Step 25. Add Final Sparkle Effects in Dreamy Room Level 82
Sprinkle sparkle effects throughout the scene, particularly around the water, ice cream sign, and carousel. These magical touches should catch the light, creating a dreamy, enchanting atmosphere that perfectly captures the essence of this beachside paradise.
Tips and Tricks
Common Mistakes to Avoid
- Don't overlook the small pool toys near the water's edge; they're easy to miss but essential for completing Dreamy Room Level 82
- Avoid placing the carousel too close to the truck, as this creates visual clutter and blocks customer access
- The white pebbles and seashells are subtle elements that blend with the sand; zoom in to ensure accurate placement
- Don't position floaties too close together in the pool; they need space to appear naturally scattered
- Watch for the pink scalloped trim on the truck; it must align perfectly with the awning's edge or it will look misaligned
Helpful Placement Tips
- Start with large structures like the truck and carousel to establish your layout before adding smaller decorations
- Use the pool's curved edge as a guide for placing beach items; they should follow the natural waterline
- When positioning the ice cream display inside the truck, drag items from a slight angle to avoid them snapping to wrong positions
- The sparkle effects work best when placed last, as they add finishing touches that bring Dreamy Room Level 82 to life
- Group similar items together: keep all floaties in the water zone, all seashells near the shore, and all furniture in designated seating areas
- If stools won't stay in position, try dragging them slightly forward first, then adjusting backward for better stability