Dreamy Room Level 553
Level 553 guide walkthrough, helping players solve puzzles and explore the wonderful world of Dreamy Room.
Dreamy Room Level 553 Walkthrough Guide
Dreamy Room Level 553 Room Story
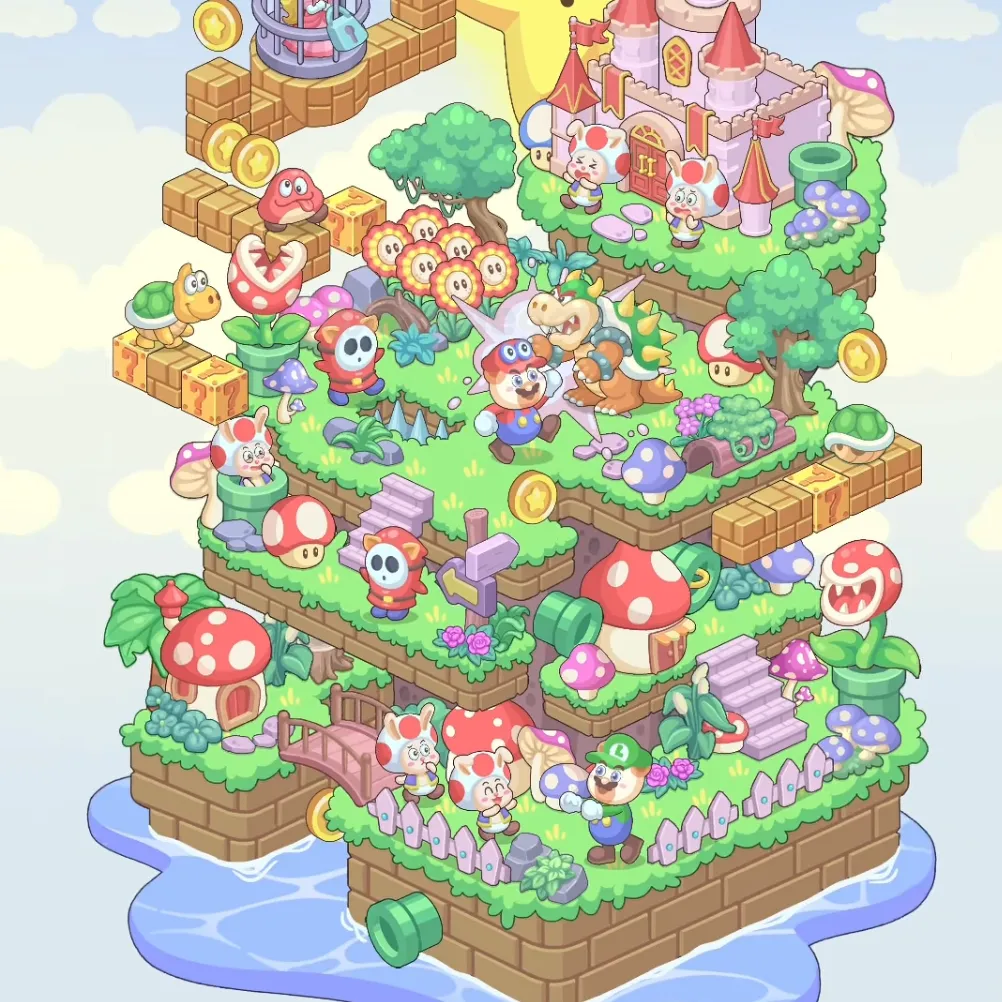
Step into the magical Mushroom Kingdom where Mario and his friends embark on an epic adventure across floating islands. In Dreamy Room Level 553, the legendary Super Star shines brightly above Princess Peach's magnificent pink castle while brave heroes Mario, Luigi, and Yoshi explore the vibrant multi-tiered platforms. Friendly Toads wave hello from their cozy mushroom houses as mischievous Goombas waddle across the grassy terrain. Golden coins sparkle throughout the landscape, green warp pipes connect different levels, and colorful power-up mushrooms await discovery. From Bowser's menacing presence to the shy Boo ghost hiding in corners, this nostalgic kingdom recreates the beloved video game world where every block, pipe, and character brings childhood memories to life in this enchanting floating paradise.
Dreamy Room Level 553: Step-by-Step Placement Guide
Step 1. Build the Water Pool Base
Drag the water pool base to form the foundation at the bottom. This blue water surface should create the base layer for the entire floating island structure in Dreamy Room Level 553.
Step 2. Construct Multi-Level Grass Platforms
Position grass platform level 1 at the bottom tier, then stack grass platform level 2, grass platform level 3, grass platform level 4, and grass platform level 5 to create the iconic tiered landscape in Dreamy Room Level 553.
Step 3. Add Brick Edges to Platforms
Place brick edge bottom, brick edge middle, and brick edge top along the platform edges. These brown brick borders should define each level's boundaries in Dreamy Room Level 553.
Step 4. Position the Super Star
Drag the super star to float above the highest platform near the castle. This glowing yellow star with its cheerful face should be the crowning element in Dreamy Room Level 553.
Step 5. Build Princess Peach's Castle
Position the princess peach castle on the upper right platform. Add castle tower left, castle tower right, castle flag, and castle windows to complete this pink fortress in Dreamy Room Level 553.
Step 6. Add Background Clouds
Place white cloud 1, white cloud 2, white cloud 3, and white cloud 4 floating in the sky. These fluffy clouds should create the dreamy atmosphere in Dreamy Room Level 553.
Step 7. Position Mario and Luigi
Place mario character in his iconic red outfit on the middle platform and luigi character in green nearby. These heroic brothers should be ready for adventure in Dreamy Room Level 553.
Step 8. Add Princess Peach
Position princess peach near her castle on the upper platform. This royal character in her pink dress should oversee the kingdom in Dreamy Room Level 553.
Step 9. Place Yoshi Dinosaur
Drag yoshi dinosaur to stand on one of the middle platforms. This friendly green dinosaur companion should be ready to help Mario in Dreamy Room Level 553.
Step 10. Add Toad Characters
Position toad character 1, toad character 2, and toad character 3 throughout the platforms. These mushroom citizens should populate the kingdom in Dreamy Room Level 553.
Step 11. Place Goomba Enemies
Arrange goomba enemy 1, goomba enemy 2, goomba enemy 3, and goomba enemy 4 across different levels. These brown mushroom enemies should waddle around in Dreamy Room Level 553.
Step 12. Add Bowser Enemy
Position bowser enemy on one of the platforms. This menacing villain should pose a challenge in Dreamy Room Level 553.
Step 13. Place Special Enemies
Add boo ghost floating near a platform, piranha plant emerging from a pipe, bullet bill flying through the air, and chain chomp chained to a post in Dreamy Room Level 553.
Step 14. Build Mushroom Houses
Position red mushroom house 1, red mushroom house 2, red mushroom house 3, purple mushroom house, and blue mushroom house across various platforms. These iconic spotted houses should provide shelter in Dreamy Room Level 553.
Step 15. Add Bird Cage
Place the bird cage on the upper left platform. This decorative purple cage should add detail to Dreamy Room Level 553.
Step 16. Scatter Gold Coins
Position gold coin 1, gold coin 2, gold coin 3, gold coin 4, gold coin 5, gold coin 6, and gold coin 7 throughout the level. These shiny coins should be collectibles in Dreamy Room Level 553.
Step 17. Add Power-Up Mushrooms
Place red mushroom power up 1 and red mushroom power up 2 on platforms. Add blue mushroom 1, blue mushroom 2, purple mushroom 1, purple mushroom 2, and purple mushroom 3 throughout Dreamy Room Level 553.
Step 18. Position Question Blocks and Bricks
Place question block 1 and question block 2 floating above platforms. Add brick block 1, brick block 2, and brick block 3 nearby in Dreamy Room Level 553.
Step 19. Install Green Warp Pipes
Position green pipe 1, green pipe 2, green pipe 3, green pipe 4, green pipe 5, and warp pipe large across different levels. These iconic pipes should provide transportation in Dreamy Room Level 553.
Step 20. Plant Trees
Drag tree 1, tree 2, and tree 3 to various platforms. These green trees should add natural scenery in Dreamy Room Level 553.
Step 21. Add Flowers
Position pink flower 1, pink flower 2, pink flower 3, pink flower 4, and pink flower 5 around the grassy areas. These colorful blooms should decorate the landscape in Dreamy Room Level 553.
Step 22. Install White Fences
Place white fence section 1, white fence section 2, and white fence section 3 along platform edges. These picket fences should border pathways in Dreamy Room Level 553.
Step 23. Add Purple Stairs
Position the purple stairs connecting two platform levels. These steps should provide access between tiers in Dreamy Room Level 553.
Step 24. Place Wooden Crate
Drag the wooden crate onto a lower platform. This storage box should add interactive elements in Dreamy Room Level 553.
Step 25. Add Green Bushes
Position green bush 1, green bush 2, and green bush 3 around the platforms. These decorative bushes should fill empty spaces in Dreamy Room Level 553.
Step 26. Add Koopa Shells
Place koopa troopa shell green and koopa troopa shell red on the ground. These turtle shells should be ready to kick and complete the nostalgic Mario world in Dreamy Room Level 553.
Tips and Tricks
Common Mistakes
- The multi-tiered platforms must be stacked in correct order from bottom to top; placing level 3 before level 2 creates structural misalignment in Dreamy Room Level 553.
- Players often confuse the numerous Goomba enemies and Toad characters; Goombas are brown mushroom enemies while Toads are friendly characters with spotted caps.
- The green pipes come in different sizes; the large warp pipe is distinct from the smaller decorative pipes and should be placed prominently.
- Multiple mushroom houses exist in different colors; ensure red, purple, and blue houses are distributed across different platform levels rather than clustered together.
- Gold coins should be scattered throughout all levels; placing them only on one tier misses the collection gameplay element in Dreamy Room Level 553.
Useful Strategies
- Build the foundation first by placing the water base and all five grass platform levels before adding any characters or decorative elements in Dreamy Room Level 553.
- Position the castle and Super Star early as they serve as visual anchors; other elements should be arranged around these focal points.
- Place all characters before adding smaller decorative items; Mario, Luigi, Princess Peach, and enemies establish the scene's narrative flow.
- Group functional elements by type; install all pipes together, place all mushroom houses in one pass, and scatter all coins systematically across levels.
- Use the brick edges as guides for platform boundaries; items should align with these borders to maintain the classic Mario aesthetic.
- Save the smallest details like flowers, bushes, and Koopa shells for last; these finishing touches fill gaps and complete the vibrant Mushroom Kingdom atmosphere in Dreamy Room Level 553.