Dreamy Room Level 456
Level 456 guide walkthrough, helping players solve puzzles and explore the wonderful world of Dreamy Room.
Dreamy Room Level 456 Walkthrough Guide
Dreamy Room Level 456 Room Story
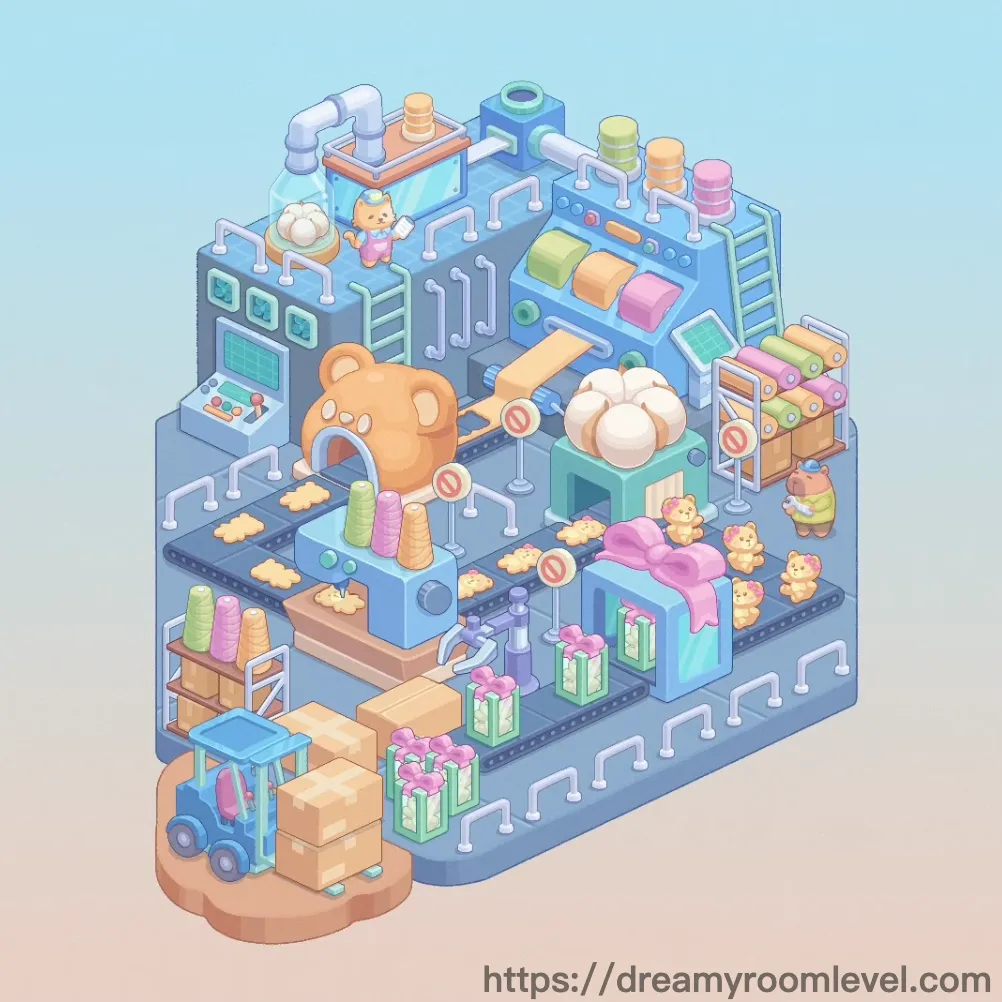
Welcome to this amazing Teddy Bear Toy Factory in Dreamy Room Level 456! This multi-level manufacturing wonderland transforms fluffy cotton into adorable teddy bears through an intricate system of conveyor belts, molds, and wrapping machines. A magnificent crystal clock oversees production while cotton clouds float through the orange bear-shaped tunnel. Cheerful cat and bear workers ensure every teddy is perfect before being wrapped in beautiful green gift boxes with pink bows. This Dreamy Room Level 456 factory captures the magic of toy-making with its colorful thread spools, whimsical machinery, and endless cuteness.
Dreamy Room Level 456: Step-by-Step Placement Guide
Step 1. Build Sky Background in Dreamy Room Level 456
Place light blue sky background as the backdrop. Add beige ground edge at the base. Following Dreamy Room Level 456 design principles, the soft colors create a dreamy factory atmosphere.
Step 2. Construct Factory Floor
Set up blue metal floor tiles as the main floor surface. According to Dreamy Room Level 456 layout requirements, industrial flooring supports heavy machinery.
Step 3. Build Factory Platforms in Dreamy Room Level 456
Install blue factory platform upper, blue factory platform middle, and blue factory platform lower. Add blue factory walls. Completing Dreamy Room Level 456 requires this multi-level structure.
Step 4. Install Bear Tunnel Mold
Place bear tunnel mold orange as the main shaping machine. Following Dreamy Room Level 456 design principles, this iconic bear shape transforms raw materials into toys.
Step 5. Set Up Crystal Clock Display in Dreamy Room Level 456
Position crystal clock display blue as the centerpiece with glowing effect. According to Dreamy Room Level 456 layout requirements, this magical timepiece oversees production.
Step 6. Install Cotton Cloud Machine
Place cotton cloud machine on the upper level. Add cotton ball large white and cotton ball glass dome. Completing Dreamy Room Level 456 requires fluffy cotton materials.
Step 7. Set Up Conveyor Belt System in Dreamy Room Level 456
Install conveyor belt upper, conveyor belt middle, and conveyor belt lower. Following Dreamy Room Level 456 design principles, conveyors transport products through production stages.
Step 8. Connect Pipe Systems
Add white pipe system left, white pipe system right, and white pipe system bottom. According to Dreamy Room Level 456 layout requirements, pipes connect all machinery.
Step 9. Install Bow and Gift Machines in Dreamy Room Level 456
Place bow attaching machine with pink bow large. Add gift wrapping machine. Completing Dreamy Room Level 456 requires packaging equipment.
Step 10. Set Up Control Panel
Install and monitor screen green. Following Dreamy Room Level 456 design principles, operators need control stations.
Step 11. Add Mechanical Arms in Dreamy Room Level 456
Position mechanical arm blue and mechanical claw gripper. According to Dreamy Room Level 456 layout requirements, robotic arms handle delicate tasks.
Step 12. Install Processing Machines
Place mixing machine top and press machine blue. Completing Dreamy Room Level 456 requires various processing equipment.
Step 13. Add Thread Spools in Dreamy Room Level 456
Set thread spool pink 1 and thread spool pink 2. Add thread spool green 1 and thread spool green 2. Following Dreamy Room Level 456 design principles, colorful threads create cute toys.
Step 14. Add More Thread Spools
Place thread spool orange 1 and thread spool orange 2. According to Dreamy Room Level 456 layout requirements, variety of colors is essential.
Step 15. Stock Fabric Rolls in Dreamy Room Level 456
Position fabric roll green, fabric roll pink, and fabric roll yellow. Add fabric roll stack shelf. Completing Dreamy Room Level 456 requires raw material storage.
Step 16. Install Storage Shelves
Set up spool storage shelf for organizing supplies. Following Dreamy Room Level 456 design principles, organized storage ensures efficient production.
Step 17. Add Ladders in Dreamy Room Level 456
Place ladder blue left and ladder blue right for worker access. According to Dreamy Room Level 456 layout requirements, workers need to reach all levels.
Step 18. Position Forklift
Set forklift blue vehicle at the loading area. Completing Dreamy Room Level 456 requires material transport equipment.
Step 19. Add Cardboard Boxes in Dreamy Room Level 456
Place cardboard boxes stack and cardboard box single. Following Dreamy Room Level 456 design principles, shipping supplies are ready.
Step 20. Add Gift Boxes
Position gift box green ribbon 1, gift box green ribbon 2, and gift box green ribbon 3. According to Dreamy Room Level 456 layout requirements, finished products are beautifully wrapped.
Step 21. Install Warning Signs in Dreamy Room Level 456
Set warning sign post 1, warning sign post 2, warning sign post 3, and warning sign post 4. Completing Dreamy Room Level 456 requires safety signage.
Step 22. Add Control Equipment
Place and gauge meter display. Following Dreamy Room Level 456 design principles, monitoring equipment ensures quality.
Step 23. Place Worker Characters in Dreamy Room Level 456
Set cat worker pink outfit at the upper station. Add bear worker blue hat at the loading area. According to Dreamy Room Level 456 layout requirements, dedicated workers run the factory.
Step 24. Add Finished Teddy Bears
Position teddy bear toy 1, teddy bear toy 2, teddy bear toy 3, teddy bear toy 4, and teddy bear toy 5. Completing Dreamy Room Level 456 requires adorable finished products.
Step 25. Add Conveyor Products in Dreamy Room Level 456
Place , , and . Following Dreamy Room Level 456 design principles, products move along the line.
Step 26. Add Final Details
Set macarons stack colorful and safety railing blue. Following Dreamy Room Level 456 design principles, these finishing touches complete your magical Teddy Bear Toy Factory!
Tips and Precautions
Precautions
- The gauge meter display is a small detail easily missed
- Button panels blend with the blue factory surfaces
- Bear cookies on conveyor are small items in a row
- Warning sign posts can be overlooked among machinery
- Thread spools of similar colors may be confused
- Mechanical claw gripper is a small attachment
- Safety railing blends with factory structure
Practical Tips
- Start with the bear tunnel mold in Dreamy Room Level 456 as the main production feature
- Install platforms before adding machinery on each level
- Place conveyor belts before adding products on them
- Set up the crystal clock as a central focal point
- Position thread spools near the spool storage shelf
- Add workers after completing their work stations
- Save small items like buttons, gauges, and bear cookies for final placement in Dreamy Room Level 456