Dreamy Room Level 16
Level 16 guide walkthrough, helping players solve puzzles and explore the wonderful world of Dreamy Room.
Dreamy Room Level 16 Walkthrough Guide
Dreamy Room Level 16 Room Story
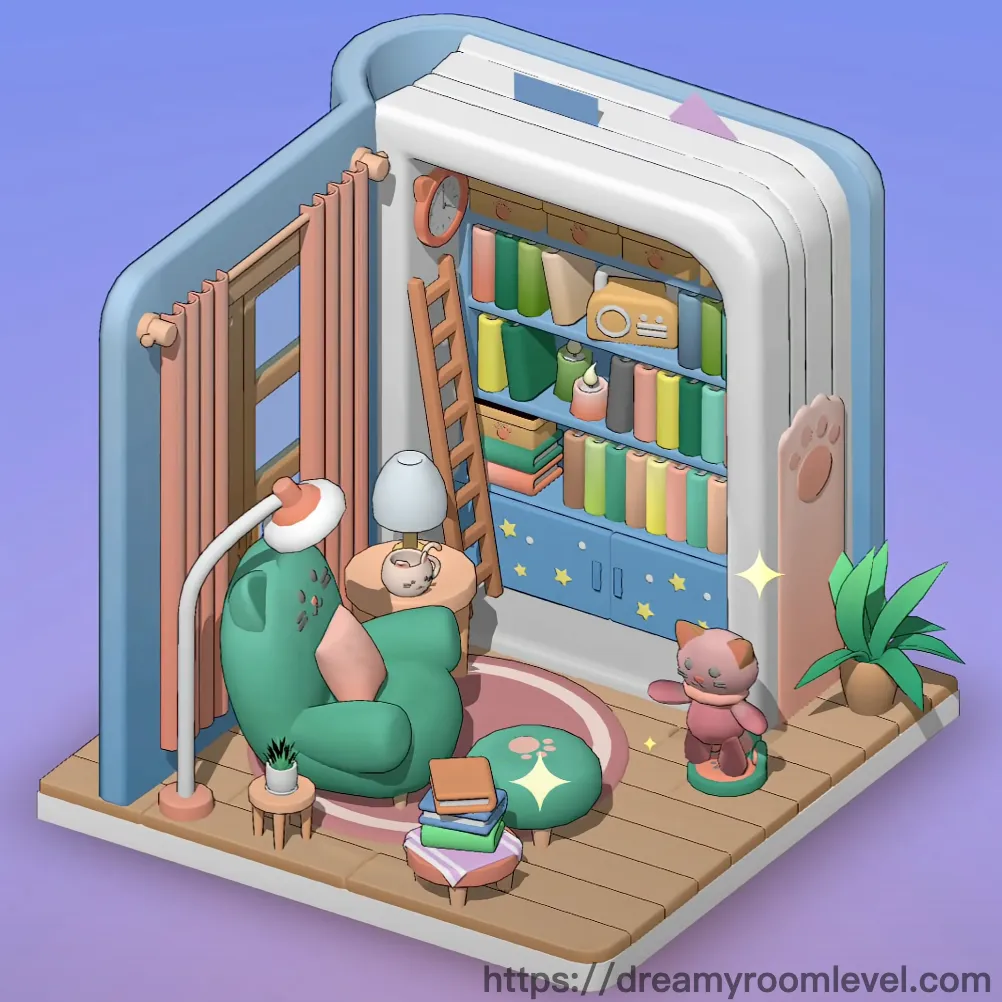
In this cozy reading nook, a young literature enthusiast has transformed a corner into their personal sanctuary. The soft green bean bag chair sits invitingly beside towering bookshelves, while a delicate harp awaits evening melodies. This is where stories come alive in Dreamy Room Level 16, surrounded by colorful books and warm lamplight, creating the perfect escape for dreamy afternoons spent lost in magical worlds.
Dreamy Room Level 16 Complete Walkthrough
Step 1. Install wooden floor foundation
Place the wooden floor as the base layer covering the entire room area. This warm wooden texture creates the foundation for Dreamy Room Level 16's cozy atmosphere.
Step 2. Position window frame on back wall
Drag the window frame to the upper center of the back wall. Ensure it's centered horizontally for balanced natural lighting.
Step 3. Add window glass panes
Insert the window glass panes directly into the window frame opening. They should snap perfectly into the frame structure.
Step 4. Install curtain rod above window
Mount the curtain rod directly above the window frame, extending slightly beyond both sides for proper curtain support.
Step 5. Hang pink window curtain in Dreamy Room Level 16
Attach the pink window curtain to the curtain rod, ensuring it drapes elegantly on both sides of the window.
Step 6. Place blue bookshelf against right wall
Position the main blue bookshelf against the right wall, aligned with the room's back corner for optimal space usage in Dreamy Room Level 16.
Step 7. Add white bookshelf frame
Overlay the white bookshelf frame onto the blue bookshelf structure, creating the distinctive layered shelving design.
Step 8. Arrange colorful books on shelves
Stack the colorful books vertically on the upper shelf compartments, creating an organized rainbow effect essential for Dreamy Room Level 16's aesthetic.
Step 9. Position green bean bag chair
Place the comfortable green bean bag chair in the left area of the room, angled slightly toward the bookshelf for ideal reading position.
Step 10. Add green ottoman in Dreamy Room Level 16
Set the matching green ottoman directly in front of the bean bag chair, about one foot away for comfortable foot support.
Step 11. Place pink circular rug
Center the pink circular rug beneath the bean bag seating area, extending slightly beyond the chair's edges.
Step 12. Position floor lamp beside chair
Stand the floor lamp to the immediate left of the bean bag chair, angled to provide optimal reading light.
Step 13. Set wooden side table
Place the small wooden side table to the right side of the bean bag chair within easy arm's reach for Dreamy Room Level 16 comfort.
Step 14. Add tea cup on table
Position the tea cup on the center of the wooden side table, handle facing outward for easy access.
Step 15. Place tea pot beside cup in Dreamy Room Level 16
Set the matching tea pot next to the tea cup on the table, creating a cozy tea service arrangement.
Step 16. Position brown harp near window
Place the elegant brown harp in the back left corner near the window, angled diagonally for both display and playability.
Step 17. Attach harp strings
Ensure the harp strings are properly aligned vertically within the harp frame for authentic detail.
Step 18. Mount wall clock above bookshelf
Hang the wall clock on the wall directly above the bookshelf center, at eye level for easy time checking in Dreamy Room Level 16.
Step 19. Place radio boombox on shelf
Position the retro radio boombox on the middle shelf of the bookcase, centered for balanced visual weight.
Step 20. Add blue storage drawer in Dreamy Room Level 16
Slide the blue storage drawer into the lower shelf compartment, handles facing forward for functionality.
Step 21. Attach drawer handles
Ensure both drawer handles are properly aligned on the storage drawer front for symmetric appearance.
Step 22. Position wooden ladder against shelf
Lean the wooden ladder against the right side of the bookshelf at a safe climbing angle for reaching high shelves.
Step 23. Place pink teddy bear on chair
Set the adorable pink teddy bear on the bean bag chair's back cushion area as a charming companion for Dreamy Room Level 16.
Step 24. Add pink cushion to ottoman
Place the soft pink cushion on top of the green ottoman for extra comfort and color coordination.
Step 25. Stack books on floor in Dreamy Room Level 16
Create stacked books on floor piles near the bean bag chair base, leaning slightly for natural placement.
Step 26. Add pink book to stack
Place the pink book on top of the floor stack, spine facing outward for visibility.
Step 27. Position green book beside pink
Add the green book next to the pink book in the floor stack for color variety.
Step 28. Place yellow book completing trio
Complete the floor arrangement with the yellow book beside the others in Dreamy Room Level 16's reading collection.
Step 29. Add potted plant on table
Position the main potted plant on a shelf or side surface for natural greenery accent.
Step 30. Place small plant pot in Dreamy Room Level 16
Set the small plant pot on the windowsill or lower shelf for layered botanical decoration.
Step 31. Add plant leaves details
Ensure plant leaves are properly oriented upward and outward for realistic plant appearance.
Step 32. Position small cactus
Place the tiny small cactus on a shelf edge or table corner for desert plant variety.
Step 33. Mount wall mounted shelf
Install the wall mounted shelf on the left wall at medium height for additional display space in Dreamy Room Level 16.
Step 34. Hang hanging plant from shelf
Suspend the hanging plant from the wall shelf or ceiling hook for vertical greenery.
Step 35. Add yellow stars decoration in Dreamy Room Level 16
Scatter yellow stars decoration on the lower shelf area for whimsical touches throughout the space.
Step 36. Place decorative stars on surfaces
Distribute additional decorative stars across various surfaces for magical ambiance.
Step 37. Apply sparkle effects
Add final sparkle effects around key focal points to complete Dreamy Room Level 16's enchanting atmosphere.
Step 38. Position cardboard box storage
Tuck the cardboard box under the desk or in corner for practical storage solution.
Step 39. Add reading lamp to shelf
Place the focused reading lamp on a shelf for task lighting when needed in Dreamy Room Level 16.
Step 40. Create floor books pile in corner
Arrange the floor books pile casually in room corner for lived-in authenticity.
Step 41. Set up corner bookshelf in Dreamy Room Level 16
Position the secondary corner bookshelf in available corner space for extra book storage.
Step 42. Place round table if space allows
Add the round table in remaining floor space for additional surface area.
Step 43. Adjust pink cat ear handle
Ensure the cute pink cat ear handle is properly attached to drawer or cabinet for playful detail.
Step 44. Apply blue gradient background
Set the blue gradient background as the upper wall treatment for depth.
Step 45. Complete with purple gradient background
Blend the purple gradient background into lower wall areas to finish Dreamy Room Level 16's dreamy color scheme.
Tips and Tricks
Important Notes
- The bean bag chair and ottoman must be placed before adding the floor rug to avoid layering issues
- Window curtains may require precise rod placement to hang correctly
- Stack floor books at slight angles for natural appearance rather than perfect alignment
- The harp needs specific corner placement to avoid blocking other elements
- Small decorative items like stars should be added last to prevent displacement
Helpful Tips
- Use the bookshelf frame as a guide for perfectly aligning books on shelves
- Drag the tea set items slowly near the table for automatic snap placement
- Position reading materials near seating areas for logical room flow
- Layer plants at different heights for dynamic visual interest
- For perfect completion of Dreamy Room Level 16, save decorative elements like stars and sparkles for final touches to avoid repositioning