Dreamy Room Level 133
Level 133 guide walkthrough, helping players solve puzzles and explore the wonderful world of Dreamy Room.
Dreamy Room Level 133 Walkthrough Guide
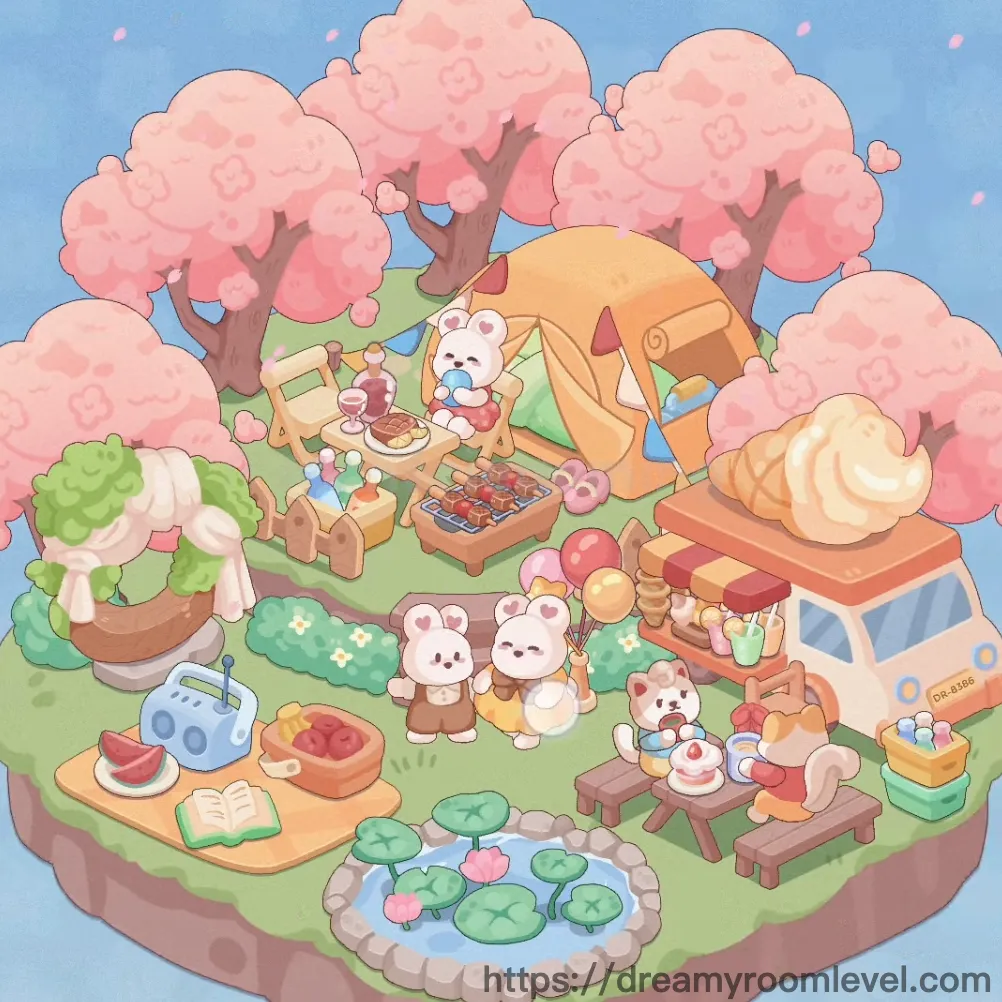
Dreamy Room Level 133 Room Story
A gentle spring breeze carries soft cherry blossom petals through the air as a cheerful white bear prepares the perfect outdoor picnic celebration. Under the warm sunshine, pink cherry trees frame this magical gathering space where friends can share delicious treats, play cheerful music, and enjoy the peaceful beauty of blooming flowers beside a tranquil lotus pond. This heartwarming scene in Dreamy Room Level 133 captures the essence of springtime joy and togetherness.
Dreamy Room Level 133: Step-by-Step Placement Guide
Step 1. Place the Cherry Blossom Trees
Position the four beautiful cherry blossom trees with pink clouds on trees around the upper and middle areas of the floating island. Place them with brown tree trunks at strategic points to frame the picnic scene. The trees should create a natural canopy with their fluffy pink blossoms, and ensure cherry blossom petals gently float downward. Following Dreamy Room Level 133 design principles, these trees establish the romantic atmosphere for the entire scene.
Step 2. Create the Ground Foundation in Dreamy Room Level 133
Spread the grass patches and decorative grass evenly across the floating island's surface to create a lush green base. Add small bushes around the edges for natural borders. This foundation layer is essential for Dreamy Room Level 133 success as it supports all other elements.
Step 3. Build the Small Pond Feature
Construct the small pond in the lower right area with a decorative stone border. Place multiple lily pads floating on the water surface, and add vibrant lotus flowers blooming among them. Include water plants around the pond edges to complete this tranquil water feature according to Dreamy Room Level 133 layout requirements.
Step 4. Set Up the Stone Path
Lay the stone path in a curved pattern connecting different areas of the picnic space. This pathway should wind naturally through the grass, providing walking access between the main gathering areas. The path creates visual flow throughout Dreamy Room Level 133.
Step 5. Position the Yellow Tent
Place the charming yellow tent with orange tent fabric accents in the upper right area behind the cherry trees. The tent should face toward the center of the picnic area, creating a cozy shelter. This placement is essential for Dreamy Room Level 133 spatial balance.
Step 6. Install the Food Truck in Dreamy Room Level 133
Position the adorable food truck on the right side of the scene, facing left toward the gathering area. The truck features a display window and should be easily accessible from the main picnic zone. This mobile kitchen serves as a focal point in Dreamy Room Level 133.
Step 7. Arrange the Wooden Bench and Table Set
Place the wooden bench and wooden table set in the central area under the cherry trees. The bench should face the table, creating an intimate dining spot. Completing Dreamy Room Level 133 requires proper furniture arrangement for the perfect picnic setup.
Step 8. Add the Picnic Table Setup
Position the picnic table in the center-left area as another dining option. This table provides additional seating space and should be surrounded by other picnic elements according to Dreamy Room Level 133 design.
Step 9. Place Outdoor Seating in Dreamy Room Level 133
Arrange the outdoor chair and wooden stool near the various tables and gathering spots. Position them at comfortable angles for conversation and dining. Add the cushion on the seating for extra comfort in this Dreamy Room Level 133 setup.
Step 10. Set Up the BBQ Grill Station
Place the BBQ grill in the middle area where it's accessible for cooking. The grill should be positioned near the main gathering space but with safe distance from seating areas, following Dreamy Room Level 133 safety considerations.
Step 11. Display the Large Bread
Position the impressive large bread on the food truck's display counter or nearby table. This oversized bakery item should be prominently visible as a centerpiece food item in Dreamy Room Level 133.
Step 12. Arrange the Vegetable Stand in Dreamy Room Level 133
Set up the vegetable stand near the food truck, displaying fresh green cabbage and other produce. This stand adds fresh ingredient options to the picnic scene according to Dreamy Room Level 133 requirements.
Step 13. Place Fruit Displays
Arrange the fruit basket and fruit display on tables and counters throughout the scene. These colorful arrangements should be easily accessible for guests enjoying this Dreamy Room Level 133 celebration.
Step 14. Add the Watermelon Slice in Dreamy Room Level 133
Place the refreshing watermelon slice on the lower left table as a juicy summer treat. The bright red fruit provides a pop of color in the Dreamy Room Level 133 food spread.
Step 15. Set Out the Strawberry Bowl
Position the strawberry bowl on one of the tables, filled with fresh red berries. This sweet treat should be centrally located for easy access during the Dreamy Room Level 133 picnic.
Step 16. Display the Grilled Skewers
Arrange the grilled skewers on the BBQ grill or nearby serving tray. These savory items should look freshly cooked and ready to enjoy in this Dreamy Room Level 133 scene.
Step 17. Place the Ice Cream Treat in Dreamy Room Level 133
Set the delightful ice cream on a table or counter where it can be enjoyed. This frozen dessert adds a sweet touch to the Dreamy Room Level 133 menu.
Step 18. Display the Cake
Position the beautiful cake as a special dessert centerpiece on one of the main tables. This celebration cake should be prominently featured in the Dreamy Room Level 133 picnic spread.
Step 19. Arrange Beverage Items in Dreamy Room Level 133
Place the drinks, juice bottles, and beverage station near the food truck or on tables. These refreshments should be easily accessible throughout Dreamy Room Level 133.
Step 20. Set Up Food Service Items
Arrange the dessert plate, food tray, and snack stand across various surfaces. These serving pieces help organize the food presentation in Dreamy Room Level 133.
Step 21. Place the Candy Box in Dreamy Room Level 133
Position the colorful candy box on a table or stand, filled with sweet treats. This delightful addition adds whimsy to the Dreamy Room Level 133 dessert selection.
Step 22. Add the Picnic Basket
Place the picnic basket near the seating area or on the grass, containing additional picnic supplies. This classic item enhances the outdoor dining atmosphere in Dreamy Room Level 133.
Step 23. Set Up the Blue Radio in Dreamy Room Level 133
Position the cheerful blue radio on a table where it can play music for the gathering. This retro device adds entertainment to the Dreamy Room Level 133 picnic ambiance.
Step 24. Place the Open Book
Set the open book on a table or bench, creating a relaxing reading spot. This peaceful element adds a quiet activity option to Dreamy Room Level 133.
Step 25. Add the Wooden Crate in Dreamy Room Level 133
Position the wooden crate near storage areas or as a rustic display stand. This versatile piece adds practical storage to the Dreamy Room Level 133 setup.
Step 26. Position the White Bear Character
Place the adorable white bear character in the center of the scene, perhaps sitting at a table or standing near the food. This cute host brings life to the Dreamy Room Level 133 picnic party.
Step 27. Hang the Balloon in Dreamy Room Level 133
Attach the colorful balloon to a table, chair, or let it float near the picnic area. This festive decoration adds celebration vibes to Dreamy Room Level 133.
Step 28. Spread the Outdoor Mat
Lay the outdoor mat on the grass as a comfortable sitting area for picnic guests. This practical item creates cozy gathering spots in Dreamy Room Level 133.
Step 29. Add Pink Flower Decorations in Dreamy Room Level 133
Scatter the beautiful pink flowers and ground flowers around the grass and near pathways. These blooms complement the cherry blossoms in Dreamy Room Level 133.
Step 30. Arrange Tree Decorations
Add charming tree decorations to the cherry blossom trees, such as hanging lights or ornaments. These details enhance the magical atmosphere of Dreamy Room Level 133.
Step 31. Add Floating Petals Effect in Dreamy Room Level 133
Ensure pink petals floating are animated throughout the scene, drifting gently from the cherry trees. This dynamic element brings the spring breeze to life in Dreamy Room Level 133.
Tips and Tricks
Important Notes
- The cherry blossom trees should be placed first as they define the spatial boundaries in Dreamy Room Level 133. Their positions affect where other items can be arranged.
- Be careful when placing items near the small pond area, as the water feature's decorative border can make it tricky to position items directly adjacent to it without overlap.
- The food truck and tent are large objects that need adequate space. Place them early before filling in smaller decorations to avoid repositioning issues.
- Small items like flowers and petals can be easily missed in the grass. Check carefully around the edges and between larger furniture pieces to ensure complete placement.
- The white bear character should be positioned where it can interact with the scene elements. Avoid placing it in isolated corners where it looks disconnected from the picnic activity.
Useful Tips
- When arranging multiple small food items, work from larger tables outward to smaller surfaces. This prevents overcrowding and ensures balanced distribution.
- For items near the pond edge, drag them slowly and watch for the placement preview to ensure they snap to the correct position without falling into the water.
- The tree decorations and floating petals are easiest to place after all ground-level items are set, as they won't obstruct your view of placement zones.
- Use the wooden crate and stands as elevation platforms for smaller food displays, creating visual depth in your arrangement.
- Group similar colored items together, such as pink flowers near the cherry trees, to create harmonious color zones throughout the scene.
- Successfully completing Dreamy Room Level 133 requires attention to the natural flow between functional areas like cooking, dining, and relaxation zones. Position items to create logical pathways between these spaces.