Dreamy Room Level 5
Level 5 guide walkthrough, helping players solve puzzles and explore the wonderful world of Dreamy Room.
Dreamy Room Level 5 Walkthrough Guide
Room Story
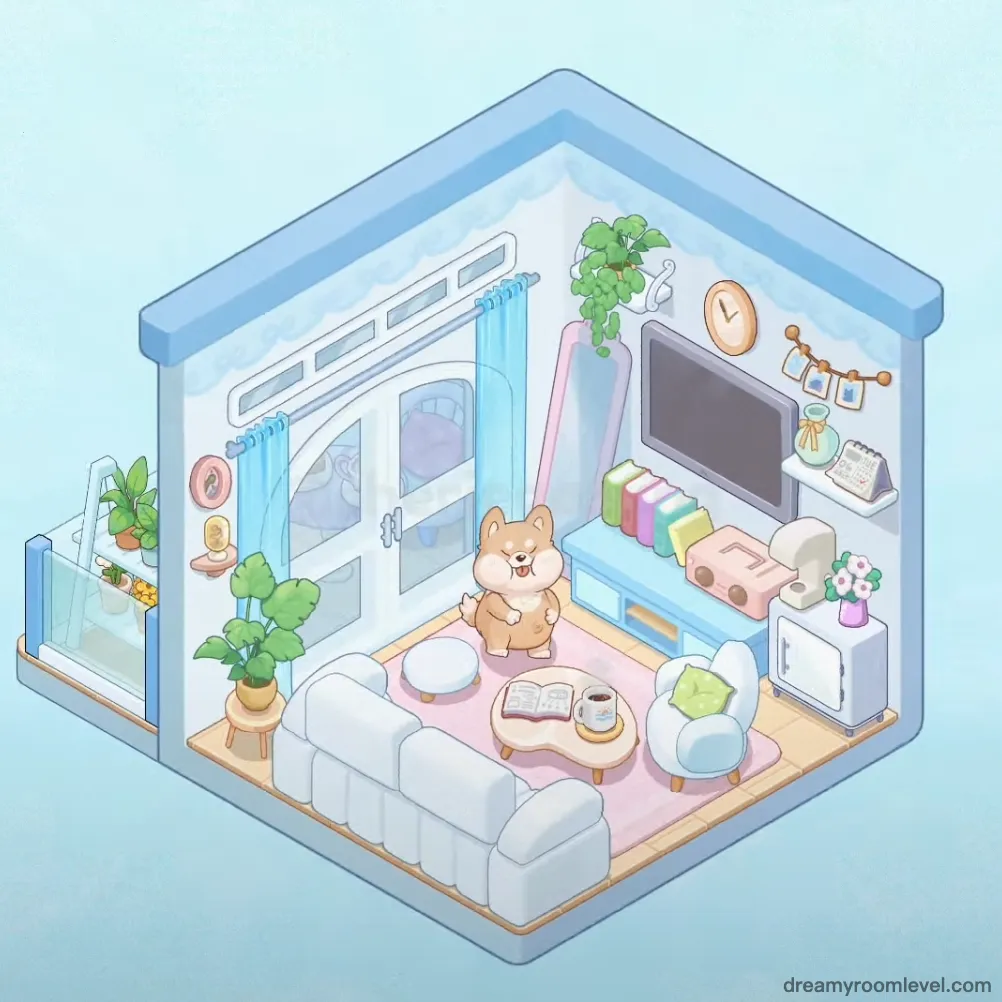
Emma's cozy living room reflects her love for afternoon tea and quiet reading moments. After moving to her new apartment, she wanted to create the perfect space for hosting friends and enjoying peaceful evenings. The soft pastel colors and carefully chosen furniture pieces in Dreamy Room Level 5 tell the story of someone who values comfort and warmth above all. Every corner holds a memory - from the teddy bear that reminds her of childhood to the fresh plants that bring life to the space. This is where she starts each morning with coffee and ends each day with a good book.
Step-by-Step Placement Guide
Step 1. Install the wooden floor foundation in Dreamy Room Level 5
Place the wooden floor as the base surface throughout the entire room area. The wooden planks should be aligned in a consistent pattern, creating a warm, natural foundation that will support all furniture and decorative elements in Dreamy Room Level 5. Ensure the floor surface is level and properly fitted to the room boundaries for optimal results.
Step 2. Set up the wooden platform area for Dreamy Room Level 5
Position the wooden platform in the center-right area of the room, creating an elevated section for the main seating arrangement. This platform design is essential in Dreamy Room Level 5 as it provides a defined space for the primary furniture grouping and adds architectural interest to the floor plan throughout the gaming experience.
Step 3. Install glass partition with support system in Dreamy Room Level 5
Mount the glass partition along the left side of the room, then secure the support pillars at each corner junction. The glass should be perfectly vertical and the pillars should provide stable structural support while maintaining the open, airy feel that defines Dreamy Room Level 5 aesthetic design principles.
Step 4. Mount the window frame in Dreamy Room Level 5
Install the window on the back wall, positioning it to allow maximum natural light into the living area. The window placement is crucial for Dreamy Room Level 5 success, as it creates a focal point that frames the outdoor view beautifully and provides essential natural lighting for the entire room setup.
Step 5. Hang curtain rod and blue curtains for Dreamy Room Level 5
Attach the curtain rod above the window, then hang the elegant blue curtains with gentle, flowing drapes. The curtains should extend slightly beyond the window frame on both sides following Dreamy Room Level 5 design standards and hang to the appropriate length for optimal light control and privacy.
Step 6. Position the comfortable sofa in Dreamy Room Level 5
Place the plush sofa on the wooden platform, positioning it to face the center of the room for optimal conversation flow. According to Dreamy Room Level 5 design principles, the sofa should be angled slightly toward the coffee table area and positioned to take advantage of natural light streaming through the window throughout the day.
Step 7. Set up the TV stand following Dreamy Room Level 5 guidelines
Position the sleek TV stand against the wall opposite the seating area, ensuring it's centered and stable according to Dreamy Room Level 5 furniture placement requirements. The stand should be placed at the perfect height for comfortable viewing from the sofa and provide adequate storage space underneath for accessories.
Step 8. Mount the TV screen in Dreamy Room Level 5
Carefully place the TV screen on top of the TV stand, ensuring it's properly centered and secure. The screen positioning in Dreamy Room Level 5 should be angled slightly downward for optimal viewing from the sofa and positioned to avoid glare from the window while maintaining perfect visual alignment with the seating area.
Step 9. Add the pink rug for warmth in Dreamy Room Level 5
Lay the soft pink rug in the center of the seating area, positioning it to anchor the furniture grouping according to Dreamy Room Level 5 color coordination principles. The rug should extend partially under the sofa and coffee table, creating a cohesive color palette that ties the entire room design together beautifully.
Step 10. Place the coffee table in Dreamy Room Level 5
Position the elegant coffee table directly in front of the sofa on the pink rug, leaving comfortable space for walking around. This central placement creates the perfect spot for entertaining guests and serves as the focal point in Dreamy Room Level 5 room arrangement, providing both functionality and aesthetic appeal for the living space.
Step 11. Set up the purple chair following Dreamy Room Level 5 standards
Place the vibrant purple chair in the left corner area near the glass partition, creating an intimate reading nook that complements Dreamy Room Level 5 overall design theme. The chair should be angled to face both the main seating area and provide a view toward the window for natural reading light.
Step 12. Position the small round table in Dreamy Room Level 5
Set the small round table beside the purple chair, creating a perfect surface for personal items and refreshments. The table positioning in Dreamy Room Level 5 should be within easy reach of the chair while maintaining clear pathways around the seating area for comfortable movement throughout the room.
Step 13. Install the wall clock for Dreamy Room Level 5
Mount the stylish clock on the wall at eye level, positioning it where it's easily visible from both seating areas in Dreamy Room Level 5. The clock should be centered on an open wall space and properly secured to serve both functional and decorative purposes while maintaining the room's balanced aesthetic appeal.
Step 14. Set up the microwave appliance in Dreamy Room Level 5
Install the compact microwave on the designated shelf area near the window, ensuring proper ventilation and easy access following Dreamy Room Level 5 safety guidelines. The appliance should be positioned at a convenient height and properly connected for safe operation within the living space environment.
Step 15. Arrange books collection following Dreamy Room Level 5 design
Place the colorful books on the TV stand and nearby surfaces, arranging them both vertically and horizontally for visual interest that aligns with Dreamy Room Level 5 intellectual atmosphere goals. Stack some books on the coffee table and display others on shelves to create a lived-in, scholarly environment.
Step 16. Add the wall calendar in Dreamy Room Level 5
Mount the calendar on the wall at a convenient viewing height, positioning it in an easily accessible location for daily reference according to Dreamy Room Level 5 practical design principles. The calendar placement should be where natural light makes it easy to read and update regularly throughout the month.
Step 17. Hang decorative flags for Dreamy Room Level 5
String the cheerful decorative flags along the upper wall area, creating a festive and playful atmosphere that captures the joyful spirit of Dreamy Room Level 5. The flags should be evenly spaced and hung at a consistent height to add color and movement to the room's upper visual plane.
Step 18. Place the elegant small vase in Dreamy Room Level 5
Position the delicate small vase on the coffee table or small round table, adding a touch of refinement to the surface arrangement. The vase should be placed where it won't obstruct conversations but adds visual elegance according to Dreamy Room Level 5 sophisticated design standards and aesthetic requirements.
Step 19. Add tropical pineapple decoration for Dreamy Room Level 5
Place the vibrant pineapple on the coffee table as a fun, tropical accent piece that brings cheerful energy to Dreamy Room Level 5. Position it slightly off-center to create visual interest and complement the other items already arranged on the table surface for maximum decorative impact.
Step 20. Arrange the delicious cake in Dreamy Room Level 5
Set the appetizing cake on the coffee table, creating an inviting centerpiece for entertaining guests and friends. This sweet addition perfectly captures the welcoming spirit that defines Dreamy Room Level 5, making guests feel immediately at home and welcomed in this beautifully designed living space.
Step 21. Add the tasty pastry following Dreamy Room Level 5 guidelines
Place the delectable pastry alongside the cake on the coffee table, creating a complete dessert display that enhances Dreamy Room Level 5 hospitality theme. The pastry should be positioned to complement the cake arrangement while leaving adequate space for other decorative table items.
Step 22. Position wall decoration in Dreamy Room Level 5
Mount the attractive wall decoration on an open wall space, adding artistic flair to the room's vertical surfaces according to Dreamy Room Level 5 design philosophy. Choose a location that balances the overall wall composition and enhances the room's aesthetic appeal throughout the entire living area.
Step 23. Add small decorations throughout Dreamy Room Level 5
Distribute the charming small decorations on various surfaces throughout the room, including shelves, tables, and windowsills following Dreamy Room Level 5 decoration principles. These items should be grouped in odd numbers and positioned to add personality without creating clutter in the space.
Step 24. Install hanging plant from ceiling in Dreamy Room Level 5
Suspend the lush hanging plant from the ceiling or a high shelf, positioning it where it can cascade naturally without obstructing walkways. The plant should hang at a height that adds vertical interest while staying safely out of the way according to Dreamy Room Level 5 safety standards and design requirements.
Step 25. Place floor plant in corner for Dreamy Room Level 5
Position the large floor plant in a corner location where it can receive adequate light while filling empty vertical space in Dreamy Room Level 5. The plant should be stable and positioned to complement the room's flow without blocking pathways or furniture access throughout the living area.
Step 26. Add window sill plant in Dreamy Room Level 5
Set the small window sill plant directly on the window ledge, taking advantage of the natural light source available in Dreamy Room Level 5. The plant positioning should be secure and not interfere with opening or closing the window or curtains during daily use.
Step 27. Position potted plant following Dreamy Room Level 5 standards
Place the medium-sized potted plant on the floor near the seating area, adding natural greenery to complement the other plant arrangements in Dreamy Room Level 5. The pot should be positioned on a stable surface where it enhances the room's natural, living atmosphere throughout the space.
Step 28. Arrange small ornaments in Dreamy Room Level 5
Distribute the various small ornaments throughout the room on shelves, tables, and other surfaces according to Dreamy Room Level 5 decorative guidelines. These decorative pieces should be arranged to create visual interest while maintaining the room's cohesive design theme throughout the entire living area.
Step 29. Set up the teapot for Dreamy Room Level 5
Place the elegant teapot on the small round table next to the purple chair, creating the foundation for a charming tea service area in Dreamy Room Level 5. The teapot should be positioned safely away from the edge and oriented for easy pouring access during afternoon tea sessions.
Step 30. Add the matching teacup in Dreamy Room Level 5
Position the delicate teacup next to the teapot on the small round table, completing the perfect tea service arrangement that embodies Dreamy Room Level 5 hospitality values. This final touch creates the cozy, hospitable atmosphere that makes the room such a welcoming and comfortable space for guests.
Step 31. Place the adorable teddy bear completing Dreamy Room Level 5
Set the cuddly teddy bear on the sofa, leaning it naturally against the cushions in a comfortable, lifelike position that captures the warmth of Dreamy Room Level 5. The teddy bear adds personality to the seating area, creating an instant feeling of home and comfort for anyone who visits this beautifully arranged living space.
Tips and Precautions
Precautions
- Watch carefully for the narrow gap between the glass partition and main furniture - items placed too close may overlap or become difficult to reposition later in your Dreamy Room Level 5 completion
- The small round table area requires precise positioning due to the purple chair's angle - ensure adequate clearance before placing tea service items
- Plants positioned near the window need careful placement to avoid blocking the blue curtains or interfering with natural light flow patterns
- The teddy bear on the sofa needs proper angling to prevent it from appearing to slide off or looking unnaturally positioned against the cushions
- Small decorative items may become hidden behind larger furniture pieces if not positioned with proper sight lines and visibility in mind during gameplay
- Coffee table arrangements can become overcrowded - maintain balance between cake, pastry, pineapple, and vase positioning throughout the level
Practical Tips
- Begin coffee table styling from the center point and work outward to maintain balanced visual weight distribution across the surface in Dreamy Room Level 5
- Use the glass partition's straight edge as an alignment guide - many room elements should parallel this structure for clean, organized aesthetics
- For optimal plant arrangement, consider the window's light direction and position plants from tallest to shortest for natural growth simulation effects
- The pink rug's borders serve as excellent furniture alignment guides - use these edges as reference points for consistent spacing throughout the room design
- When arranging small ornaments and decorations, group them in clusters of three or five items for more natural, aesthetically pleasing compositions
- Master these advanced positioning techniques to achieve the perfect room harmony that makes Dreamy Room Level 5 completion both efficient and visually stunning for all players seeking the ultimate cozy living room experience