Dreamy Room Level 129
Level 129 guide walkthrough, helping players solve puzzles and explore the wonderful world of Dreamy Room.
Dreamy Room Level 129 Walkthrough Guide
Dreamy Room Level 129 Room Story
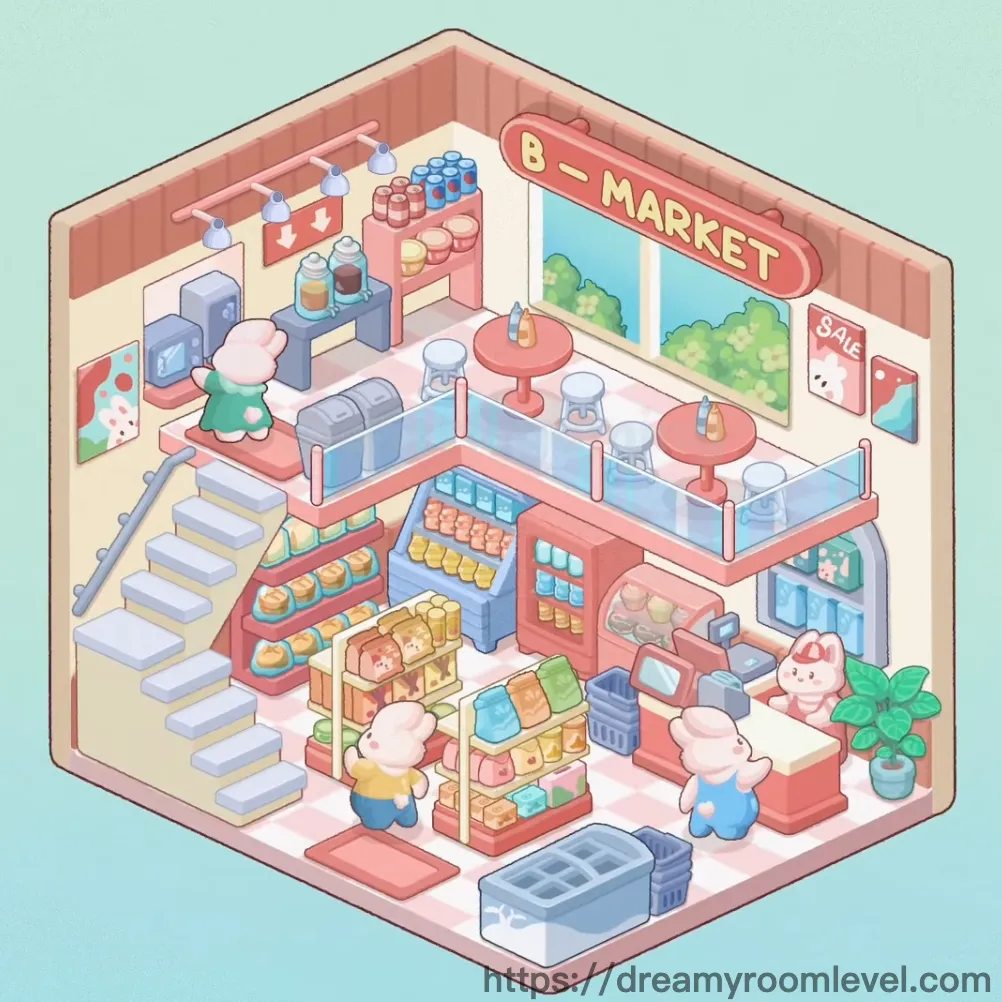
Welcome to the heartwarming B-Market, where three adorable rabbit friends run their cozy neighborhood convenience store. Every morning, the green rabbit arranges fresh pastries while the yellow and blue rabbits stock colorful beverages on the shelves. The soft pink walls and cheerful checkered floor create a welcoming atmosphere for all the woodland creatures who stop by. This charming two-story market, complete with a spiral staircase and window overlooking the forest, has become the heart of the community in Dreamy Room Level 129, where friendship and daily essentials blend perfectly together.
Dreamy Room Level 129: Step-by-Step Placement Guide
Step 1. Install Pink Walls and Ceiling Structure
Begin your Dreamy Room Level 129 setup by establishing the pink walls and ceiling. Position the coral-pink vertical paneled walls to form the store's perimeter, creating a warm enclosure. The ceiling should align perfectly at the top edge, maintaining the isometric perspective of the room.
Step 2. Lay Down the Checkered Floor
Place the checkered floor with its distinctive pink and white tile pattern across the entire base. Ensure the diagonal pattern aligns properly from corner to corner, creating the foundation for all furniture placement in Dreamy Room Level 129.
Step 3. Add Window on Upper Level
Install the large window on the back wall of the upper floor area. This window features a scenic forest view and should be centered on the upper back wall, allowing natural light to illuminate the seating area.
Step 4. Build the Staircase System
Construct the stairs along the left side of the store, leading to the upper floor. The light gray steps should ascend diagonally from the lower left corner. Add the handrail in pink along the outer edge and install the stairs platform at the top, creating a safe landing area for Dreamy Room Level 129 customers.
Step 5. Mount the Market Sign
Position the prominent market sign displaying "B-MARKET" on the upper right wall section. This curved red-orange sign with yellow lettering serves as the store's main identifier and should be placed above the window area.
Step 6. Set Up Bar Counter and Seating Area
Place the bar counter on the upper floor, creating a seating area near the window. This L-shaped pink counter with glass panels should wrap around the upper right corner. Install bar stools white seats with gray bases along the counter's edge, allowing customers to enjoy their purchases while overlooking the store in Dreamy Room Level 129.
Step 7. Position Round Tables with Stools
Arrange the round table pink and round table red in the upper seating area. Place the pink table closer to the window and the red table slightly forward. Surround each table with white stools (four per table) to create intimate dining spots for Dreamy Room Level 129 visitors.
Step 8. Install Checkout Counter System
Position the main checkout counter in the lower right section of the store. This pink L-shaped counter with glass display panels should face the entrance. Place the cash register on top of the counter's surface, ready for transactions in Dreamy Room Level 129.
Step 9. Set Up Product Display Shelves
Install the multi-tiered product shelves along the right wall behind the checkout counter. These pink shelving units should display various packaged goods. Add display shelves on the left wall area for additional product storage in Dreamy Room Level 129.
Step 10. Place Refrigerator Unit
Position the tall refrigerator on the back left wall, next to the coffee station. This gray appliance with glass doors should display chilled beverages and be easily accessible to customers following Dreamy Room Level 129 layout standards.
Step 11. Install Beverage Cooler and Vending Machine
Place the beverage cooler (horizontal glass-topped unit) near the checkout area. Position the vending machine along the left wall, creating a convenient grab-and-go section for Dreamy Room Level 129 shoppers.
Step 12. Add Coffee Station Equipment
Set up the coffee machine (gray appliance) on the upper left counter area. Next to it, install the drink dispenser with its blue containers, creating a complete beverage service station in Dreamy Room Level 129.
Step 13. Stock Blue and Pink Bottle Collections
Arrange blue bottles in the refrigerator's top section and on upper shelves. Place pink bottles on adjacent shelving areas. These beverage containers should create an appealing color-coordinated display following Dreamy Room Level 129 merchandising principles.
Step 14. Display Glass Jars and Cans
Position glass jars containing preserved goods on the counter near the coffee station. Arrange cans in neat rows on the middle shelves of the product display, creating organized sections in Dreamy Room Level 129.
Step 15. Stock Milk Cartons and Juice Bottles
Place milk cartons in the refrigerator's middle section for proper temperature control. Arrange juice bottles both in the cooler and on the counter display near the beverage station, ensuring variety for Dreamy Room Level 129 customers.
Step 16. Organize Colorful Product Collections
Distribute orange products on the lower right shelves. Place yellow products on the middle-right shelving. Arrange green products on upper shelves. Position blue products throughout various display areas, creating a vibrant rainbow effect in Dreamy Room Level 129.
Step 17. Set Up Bread Display Case
Install the bread display case on the lower level near the center. This glass-fronted case should showcase fresh pastries and donuts on individual plates, creating an appetizing bakery section for Dreamy Room Level 129 visitors.
Step 18. Arrange Egg Display and Food Packages
Place the eggs carton on the counter display near the bakery section. Organize various food packages on the surrounding shelves, ensuring all items are clearly visible and accessible in Dreamy Room Level 129.
Step 19. Install Snack Shelves Display
Position the snack shelves along the lower section of the right wall. These should display chips, cookies, and other packaged snacks in an organized manner following Dreamy Room Level 129 retail standards.
Step 20. Add Display Stand and Food Display
Place the display stand near the center aisle, featuring promotional items. Set up the food display case in the lower right area, showcasing prepared items for Dreamy Room Level 129 customers.
Step 21. Position Shopping Basket
Place the shopping basket near the entrance on the lower level. This gray plastic basket should be easily accessible for customers beginning their shopping in Dreamy Room Level 129.
Step 22. Install Trash Bin
Position the trash bin (gray with lid) near the seating area on the upper floor. This waste receptacle should be conveniently located but unobtrusive in Dreamy Room Level 129.
Step 23. Add Decorative Plant Pot
Place the plant pot with green foliage on the checkout counter's corner. This small decorative element adds life and warmth to the store environment in Dreamy Room Level 129.
Step 24. Hang Wall Poster with Arrows
Mount the wall poster arrows (red sign with white downward arrows) on the upper left wall near the coffee station. This directional signage helps guide customers through Dreamy Room Level 129.
Step 25. Display Sale Sign
Attach the sale sign showing "SALE" text on the wall near the window area. This promotional signage attracts attention to special offers in Dreamy Room Level 129.
Step 26. Add Storage and Product Boxes
Place storage boxes beneath counters and in the back areas. Stack product boxes near the beverage cooler, maintaining inventory organization in Dreamy Room Level 129.
Step 27. Install Wall Decorations
Add various wall decorations including small frames and posters around the store. These should complement the pink color scheme and enhance the cozy atmosphere of Dreamy Room Level 129.
Step 28. Add Pink Railings Safety Features
Install pink railings around the upper floor's edge and along the counter sections. These safety barriers match the store's color scheme while protecting customers in Dreamy Room Level 129.
Step 29. Ensure White Floor Tiles Coverage
Verify that white floor tiles alternate properly with pink tiles throughout the checkered pattern. The white tiles should create a clean, bright appearance across the entire floor in Dreamy Room Level 129.
Step 30. Position Upper Floor Area Components
Complete the upper floor area by ensuring all seating, tables, and counter elements are properly arranged. This elevated section provides a comfortable space for customers to relax in Dreamy Room Level 129.
Step 31. Place Green Rabbit Character
Position the green rabbit character on the upper floor near the bar counter. This adorable staff member wears a green dress and should be placed facing the seating area, ready to serve customers in Dreamy Room Level 129.
Step 32. Position Yellow Rabbit Character
Place the yellow rabbit character in the middle section of the store near the central displays. This rabbit wearing yellow and blue clothing should be positioned as if arranging merchandise in Dreamy Room Level 129.
Step 33. Add Blue Rabbit Character
Position the blue rabbit character near the checkout counter on the lower right. This friendly staff member in blue attire should be placed facing the register, ready to assist shoppers in Dreamy Room Level 129.
Tips and Tricks
Common Mistakes to Avoid
- Don't overlook the small items on the upper shelves near the ceiling, which can be easily missed during initial placement
- Avoid placing the rabbit characters before furniture, as they may get hidden behind larger items
- The stairs platform requires precise alignment with the staircase to avoid visual gaps
- Small bottles and jars can be difficult to see against the pink background, requiring careful inspection of Dreamy Room Level 129
- The checkered floor pattern must be aligned correctly from the start, as misalignment affects all subsequent placements
Placement Strategies
- Start with the largest structural elements (walls, floor, stairs) before adding any furniture or characters
- Use the window and market sign as reference points for upper floor item placement
- Group similar colored products together (blues with blues, pinks with pinks) for easier identification
- When placing bottles and small items on shelves, drag from above and drop straight down for accurate positioning
- The rabbit characters snap into place more easily when positioned near their designated work stations
- Completing Dreamy Room Level 129 efficiently requires placing all counter and shelf units before stocking them with products