Dreamy Room Level 546
Level 546 guide walkthrough, helping players solve puzzles and explore the wonderful world of Dreamy Room.
Dreamy Room Level 546 Walkthrough Guide
Dreamy Room Level 546 Room Story
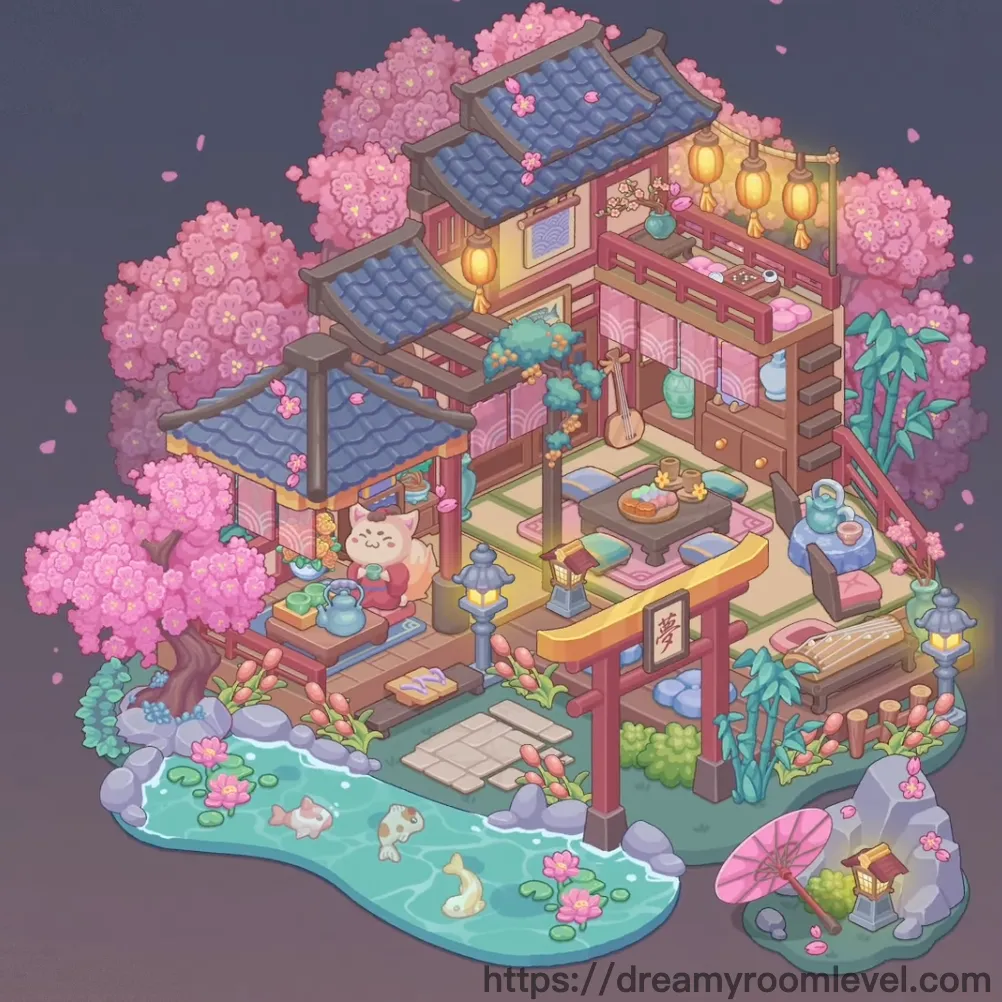
Step into an enchanting Japanese sanctuary where cherry blossoms paint the sky in shades of pink and dreams float on gentle spring breezes. This serene Dreamy Room Level 546 retreat belongs to Sakura, a musical cat who spends her days practicing shamisen while sipping green tea with her frog friend. The traditional house features elegant blue-tiled roofs cascading over tatami-floored rooms filled with golden lanterns and delicate ceramics. Outside, a tranquil koi pond reflects the magnificent cherry blossom trees while lotus flowers bloom on the water's surface. From the wooden engawa deck where stone lanterns glow at dusk to the dream kanji sign promising peaceful slumber, every corner captures the timeless beauty of a Japanese garden paradise.
Dreamy Room Level 546: Step-by-Step Placement Guide
Step 1. Lay Tatami Floor
Drag the tatami floor to cover the main interior room area. This traditional green-bordered mat flooring should fill the entire indoor space of Dreamy Room Level 546.
Step 2. Install Pink Walls
Position the pink walls to form the L-shaped room structure. These soft pink walls should create the warm backdrop for the traditional Japanese interior.
Step 3. Place Grass Ground
Drag the grass ground to cover the exterior garden area. This green lawn should surround the house structure and extend to the pond edge in Dreamy Room Level 546.
Step 4. Create Pond Water Area
Position the pond water in the front left section of the garden. This serene water feature should curve naturally around the garden creating the koi pond.
Step 5. Install Blue Tile Roofs
Place blue tile roof 1 on the main house section and blue tile roof 2 on the upper level. Add the blue tile awning over the engawa deck area in Dreamy Room Level 546.
Step 6. Build Wooden Deck
Drag the wooden deck to extend from the tatami room outward. This engawa platform should connect the interior to the garden steps.
Step 7. Install Round Wooden Window
Place the round wooden window on the upper wall section. This circular window with wooden frame should be positioned beneath the main roof in Dreamy Room Level 546.
Step 8. Add Red Wooden Railings
Position red wooden railing 1 and red wooden railing 2 along the upper balcony and deck edges. These traditional red barriers should frame the elevated areas.
Step 9. Install Red Torii Pillars
Place red torii pillar 1 and red torii pillar 2 at the front corners of the deck. These tall red columns should support the awning structure in Dreamy Room Level 546.
Step 10. Add Wooden Stairs
Position the wooden stairs leading from the deck down to the garden level. These steps should connect the elevated house to the ground pathway.
Step 11. Lay Stone Pathway
Place the stone pathway on the grass area leading from the stairs. These gray stepping stones should create a path through the garden in Dreamy Room Level 546.
Step 12. Position Wooden Low Table
Drag the wooden low table to the center of the tatami room. This traditional chabudai should be the focal point of the tea gathering space.
Step 13. Arrange Floor Cushions
Place pink floor cushion 1 and pink floor cushion 2 on opposite sides of the table. Add the blue floor cushion nearby for additional seating in Dreamy Room Level 546.
Step 14. Install Wooden Tansu Chest
Position the wooden tansu chest on the upper level near the round window. This traditional storage chest should hold treasured items.
Step 15. Add Wooden Shelf Unit
Place the wooden shelf unit against the right wall area. This multi-tiered display should showcase decorative items in Dreamy Room Level 546.
Step 16. Position Wooden Daybed
Drag the wooden daybed to the right corner of the room. Add the pink futon mattress on top for comfortable relaxation.
Step 17. Hang Fish Painting
Place the fish painting on the upper wall near the tansu chest. This framed artwork should add artistic charm to the interior in Dreamy Room Level 546.
Step 18. Install Yellow Lanterns
Position yellow lantern 1, yellow lantern 2, and yellow lantern 3 hanging from the eaves and ceiling areas. These golden paper lanterns should illuminate the house.
Step 19. Add Stone Lanterns
Place stone lantern 1 near the deck entrance and stone lantern 2 in the garden area. These traditional ishidoro should guide visitors in Dreamy Room Level 546.
Step 20. Position Wooden Lanterns
Drag wooden lantern 1, wooden lantern 2, and wooden lantern 3 around the garden and rock areas. These andon lanterns should glow warmly at dusk.
Step 21. Add Dream Kanji Sign
Place the dream kanji sign on the wooden railing or wall area. This calligraphy sign with the character "夢" (dream) adds cultural authenticity in Dreamy Room Level 546.
Step 22. Position Decorative Screens
Add the pink paper screen and wave pattern panel on the upper level shelves. These decorative panels should display traditional patterns.
Step 23. Arrange Vases and Ceramics
Place the cherry blossom vase with pink flowers on the tatami floor. Position the green ceramic vase on the shelf unit in Dreamy Room Level 546.
Step 24. Set Up Tea Service
Position the blue teapot on the low table. Add tea cup 1 and tea cup 2 beside it for the tea ceremony setup.
Step 25. Add Food and Offerings
Place the mochi dango plate on the table and the golden offering coins nearby. Add the golden offering box near the entrance in Dreamy Room Level 546.
Step 26. Position Musical Instruments
Drag the shamisen instrument to lean against the wall near the sitting area. Place the koto harp on the wooden deck for outdoor performances.
Step 27. Add Incense and Accessories
Position the incense burner on the table emitting gentle smoke. Add the pink pillow and blue flower cushion for comfort in Dreamy Room Level 546.
Step 28. Place Blue Daruma Doll
Add the blue daruma doll on the right side of the room near the shelf. This lucky charm should watch over the peaceful space.
Step 29. Position Parasols
Place the blue parasol on the deck area and the pink ground parasol on the rocks near the pond. These wagasa umbrellas add colorful accents in Dreamy Room Level 546.
Step 30. Plant Cherry Blossom Trees
Position cherry blossom tree 1 and cherry blossom tree 2 at the back corners of the scene. These magnificent sakura should frame the entire garden.
Step 31. Add Bamboo Plants
Place bamboo plant 1 and bamboo plant 2 on the right side of the garden. These tall green stalks should add vertical interest in Dreamy Room Level 546.
Step 32. Position Garden Bushes
Add green bush 1 and green bush 2 around the garden perimeter. Place pink tulip bush 1, pink tulip bush 2, pink tulip bush 3, and pink tulip bush 4 for colorful borders.
Step 33. Arrange Gray Rocks
Position gray rock 1, gray rock 2, and gray rock 3 around the pond edges and garden corners. These natural stones should create a zen garden atmosphere in Dreamy Room Level 546.
Step 34. Add Pond Life
Place koi fish 1, koi fish 2, and koi fish 3 swimming in the pond water. These colorful fish should bring life to the water feature.
Step 35. Position Lotus and Lily Pads
Add lotus flower 1, lotus flower 2, and lotus flower 3 floating on the pond. Place lily pad 1, lily pad 2, and lily pad 3 around them in Dreamy Room Level 546.
Step 36. Add Bonsai Tree
Position the bonsai tree on the upper balcony or shelf area. This miniature tree should complement the larger cherry blossoms.
Step 37. Place Cat Kimono Character
Drag the cat kimono character to sit on the deck near the tea service. This adorable cat in traditional dress should be the main resident of Dreamy Room Level 546.
Step 38. Add Frog Blue Robe Character
Position the frog blue robe character on the right side of the room near the daybed. This friendly frog companion enjoys tea time with the cat.
Step 39. Place Footwear and Details
Add the wooden geta sandals at the bottom of the stairs. Position the wind chime hanging from the eaves in Dreamy Room Level 546.
Step 40. Add Final Decorations
Place the roof flower decoration on the blue tile roof and scatter the falling cherry petals throughout the scene. Add stepping stones to complete this serene Japanese garden paradise.
Tips and Tricks
Common Mistakes
- The three blue tile roof sections require precise stacking; the main roof, secondary roof, and awning must be layered correctly to achieve the traditional Japanese architecture look in Dreamy Room Level 546.
- Players often confuse the placement of the multiple lantern types; yellow paper lanterns hang from ceilings, stone lanterns stand on ground, and wooden lanterns go near rocks.
- The koi fish and lotus flowers need to be placed specifically in the pond water area; positioning them on grass or rocks breaks the natural water garden effect.
- The red torii pillars must be placed at specific corners to properly support the awning structure; misaligned pillars create an unstable appearance.
- Small items like the geta sandals, wind chime, and offering box are easily overlooked; check the stairs area and eaves carefully.
Useful Strategies
- Start with the base structure (tatami, walls, grass, pond) before adding roofs to establish the room's foundation and garden layout properly.
- Complete all three roof sections together to visualize the multi-tiered architecture before adding interior furniture in Dreamy Room Level 546.
- When arranging the pond area, place water first, then rocks around edges, followed by lily pads, lotus flowers, and finally koi fish for proper layering.
- Group similar decorative elements together during placement; add all lanterns in one sequence, then all plants, then all garden rocks for efficient completion.
- The cherry blossom trees should be placed early as they frame the entire scene and help establish the visual boundary for all other elements.
- Save the two character placements for last; the cat and frog friends are easier to position once all furniture and tea service items define their activity zones in this peaceful Japanese retreat.