Dreamy Room Level 97
Level 97 guide walkthrough, helping players solve puzzles and explore the wonderful world of Dreamy Room.
Dreamy Room Level 97 Walkthrough Guide
Dreamy Room Level 97 Room Story
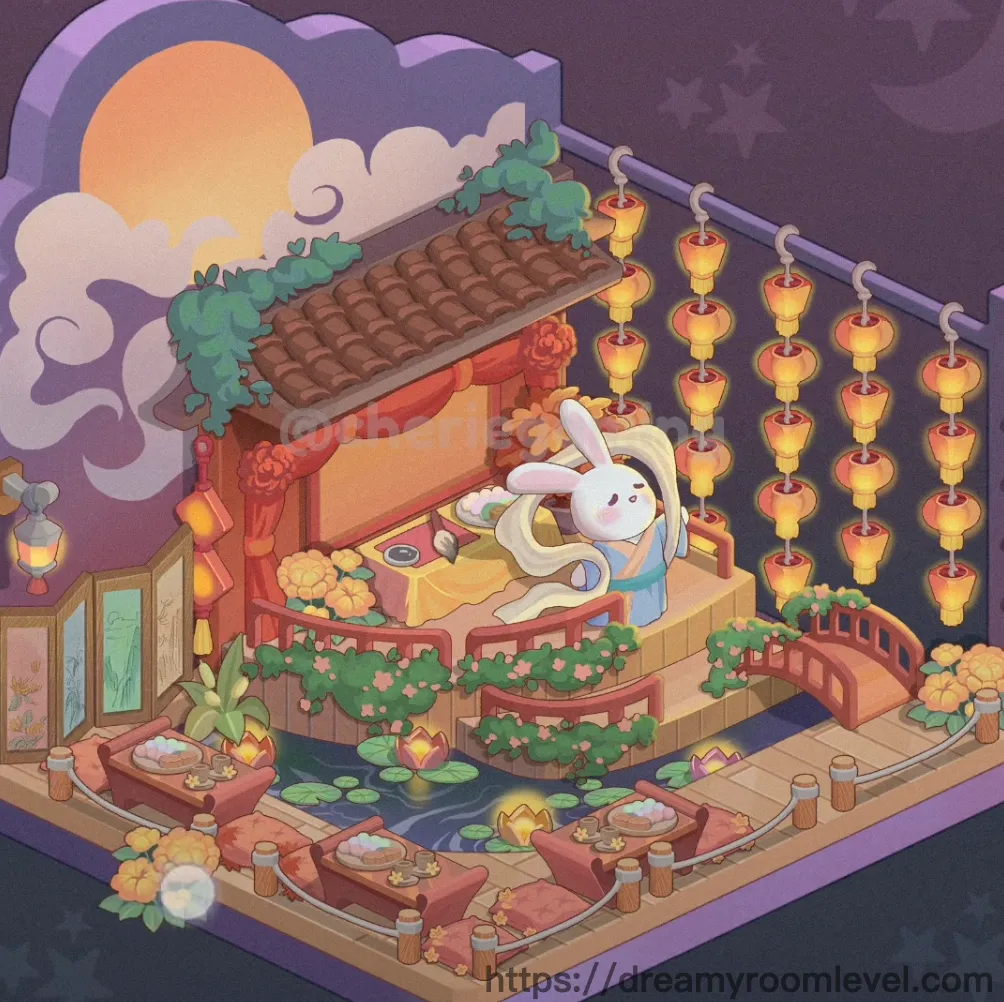
Under the harvest moon's gentle glow, a white rabbit prepares for the Mid-Autumn Festival in her enchanted garden pavilion. She carefully arranges mooncakes and tea, hanging red lanterns that dance in the evening breeze. The lotus pond reflects the purple twilight sky, while orange blossoms frame this magical celebration space. In Dreamy Room Level 97, every element tells a story of tradition, warmth, and the joy of gathering under autumn's first full moon.
Dreamy Room Level 97: Step-by-Step Placement Guide
Step 1. Build the Wooden Platform Base
Start by placing the wooden platform base as your foundation. This beige rectangular platform forms the ground level where all elements will rest. Ensure it's centered on the screen to provide balanced space for the garden layout.
Step 2. Add the Purple Cloud Backdrop
Position the purple cloud backdrop along the back wall. This curved purple wall with scalloped edges creates the dreamy atmosphere. Align it perfectly behind the platform to establish the vertical backdrop for Dreamy Room Level 97.
Step 3. Install Tile Flooring
Drag the tile flooring onto the wooden platform. These cream-colored square tiles cover the main walking area and surround the water feature. Position them to create a clean pathway around the central pond area.
Step 4. Construct the Wooden Pavilion Structure
Place the wooden pavilion structure at the center-back of the platform. This elevated wooden gazebo with railings serves as the focal architectural element. Position it slightly raised to create depth in Dreamy Room Level 97.
Step 5. Attach the Brown Tiled Roof
Mount the brown tiled roof on top of the pavilion structure. The terracotta-colored tiles should align perfectly with the wooden frame below. Ensure the roof edges extend slightly beyond the pillars for authentic architectural detail.
Step 6. Set Red Wooden Pillars
Install the red wooden pillars at the corners and sides of the pavilion. These coral-red support beams connect the roof to the platform. Position them vertically to properly support the roof structure according to Dreamy Room Level 97 design.
Step 7. Hang Yellow Lantern Strings
Attach three yellow lantern strings: place yellow lantern string left from the left roof edge, yellow lantern string center cascading down the middle, and yellow lantern string right extending from the right side. Each string features multiple glowing yellow-orange lanterns hanging vertically.
Step 8. Add Red Lantern Decorations
Place red lantern decorations along the pavilion's horizontal beams. These small red lanterns with tassels should hang from the roof corners and frame edges to enhance the festive atmosphere in Dreamy Room Level 97.
Step 9. Position the Wooden Bridge
Drag the wooden bridge to span across the water pond on the right side. This arched red-brown bridge connects the main platform to the elevated pavilion area. Align it carefully to ensure both ends touch solid ground.
Step 10. Install Bridge Railings
Attach bridge railings along both sides of the wooden bridge. These decorative red railings with vertical posts provide safety and visual appeal. They should follow the bridge's curved shape perfectly.
Step 11. Create the Water Pond
Place the water pond in the lower center-right area. This dark blue rectangular pool with gentle wave patterns becomes the garden's tranquil focal point. Position it adjacent to the bridge and surrounded by tiles.
Step 12. Float Lily Pads and Lotus Flowers
Add lily pads and water lotus flowers scattered across the pond surface. The green circular pads should float naturally with delicate pink lotus blooms rising above them, creating authentic water garden beauty in Dreamy Room Level 97.
Step 13. Arrange Pink Floor Cushions Around Tables
Position four pink cushions strategically: pink floor cushion large left beside the left table, pink floor cushion large right near the right table, pink floor cushion medium at the front-left corner, and pink floor cushion small in front. These coral-pink floor pillows provide seating around the tea area.
Step 14. Place Yellow Cushion on Pavilion
Set the yellow cushion on pavilion on the elevated wooden platform inside the gazebo structure. This golden cushion serves as a comfortable seat with a perfect view of the garden below.
Step 15. Add Pink Pillow with Flower
Position the pink pillow with flower on the pavilion platform beside the yellow cushion. This decorative pink pillow features an orange flower detail, adding comfort to the seating area in Dreamy Room Level 97.
Step 16. Set Low Wooden Tables
Place two tea tables: drag low wooden table left to the front-left area beside its cushion, and low wooden table right to the front-right position. These short reddish-brown tables sit low to the ground for traditional floor seating.
Step 17. Arrange Tea Sets on Tables
Place tea set on left table and tea set on right table accordingly. Each set includes wooden tea cups and a tea pot arranged neatly on their respective tables for the tea ceremony setup.
Step 18. Add Food Plates and Treats
Distribute food plates with dumpling dishes and moon cake across both tables. The traditional treats should be arranged invitingly, with mooncakes taking prominent positions to celebrate the festival theme in Dreamy Room Level 97.
Step 19. Plant Orange Tree Top Right
Position the orange tree top right in the upper right corner behind the pavilion roof. This small tree with orange tree flowers adds height and autumn color, with golden-orange blooms creating a warm backdrop.
Step 20. Add Yellow Flower Bush Top Left
Place the yellow flower bush top left in the upper left area near the backdrop edge. This cluster of golden yellow chrysanthemums provides visual balance to the orange tree on the opposite side.
Step 21. Drape Green Vine Plant on Roof
Attach the green vine plant on roof along the left side of the pavilion roof. This trailing ivy with lush green leaves should cascade naturally from the roof tiles, adding organic movement to the structure.
Step 22. Hang Green Hanging Plants
Position green hanging plants beneath the roof eaves and along the pavilion edges. These suspended leafy vines with small flowers create natural curtains that soften the architectural lines in Dreamy Room Level 97.
Step 23. Weave Pink Flowering Vines on Platform
Drape pink flowering vines on platform along the platform edges and bridge base. These climbing vines with delicate pink blossoms should wrap around railings and platform corners naturally.
Step 24. Set Potted Plant Bottom Left
Place the potted plant bottom left in the lower left foreground. This small container garden adds greenery at ground level and helps frame the scene's left boundary.
Step 25. Add Green Bushes with Pink Flowers
Position green bushes with pink flowers around the platform edges and near the water pond. These flowering shrubs with pink blooms should be scattered to create natural garden borders following Dreamy Room Level 97 aesthetics.
Step 26. Place Decorative Pink Rocks
Arrange decorative rocks pink around the pond edges and garden pathways. These coral-tinted stones provide natural landscaping accents and help define the water feature's perimeter.
Step 27. Add Wooden Barrel Accessories
Position wooden barrel accessories near the platform corners and beside the pavilion steps. These small wooden containers serve as rustic decorative elements and plant holders.
Step 28. Install Lantern Pole Stand
Place the lantern pole stand on the left side of the lower platform area. This vertical post with a hanging lantern provides additional lighting and marks the garden's entrance in Dreamy Room Level 97.
Step 29. Add Small Wooden Fence Sections
Install small wooden fence sections along platform edges where needed. These low wooden barriers help define boundaries and prevent items from visually falling off the platform.
Step 30. Frame Pavilion Window
Attach the pavilion window frame to the back wall of the gazebo structure. This wooden window opening allows visual depth and connects the interior space to the backdrop scenery.
Step 31. Install Door with Green Panels
Position the door with green panels on the left side of the lower level. This traditional entrance features jade-green decorative panels and serves as the garden's main access point.
Step 32. Add Roof Decorative Trim Red
Attach roof decorative trim red along the roof edges and pavilion corners. This ornamental red trim with carved patterns adds authentic architectural detail to complete the traditional design in Dreamy Room Level 97.
Step 33. Place Orange Peony Decoration on Roof
Mount the orange peony decoration on roof at the pavilion's front roof peak. This large orange flower ornament serves as a crowning decorative element and festival symbol.
Step 34. Position White Rabbit Character
Place the rabbit character white on the elevated pavilion platform. This adorable white bunny with rabbit blue clothing wears a traditional blue outfit and sits comfortably in the gazebo's center.
Step 35. Add Rabbit Carrying Basket
Attach the rabbit carrying basket to the rabbit character's hands or nearby. This woven basket contains mooncakes in basket, showing the rabbit's festival preparations in Dreamy Room Level 97.
Step 36. Set the Setting Sun Backdrop
Add the setting sun backdrop behind the purple clouds in the upper portion of the scene. This warm orange-gold circle creates the harvest moon effect and establishes the evening timeframe.
Step 37. Layer White Clouds
Position white clouds around the setting sun in the sky area. These fluffy white cloud formations should partially frame the moon, creating atmospheric depth in the twilight sky.
Step 38. Add Purple Mountain Silhouette
Place the purple mountain silhouette along the horizon line behind the pavilion. These distant mountain shapes in deep purple tones create layered depth and establish the landscape setting.
Step 39. Scatter Star Decorations in Sky
Add star decorations in sky throughout the purple evening sky. These small twinkling stars should be scattered naturally across the upper backdrop to enhance the magical nighttime atmosphere of Dreamy Room Level 97.
Step 40. Lay Stone Pathway and Platform Trim
Finally, position the stone pathway leading to the pavilion entrance, and add wooden platform edge trim around the base perimeter. The game gift box pink purple may appear as a reward element in the corner. These finishing touches complete the polished garden scene.
Tips and Tricks
Common Mistakes to Avoid
- Players often miss placing the small decorative rocks around the pond edges, leaving gaps in the natural landscaping that makes the water feature look incomplete
- The hanging lantern strings must be positioned in the correct order from left to right, or they'll block placement of the roof decorations and create visual clutter
- Don't forget the small wooden fence sections along the platform edges - they're easy to overlook but essential for completing Dreamy Room Level 97's polished look
- The flowering vines need to be placed before larger furniture pieces, otherwise they become hidden behind cushions and tables, making them impossible to position correctly
- Watch for the bridge railings alignment - if placed at wrong angles, they won't attach properly to the curved bridge structure and will snap back to inventory
Pro Placement Strategies
- Start with the largest structural elements (platform, backdrop, pavilion) before adding smaller decorations - this prevents items from blocking access to key placement zones
- When arranging the three lantern strings, drag them from top to bottom in a smooth arc motion to trigger the natural hanging animation and proper attachment points
- For the densely decorated pond area with lily pads, lotus flowers, and rocks, zoom in slightly and place items from back to front to avoid overlapping errors
- The tea ceremony setup requires precise alignment - place tables first, then cushions at exact angles beside them, finally add tea sets to trigger the proper "seated dining" arrangement
- Use the rabbit character as your final centerpiece - position it last so you can adjust its exact angle to face the mooncake displays and create the perfect storytelling moment in Dreamy Room Level 97
- The purple mountain backdrop has specific "snap points" - drag it slowly along the horizon until you feel the magnetic pull that indicates correct placement depth