Dreamy Room Level 92
Level 92 guide walkthrough, helping players solve puzzles and explore the wonderful world of Dreamy Room.
Dreamy Room Level 92 Walkthrough Guide
Dreamy Room Level 92 Room Story
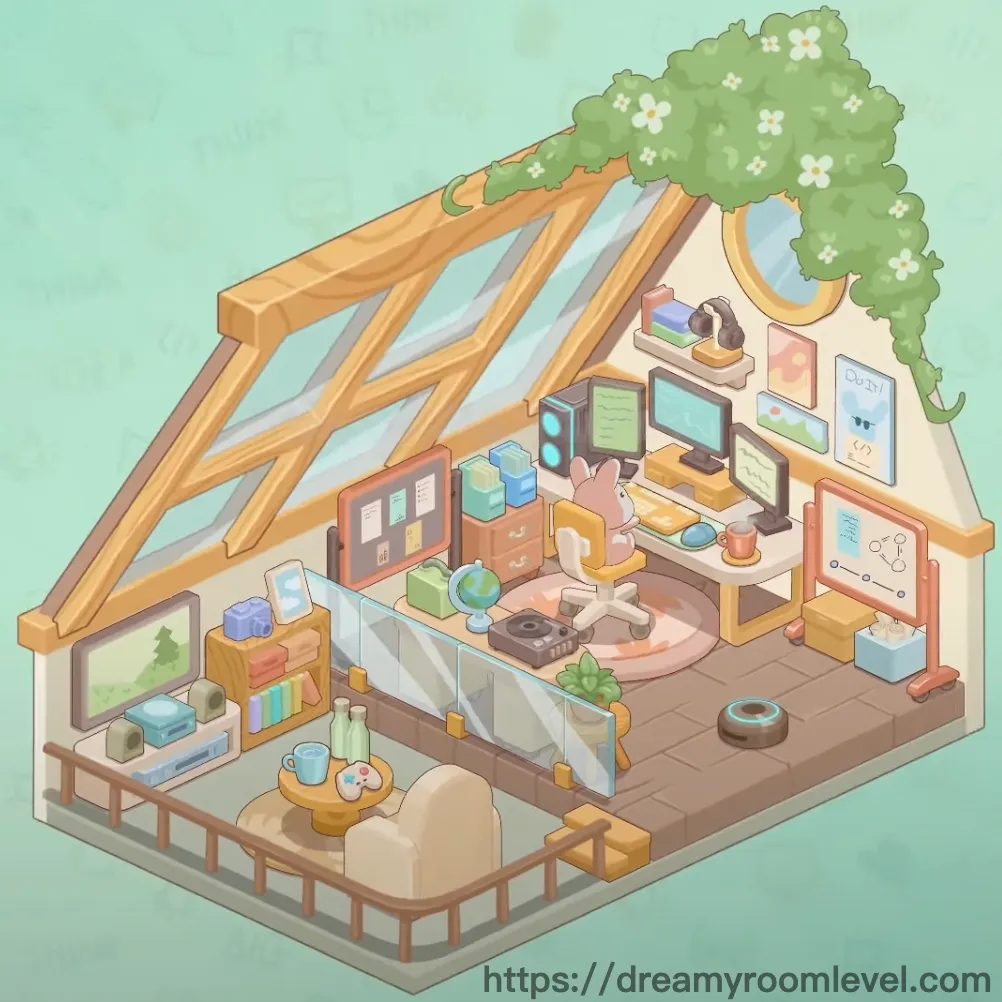
In this cozy attic workspace, a creative freelancer has built their dream studio. Sunlight streams through the window, illuminating the pink character seated at their multi-monitor setup, surrounded by colorful building blocks and cherished collectibles. The space perfectly balances productivity with personality, featuring a vintage record player, globe for travel inspiration, and a comfortable sofa for brainstorming breaks. This Dreamy Room Level 92 sanctuary showcases how passion and creativity can transform an attic into a vibrant working haven where imagination flows freely.
Dreamy Room Level 92: Step-by-Step Placement Guide
Step 1. Install Wooden Roof Beams and Ceiling Lamp Area
Begin Dreamy Room Level 92 by establishing the attic structure. Position the wooden roof beams diagonally across the upper portion, creating the characteristic A-frame ceiling. Place the ceiling lamp area at the peak where the beams meet, ensuring proper lighting for the workspace below.
Step 2. Set Up Cream Colored Walls and Gray Floor Tiles
Establish the room boundaries in Dreamy Room Level 92 by placing the cream colored walls on both sides of the attic space. Install the gray floor tiles to cover the entire floor area, creating a modern industrial foundation for the studio.
Step 3. Position Window Frame with Tree Outside
Install the window frame on the right wall near the roof beams. Place the tree outside the window with white flowers on tree and green vine on tree wrapping around it, creating a natural view that brings life to this Dreamy Room Level 92 workspace.
Step 4. Install Glass Railing at Front Edge
Position the glass railing along the front edge of the attic floor where it meets the lower level. This safety feature should span the entire width, providing both protection and a modern aesthetic touch.
Step 5. Place Wooden Work Desk in Center
Position the wooden work desk in the central area of the attic, slightly toward the back. This L-shaped desk should face the window, creating an optimal workspace setup that's essential for Dreamy Room Level 92 completion.
Step 6. Set Yellow Office Chair at Desk
Slide the yellow office chair into position at the desk, facing the monitors. The chair should be centered at the desk's main working surface, ready for the character to use.
Step 7. Seat Pink Character on Chair
Place the pink character on the yellow office chair. Position them facing the desk and monitors, as if actively working at their Dreamy Room Level 92 creative station.
Step 8. Arrange Computer Monitors on Desk
Set up the multi-monitor display by placing the computer monitor green screen on the left side of the desk on a monitor stand. Position the computer monitor blue screen in the center. Place the computer monitor yellow frame on the right side. Add the computer monitor red frame at an angle on the desk surface, creating an efficient multi-screen setup.
Step 9. Add Mouse Pad and Coffee Mug to Desk
Place the mouse pad on the desk surface near the keyboard area. Position the coffee mug on desk within easy reach, completing the active workspace setup for Dreamy Room Level 92.
Step 10. Position Books Stack and Desk Organizer
Stack the books stack on desk on the left corner of the workspace. Place the desk organizer nearby to keep supplies tidy, maintaining an organized creative environment.
Step 11. Place Orange Drawer Cabinet Next to Desk
Position the orange drawer cabinet directly adjacent to the work desk on the left side. This storage unit provides essential organization for this Dreamy Room Level 92 studio space.
Step 12. Set Globe and Record Player on Cabinet
Place the globe on the lower shelf of the orange cabinet, representing travel inspiration. Position the record player on a surface nearby, adding vintage charm to the creative workspace.
Step 13. Position Beige Sofa at Front Area
Place the beige sofa in the front-left area near the glass railing. This comfortable seating provides a relaxation zone for brainstorming sessions in Dreamy Room Level 92.
Step 14. Add Small Round Coffee Table with Coffee Mug
Position the small round coffee table in front of the sofa. Place the coffee mug on table on its surface, creating a cozy break area.
Step 15. Place Yellow Round Stool Near Center
Position the yellow round stool between the work area and the relaxation zone. This versatile seating adds a pop of color to the Dreamy Room Level 92 layout.
Step 16. Add Potted Plant on Stool
Place the potted plant on top of the yellow round stool, bringing natural greenery into the workspace and improving the room's atmosphere.
Step 17. Position Robot Vacuum Cleaner on Floor
Place the robot vacuum cleaner on the floor near the center area. This smart device keeps the studio clean automatically, essential for maintaining this Dreamy Room Level 92 workspace.
Step 18. Set Cardboard Box on Floor
Position the cardboard box floor near the right side of the room, suggesting either recent delivery or storage needs in this active creative space.
Step 19. Install Wall Bookshelf with Books
Mount the wall bookshelf on the left wall area. Fill it with books in bookshelf, creating both storage and visual interest for Dreamy Room Level 92.
Step 20. Add Colorful Blocks to Shelf
Arrange the colorful blocks on shelf within the bookshelf, mixing them with the books to add playful decoration and creative inspiration.
Step 21. Place Blue Building Blocks on Cabinet
Position the blue building blocks on top of the orange drawer cabinet. Stack them in an interesting configuration to add visual appeal.
Step 22. Add Green and Cyan Building Blocks
Place the green building blocks next to the blue blocks on the cabinet. Position the cyan building blocks nearby, creating a colorful collection that showcases the creative nature of this Dreamy Room Level 92 studio.
Step 23. Install Wall Shelf with Items
Mount the wall shelf with items on the upper right wall area near the window. Arrange the items on wall shelf including small decorative pieces and collectibles.
Step 24. Hang Pink Wall Poster
Attach the pink wall poster to the right wall near the desk area. This decorative element adds personality to the Dreamy Room Level 92 workspace.
Step 25. Mount Do It Wall Poster
Hang the do it wall poster on the wall, positioned to inspire productivity. The motivational message perfectly fits this creative studio environment.
Step 26. Display Diagram Wall Poster
Position the diagram wall poster on the right wall area. This technical or conceptual poster adds an intellectual touch to the workspace.
Step 27. Hang Picture Frame
Mount the picture frame on the wall near other decorative elements, adding a personal touch to this Dreamy Room Level 92 creative sanctuary.
Step 28. Place Pink Bag on Beam
Position the pink bag on beam on the left wooden roof beam. Drape it naturally over the beam's edge for authentic storage.
Step 29. Stack Blue Book on Beam
Place the blue book on beam on the same left beam near the pink bag. Add the book on beam next to it, creating a casual reading stack in this Dreamy Room Level 92 attic.
Step 30. Position Orange Box on Beam
Place the orange box on beam on the center or right wooden beam. This storage box should sit securely on the beam's flat surface.
Step 31. Add Stuffed Toy on Beam
Position the stuffed toy on beam near the orange box, adding whimsical decoration to the upper space of this Dreamy Room Level 92 studio.
Step 32. Place Yellow Box on Beam
Set the yellow box on beam on the right beam area, providing additional overhead storage while maintaining the colorful aesthetic.
Step 33. Arrange Decorative Items on Beam
Scatter the remaining decorative items on beam across the wooden beams, creating visual interest at different heights throughout the attic space.
Step 34. Hang Game Controller from Beam
Suspend the hanging game controller from the center beam using its cable. This playful element dangles above the workspace, showcasing the owner's gaming interests in this Dreamy Room Level 92 setup.
Tips and Warnings
Important Notes
- The wooden roof beams items are easily overlooked but essential for Dreamy Room Level 92 completion - check all beam surfaces carefully for pink bags, books, boxes, and decorative items
- Multiple monitors can overlap during placement - position the monitor stands carefully to avoid collision issues
- The glass railing must be placed before adding items near the front edge, or they may fall through
- Small building blocks on the cabinet top can be hidden by larger items if placed in wrong order
- Wall posters and shelves have specific mounting points - drag them to the wall's edge until they snap into position
Useful Tips
- For cramped desk space, place monitors from left to right to avoid repositioning in Dreamy Room Level 92
- Beam items don't have magnetic snap points - angle your drag upward and release when items hover over the beam
- Identify correct monitor by frame color before placing to prevent confusion with similar screens
- The yellow stool with plant combo prevents the vacuum cleaner from getting stuck - place it away from corners
- Group similar items like building blocks together first, then distribute them to save placement time
- Use the window tree as a landmark to orient yourself when placing right-side wall decorations in this Dreamy Room Level 92 challenge
- Coffee mugs on desk versus table are easily mixed up - check the mug's placement destination carefully