Dreamy Room Level 119
Level 119 guide walkthrough, helping players solve puzzles and explore the wonderful world of Dreamy Room.
Dreamy Room Level 119 Walkthrough Guide
Dreamy Room Level 119 Room Story
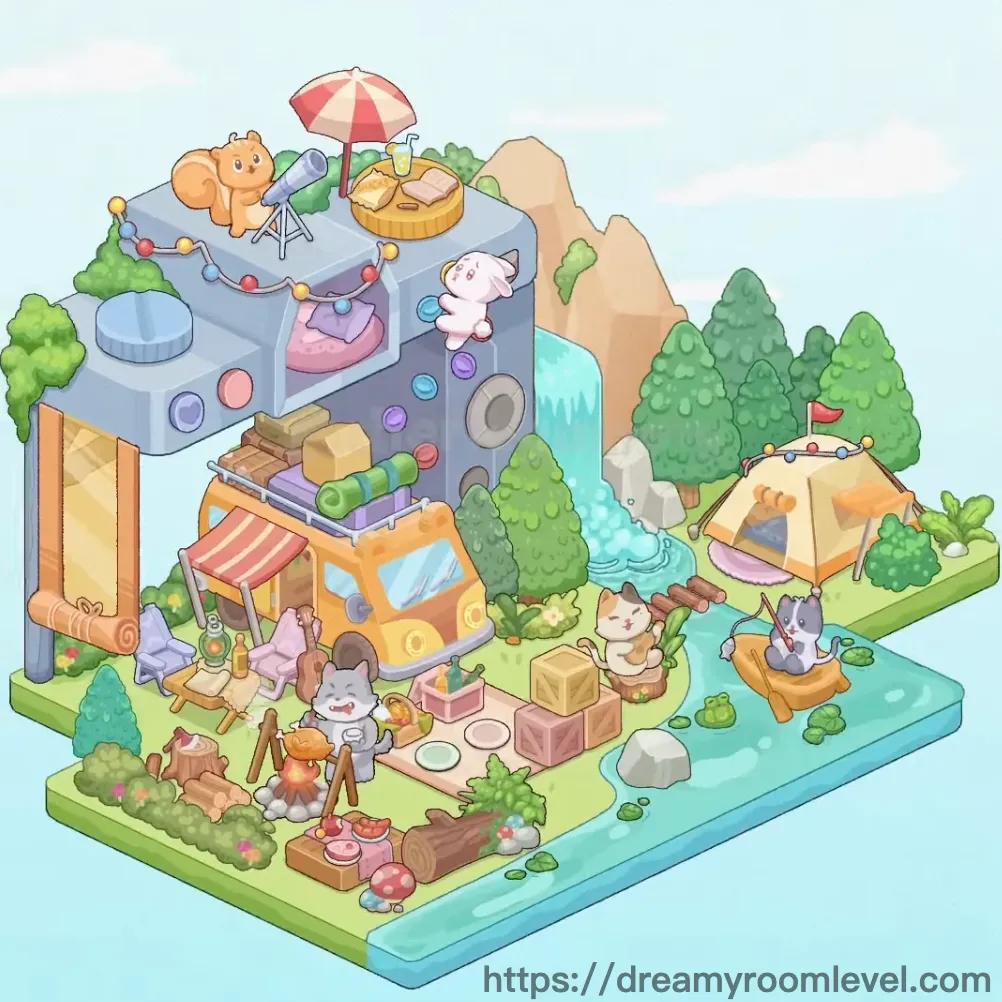
Under the cascading waterfall and towering peaks, a cozy camping retreat comes to life in Dreamy Room Level 119. A cheerful yellow bus transforms into a mobile home, where colorful animal friends gather for an outdoor adventure. String lights twinkle above the campsite while the gentle sound of water creates a peaceful melody. This mountain paradise becomes a perfect escape where nature meets comfort, and every creature finds their special spot by the riverside camp.
Dreamy Room Level 119: Step-by-Step Placement Guide
Step 1. Position the Mountain and Waterfall
Place the mountain formation at the back-center of the scene, ensuring the waterfall flows naturally from the cliff edge. The waterfall should cascade down into the river below, creating the focal point backdrop for this Dreamy Room Level 119 camping scene.
Step 2. Establish the River and Grass Platform
Position the river flowing from the waterfall pool toward the bottom-right corner of the scene. Place the grass platform on both sides of the river, creating the main ground level where all camping elements will be arranged in Dreamy Room Level 119.
Step 3. Plant Tall Trees and Bushes
Arrange tall trees on the right side near the waterfall and scattered around the grass areas. Add bushes in various spots across the platform, including some on the mountain slopes, to create natural greenery throughout the camping site.
Step 4. Add Rocks and Stones
Place larger rocks near the waterfall base and along the riverbank. Scatter smaller stones throughout the grass platform and in the river water, creating natural terrain details that enhance the outdoor atmosphere.
Step 5. Park the Yellow Bus in Dreamy Room Level 119
Position the yellow bus on the left side of the grass platform, facing slightly toward the viewer. This mobile home serves as the central structure and should be placed prominently in the mid-ground area, ensuring all sides are accessible.
Step 6. Construct the Grey Building
Attach the grey building directly on top of the yellow bus, creating a two-story camping structure. The building should align perfectly with the bus base and include the viewing window displaying the pink mask inside.
Step 7. Install the Pink Mask and Telescope
Place the pink mask inside the grey building's front window, visible through the glass. Position the telescope on the rooftop's left rear corner, angled upward for stargazing in this Dreamy Room Level 119 setup.
Step 8. Place the Gold Coin
Set the gold coin on the rooftop's right side, centered and lying flat. This collectible sits prominently on top of the grey building as a reward element.
Step 9. Install Control Buttons
Arrange the , , , and on the grey building's front panel in a diagonal pattern. These colorful controls should be evenly spaced across the facade for Dreamy Room Level 119 interactive elements.
Step 10. Mount the Speaker
Attach the speaker to the grey building's right side wall, positioned near the middle height. The circular speaker faces outward to broadcast music across the camping area.
Step 11. Arrange Bedding on the Bus Roof
Place the green sleeping bag rolled up on the yellow bus's roof rack. Add the purple pillow and orange pillow beside it, creating a cozy sleeping setup in this Dreamy Room Level 119 outdoor bedroom.
Step 12. Set Up Camping Table and Chair
Position the camping table on the ground to the left of the bus, near the camping area. Place the chair beside it, creating a dining spot where campers can enjoy meals.
Step 13. Build the Campfire in Dreamy Room Level 119
Create the campfire on the grass in front-left of the bus, with logs arranged in a tepee formation. Add the sparkle effect above the flames to show active burning and warmth.
Step 14. Lay the Picnic Blanket
Spread the picnic blanket on the grass platform near the center-right area, between the bus and the river. This creates a comfortable sitting area for the animal friends.
Step 15. Place the Treasure Chest
Set the treasure chest on the picnic blanket, positioned slightly off-center. The chest should be closed and ready to be discovered in Dreamy Room Level 119.
Step 16. Stack Logs and Add Wooden Board
Arrange logs in small piles around the campfire area and near the bottom-left corner. Place the wooden board flat on the grass near the lower area, serving as a food preparation surface.
Step 17. Prepare the Meat
Position the meat on the wooden board in two pieces, ready for cooking. The meat should appear fresh and displayed prominently on this makeshift cutting board.
Step 18. Welcome the Pink Pig
Place the pink pig on the grey building's rooftop, positioned near the edge on the right side. This cheerful character appears to be enjoying the view from this elevated position in Dreamy Room Level 119.
Step 19. Position the Orange Squirrel
Set the orange squirrel on the grey building's front face, climbing or sitting on the structure's middle section. The squirrel adds playful energy to the camping scene.
Step 20. Place the White Cat
Position the white cat on the grass near the picnic area, sitting beside a food box. This curious feline should face toward the camping activities.
Step 21. Add the Grey Cat in Dreamy Room Level 119
Set the grey cat in the front-left camping area, near the logs and campfire setup. This cat appears to be helping with camp preparations.
Step 22. Position the Purple Penguin
Place the purple penguin on the riverbank or in the shallow water at the bottom-right area. This playful character enjoys the cool water near the camping spot.
Step 23. Add the Duck
Position the duck in the campfire area or near the left side of the setup, participating in the camping activities with other animal friends in Dreamy Room Level 119.
Step 24. Set Up the Tent
Pitch the tent on the grass platform to the right of the bus, near the river area. The tent should be fully erected with its entrance visible and flag mounted on top, creating additional shelter.
Step 25. Install the Umbrella
Open the umbrella on the grey building's rooftop beside the gold coin. This red and white striped parasol provides shade and decorative flair to the upper camping level.
Step 26. Hang String Lights
Drape string lights across the grey building's rooftop and around the upper structure. The colorful bulbs should create a festive atmosphere, connecting different parts of this Dreamy Room Level 119 camping setup.
Step 27. Add the Drink Cup
Place the drink cup on the rooftop lounge area near the umbrella, positioned as a refreshment for the rooftop relaxation spot.
Step 28. Set Up the Shop Stand
Position the shop stand on the grass platform in the left-front area, creating a small market stall with its distinctive red and white striped awning for trading goods.
Step 29. Launch the Wooden Boat
Float the wooden boat in the river near the bottom-right section, appearing ready for water adventures. The boat should sit naturally in the water flow.
Step 30. Place the Fishing Rod in Dreamy Room Level 119
Position the fishing rod either in the boat or on the riverbank, extending toward the water. This tool completes the fishing setup for catching river fish.
Step 31. Grow Mushrooms
Plant mushrooms in clusters on the grass platform, particularly near the bottom-left corner and around tree bases. These add natural foraging elements to the scene.
Step 32. Add Flowers
Scatter flowers across the grass platform in small colorful patches, particularly in the front-left area and near the tent. These blooms brighten the camping environment.
Step 33. Place Food Boxes
Set food boxes near the white cat and around the picnic area. These storage containers hold camping supplies and provisions for the adventure.
Step 34. Arrange Plates
Position plates on the camping table and near the picnic blanket. The circular dishes should be ready for serving meals to all the camping friends.
Step 35. Slice the Watermelon
Place watermelon slices on the wooden board near the meat, showing fresh fruit ready to eat. The bright red fruit adds color to the food preparation area.
Step 36. Stack Crates
Arrange crates near the picnic blanket and around the camping area. These wooden boxes serve as storage and seating throughout the Dreamy Room Level 119 campsite.
Step 37. Build the Fence
Construct the fence sections around the perimeter of the camping area, particularly near the shop stand and tent. These barriers define the camping boundaries and add structure to the layout.
Tips and Tricks
Common Mistakes
- The pink mask inside the grey building window is easy to overlook—ensure it's visible through the glass panel before moving to other elements
- Multiple animal characters need precise positioning to avoid overlap; place larger animals first, then fit smaller ones around them
- The wooden boat in the river requires careful alignment with the water flow direction to appear natural
- String lights must connect properly between attachment points on the rooftop to create the continuous lighting effect
- Food items on the wooden board (meat and watermelon) can shift if not placed flat on the surface
Placement Strategies
- Start with the mountain and waterfall backdrop to establish depth, then work forward placing the bus and building before adding smaller details
- When arranging the four colored buttons on the grey building, use the diagonal pattern from upper-left to lower-right for proper spacing
- Position rooftop elements (umbrella, pig, telescope) by working from back to front to avoid accidentally moving already-placed items
- For riverside elements like stones and the boat, place items slightly overlapping the water edge for realistic integration in Dreamy Room Level 119
- Group similar small items together in one motion when possible—place all logs in the same area before moving to flowers and mushrooms
- The camping table and chair should be positioned with enough space between them for character access, approximately one character-width apart