Dreamy Room Level 77
Level 77 guide walkthrough, helping players solve puzzles and explore the wonderful world of Dreamy Room.
Dreamy Room Level 77 Walkthrough Guide
Dreamy Room Level 77 Room Story
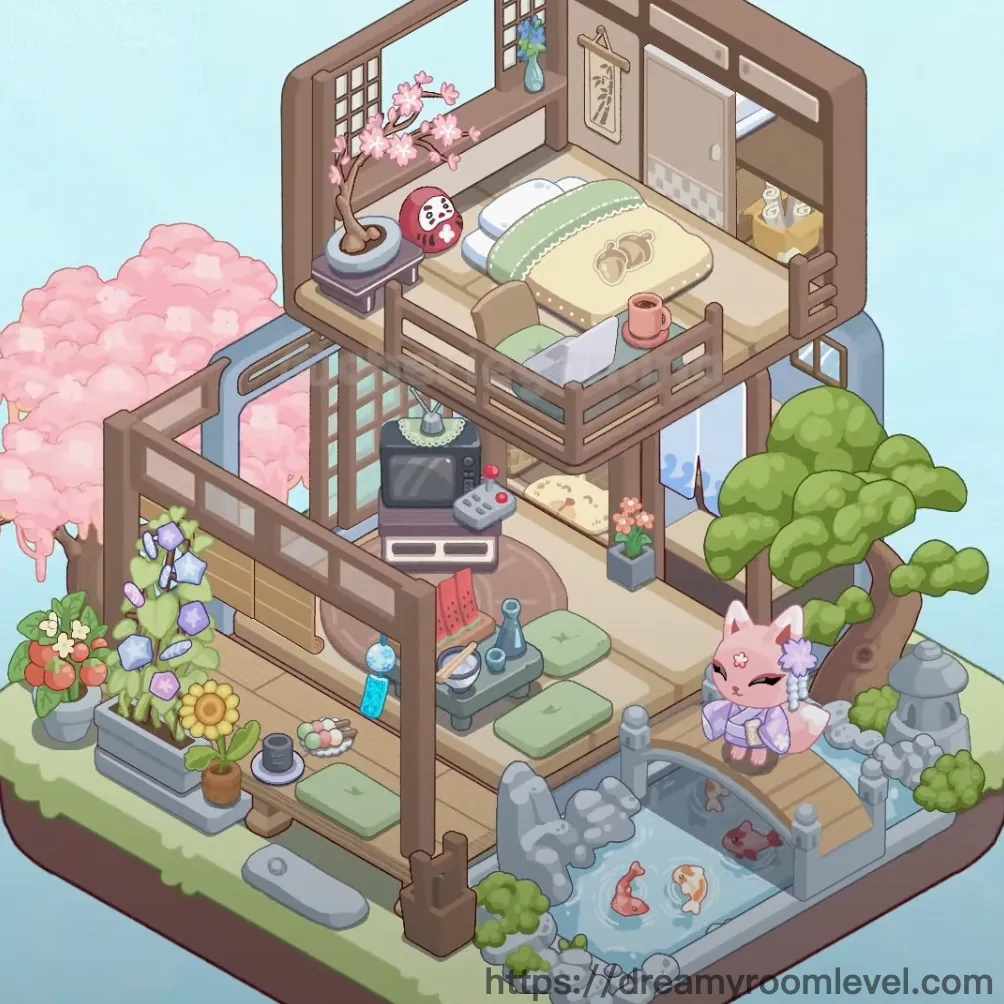
In a tranquil corner of the city, this traditional Japanese-style dwelling tells the story of harmony between modern comfort and ancient aesthetics. The owner, a tea ceremony master, designed this two-story sanctuary where pink cherry blossoms frame the upper bedroom while a serene koi pond graces the lower garden. Every morning, sunlight filters through grid windows, awakening the space where tradition meets peaceful daily living. This Dreamy Room Level 77 sanctuary reflects a lifestyle of balance and beauty.
Dreamy Room Level 77: Step-by-Step Placement Guide
Step 1. Install the Wooden Frame Foundation
Begin Dreamy Room Level 77 by dragging the wooden frame to form the outer boundaries of the two-story structure. Position it to create a stable base that will support all interior elements. The frame should align with the visible edges of the building, establishing the main architectural outline.
Step 2. Lay Down the Wooden Floor Base
Place the wooden floor panels across both levels of the structure. Start from the upper bedroom area and extend down to the lower living space, ensuring complete coverage. The flooring creates a warm foundation for all furniture placements in Dreamy Room Level 77.
Step 3. Position Wooden Pillars and Support Beams
Install the wooden pillars at key structural points, particularly at corners and room divisions. Add support beams horizontally between pillars to reinforce the structure. These elements are crucial for Dreamy Room Level 77's architectural integrity and should align with the ceiling beam placement above.
Step 4. Set Up the Roof Structure and Wall Panels in Dreamy Room Level 77
Position the roof structure to cap the building, ensuring proper alignment with the pillars. Install wall panels along the interior walls of both levels, creating defined room spaces with traditional aesthetic appeal.
Step 5. Install Grid Windows and Window Frames
Place the grid windows in the upper bedroom area's left wall and lower level's back wall. Add window frames around each opening. These windows allow natural light to illuminate the space and provide views of the surrounding garden in Dreamy Room Level 77.
Step 6. Add the Sliding Door and Room Divider
Position the sliding door on the upper level's right side, creating an entrance to the bedroom. Place the room divider strategically to separate functional areas while maintaining the open flow characteristic of Dreamy Room Level 77 design.
Step 7. Install Wooden Railings and Balcony Floor
Drag the wooden railings along the edges of the upper bedroom's balcony opening, creating a safe barrier. Place the balcony floor planks to extend the upper level's usable space overlooking the lower garden area in Dreamy Room Level 77.
Step 8. Position the Large Bed in Dreamy Room Level 77
Place the bed in the upper bedroom's center-right area, angled slightly toward the windows for optimal natural light. This becomes the focal point of the sleeping area and sets the foundation for adding bedding accessories.
Step 9. Add Green Bedding and Pillow
Drape the green bedding over the bed, ensuring it covers the mattress completely with neat edges. Position the pillow at the bed's head, creating an inviting rest space. The green color palette enhances Dreamy Room Level 77's natural aesthetic.
Step 10. Place the Daruma Doll and Scroll Hanging
Set the daruma doll on the small elevated table near the cherry blossom tree in the upper bedroom. Hang the scroll hanging on the wall behind the bed, adding traditional Japanese cultural elements to Dreamy Room Level 77.
Step 11. Install Paper Lantern in Dreamy Room Level 77
Suspend the paper lantern from the ceiling beam in the upper bedroom area. Position it centrally to provide ambient lighting and enhance the traditional atmosphere of the sleeping quarters.
Step 12. Set Up the Cherry Blossom Tree and Flower Vase
Position the cherry blossom tree in the upper left corner of the bedroom balcony, with its pink blooms gracefully extending over the railing. Place the flower vase on the small table beside it, creating a harmonious botanical display in Dreamy Room Level 77.
Step 13. Add Pink Cherry Tree and Green Foliage Tree
Plant the pink cherry tree on the left side of the lower garden area, near the entrance. Position the green foliage tree on the right side, creating a balanced natural frame. These trees define Dreamy Room Level 77's garden boundaries.
Step 14. Create the Koi Pond Area in Dreamy Room Level 77
Excavate and place the koi pond in the lower right section of the garden floor. This water feature becomes a central element, requiring careful positioning before adding decorative elements around it.
Step 15. Add Koi Fish to the Pond
Release the koi fish into the pond water. Multiple fish should be placed swimming in different directions, creating a lively aquatic scene. The orange and white koi add vibrant colors to Dreamy Room Level 77's garden.
Step 16. Arrange Decorative Rocks and Garden Stones
Scatter decorative rocks around the koi pond's edges, creating a natural shoreline effect. Add garden stones throughout the lower garden area. Place decorative pebbles in clusters for texture variation in Dreamy Room Level 77.
Step 17. Install Stepping Stones and Wooden Stairs in Dreamy Room Level 77
Position stepping stones leading from the garden entrance toward the pond area, creating a pathway. Install the wooden stairs connecting the lower and upper levels, ensuring proper alignment with both floor levels.
Step 18. Place the TV Screen and Game Controller
Mount the TV screen on the lower level's interior wall, at eye level when seated. Position the game controller on the small table nearby, creating an entertainment zone within Dreamy Room Level 77.
Step 19. Set Up Small Table and Wooden Bench in Dreamy Room Level 77
Place the small table in the lower level's center area, serving as a tea ceremony surface. Position the wooden bench along the garden's edge, providing seating with a pond view.
Step 20. Arrange Floor Cushions and Green Cushions
Distribute floor cushions around the small table in traditional Japanese seating arrangement. Add green cushions for color coordination and comfort, creating an authentic tea ceremony space in Dreamy Room Level 77.
Step 21. Place Tea Set Components in Dreamy Room Level 77
Arrange the complete tea set on the small table's surface. Position the teapot centrally, surrounded by tea cups for guests. Place an additional tea cup on the upper bedroom's small table.
Step 22. Add Decorative Rug and Tatami Mat
Lay the decorative rug beneath the tea ceremony table to define the sitting area. Position the tatami mat in the upper bedroom near the bed, adding traditional Japanese flooring texture to Dreamy Room Level 77.
Step 23. Position Water Bottle and Food Items in Dreamy Room Level 77
Place the water bottle on the lower level near the cushions for refreshment access. Arrange food items and a watermelon slice on the small dining area for a homey touch.
Step 24. Install Wooden Fence Sections
Position wooden fence segments along the garden's perimeter at ground level, creating boundaries while maintaining the open aesthetic. The fence should complement Dreamy Room Level 77's traditional architectural style.
Step 25. Add Bonsai Pot and Wooden Box
Place the bonsai pot on the upper bedroom's small table beside the daruma doll, showcasing miniature tree cultivation. Position the wooden box near the bed for storage in Dreamy Room Level 77.
Step 26. Arrange Multiple Flower Pots in Dreamy Room Level 77
Distribute flower pots throughout the garden area, placing them near the fence, by the entrance, and along the walkway. These containers add bursts of color and vertical garden interest.
Step 27. Plant Sunflower in the Garden
Position the sunflower in its pot on the lower left side of the garden, its bright yellow petals adding cheerful contrast to the pink cherry blossoms in Dreamy Room Level 77.
Step 28. Add Purple Flowers and Morning Glory
Plant purple flowers in pots along the lower garden edge and near the entrance area. Position morning glory vines near the wooden fence, allowing them to climb naturally in Dreamy Room Level 77.
Step 29. Place Succulent Plants in Dreamy Room Level 77
Scatter succulent plants in small containers near the building entrance and along the wooden bench area, adding low-maintenance greenery that complements the garden's aesthetic.
Step 30. Add Pink Cat Character
Position the pink cat character on the lower level near the koi pond, creating a whimsical guardian presence. This character adds personality and charm to Dreamy Room Level 77's garden scene.
Step 31. Install Stars Decoration and Pink Clouds in Dreamy Room Level 77
Suspend the stars decoration from the upper right exterior area, creating a dreamy celestial accent. Add pink clouds floating near the cherry blossom tree for magical atmosphere enhancement.
Step 32. Position Green Trees Decoration
Place green trees in the background beyond the garden fence, creating depth and a sense of surrounding forest in Dreamy Room Level 77's environment.
Tips and Common Mistakes
Common Mistakes
- Players often overlook the decorative pebbles around the koi pond, leaving gaps in the natural shoreline design that affects Dreamy Room Level 77's completion
- The stepping stones path can be misaligned if not placed in proper sequence from entrance to pond area
- Grid windows frequently get positioned incorrectly when players confuse upper and lower level window placements
- The wooden stairs connection point between floors requires precise alignment, or items won't snap properly into place
- Small items like tea cups and the wooden box are easily hidden behind larger furniture, causing players to miss them during final checks in Dreamy Room Level 77
Useful Techniques
- Begin with the koi pond placement first on the lower level, as this large element determines the positioning of surrounding garden stones and decorative rocks
- When arranging floor cushions around the tea table, place them at equal distances in a circular pattern to achieve the traditional symmetrical seating arrangement
- The cherry blossom tree should be positioned before the upper railing to ensure its branches drape naturally over the balcony edge
- Use the "zoom out" view to verify that flower pots are evenly distributed throughout the garden rather than clustered in one area
- Place the pink cat character last among garden elements, as it tends to overlap with pond decorations and requires careful angle adjustment
- Master Dreamy Room Level 77 by completing structural elements before adding decorative items, ensuring a stable foundation for detailed placement work