Dreamy Room Level 64
Level 64 guide walkthrough, helping players solve puzzles and explore the wonderful world of Dreamy Room.
Dreamy Room Level 64 Walkthrough Guide
Dreamy Room Level 64 Room Story
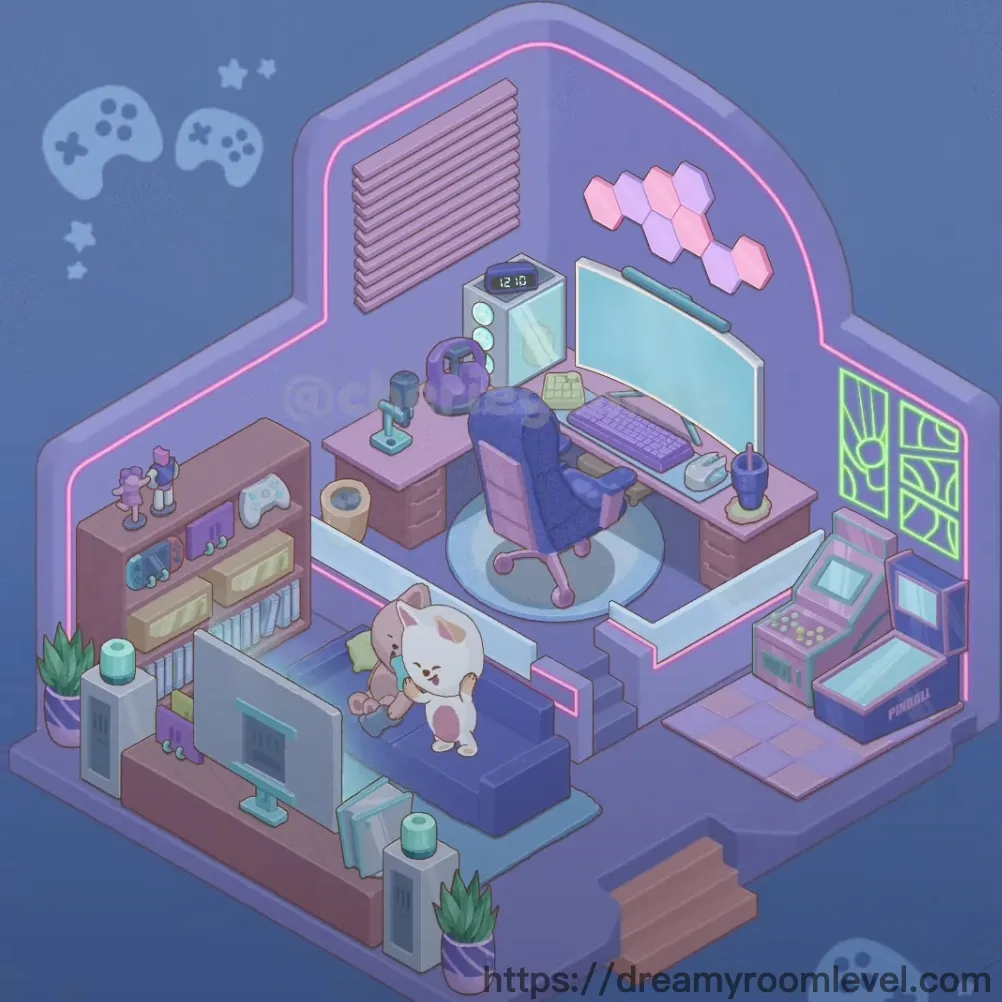
In the heart of a gamer's sanctuary, this cozy gaming den tells the story of Alex, a passionate streamer who transformed a simple room into a vibrant digital haven. The soft glow of pink and green neon lights reflects his late-night gaming sessions, while the beloved cat plushie on the couch witnesses every victory and defeat. Each carefully placed figurine and hexagonal wall art represents a gaming milestone, creating a space where virtual adventures and real comfort blend seamlessly in Dreamy Room Level 64.
Dreamy Room Level 64 Complete Walkthrough
Step 1. Install the Neon Border Frame
Position the neon border along all walls to create the room's glowing pink outline. This foundational element wraps around the entire space, establishing the vibrant gaming atmosphere that defines Dreamy Room Level 64. Start from the top left corner and follow the wall contours carefully.
Step 2. Mount the Ventilation Panel
Place the ventilation panel on the upper left wall section above the bookshelf area. This rectangular panel with horizontal slats ensures proper air circulation. Align it parallel to the ceiling edge for a clean, professional installation in Dreamy Room Level 64.
Step 3. Set Up Gaming Desk in Dreamy Room Level 64
Drag the gaming desk to the right side of the room, positioning it against the wall beneath the hexagonal decorations. This pink-toned desk serves as the main gaming station. Ensure it's centered properly to accommodate all the equipment that will complete your Dreamy Room Level 64 setup.
Step 4. Position the Gaming Chair
Place the gaming chair directly in front of the gaming desk, ensuring it's centered with the desk's workspace. This comfortable purple chair features a wheeled base and ergonomic design, perfectly angled for hours of gaming in Dreamy Room Level 64.
Step 5. Install Bookshelf on Left Wall
Position the bookshelf against the left wall near the entrance area. This brown wooden shelf unit with multiple compartments will store various collectibles. Place it firmly against the wall, ensuring Dreamy Room Level 64's storage solutions are secure.
Step 6. Place Drawer Cabinet
Set the drawer cabinet beside the gaming desk on the right side. This storage unit features multiple drawers for organizing gaming accessories and should align with the desk height for easy access throughout your Dreamy Room Level 64 experience.
Step 7. Position Blue Couch in Dreamy Room Level 64
Drag the blue couch to the lower left area of the room, creating a relaxation zone. This comfortable seating faces toward the center, providing a perfect spot to take breaks during intense Dreamy Room Level 64 gaming sessions.
Step 8. Add Small Table Near Couch
Place the small table adjacent to the blue couch on the right side. This compact surface provides a convenient spot for drinks and snacks, completing the lounge area of Dreamy Room Level 64.
Step 9. Install Arcade Machine
Position the arcade machine in the bottom right corner of the room. This retro gaming cabinet with "PINBALL" branding adds authentic gaming nostalgia. Ensure it's accessible and properly aligned in Dreamy Room Level 64.
Step 10. Set Up Computer Monitor in Dreamy Room Level 64
Place the computer monitor on the gaming desk, centering it for optimal viewing. This large cyan-framed display is the centerpiece of your gaming setup, essential for completing Dreamy Room Level 64 successfully.
Step 11. Position Keyboard and Mouse
Place the keyboard directly in front of the monitor on the desk surface, and position the mouse to its right on a mouse pad. These essential peripherals should be within comfortable reach for gaming in Dreamy Room Level 64.
Step 12. Add Desk Lamp
Mount the desk lamp on the right side of the gaming desk. This adjustable lighting fixture provides focused illumination for late-night gaming sessions, an essential component of Dreamy Room Level 64.
Step 13. Place Retro Radio in Dreamy Room Level 64
Set the retro radio on the small table next to the drawer cabinet. This vintage-style device with its clock display adds character. Following Dreamy Room Level 64 design principles, position it where it's visible but not intrusive.
Step 14. Install Hexagon Wall Art
Attach the hexagon wall art to the wall above the gaming desk area. These pink geometric pieces create a modern, stylish backdrop. Arrange them in a scattered pattern for visual interest in Dreamy Room Level 64.
Step 15. Mount Green Neon Sign
Install the green neon sign on the right wall near the arcade machine. This glowing decorative element adds vibrant contrast to the pink lighting scheme, completing the neon aesthetic of Dreamy Room Level 64.
Step 16. Arrange Game Controllers
Place the game controller and white gamepad on the bookshelf's lower shelf. These gaming essentials should be easily accessible, representing the gaming lifestyle central to Dreamy Room Level 64.
Step 17. Position Cat Plush Toy in Dreamy Room Level 64
Set the adorable cat plush toy on the blue couch, giving it a relaxed, sitting position. This white and tan companion adds warmth and personality to the gaming space of Dreamy Room Level 64.
Step 18. Display Figurines
Arrange the figurines on the bookshelf's top section. These collectible characters showcase gaming achievements and personal interests, adding personality to Dreamy Room Level 64.
Step 19. Add Decorative Balls
Place the decorative balls on the bookshelf's middle shelf. These small spherical ornaments in various colors add visual interest to the storage unit in Dreamy Room Level 64.
Step 20. Organize Books on Shelves in Dreamy Room Level 64
Stack the books vertically on the bookshelf's lower compartments. Include gaming guides, manga, and other reading materials that reflect the room's theme in Dreamy Room Level 64.
Step 21. Place Coffee Mug
Set the coffee mug on the small table beside the couch. This essential beverage container is perfect for those long gaming marathons in Dreamy Room Level 64.
Step 22. Add Tissue Roll
Position the tissue roll on the floor near the small table, making it convenient for quick access during intense Dreamy Room Level 64 gaming sessions.
Step 23. Place Backpack in Dreamy Room Level 64
Set the backpack on the floor near the drawer cabinet. This purple bag adds a lived-in feel, suggesting the room owner's active lifestyle beyond Dreamy Room Level 64.
Step 24. Position Circular Rug
Lay the circular rug beneath the gaming chair, centering it under the desk area. This light-colored round rug defines the gaming zone and adds comfort in Dreamy Room Level 64.
Step 25. Add Potted Plants
Place the potted plant specimens on white pedestals near the entrance stairs. These green succulents bring natural elements into the digital space, balancing the atmosphere of Dreamy Room Level 64.
Step 26. Install Platform Base and Floor Tiles in Dreamy Room Level 64
Set up the platform base structure that elevates different room sections, and ensure the floor tiles create a cohesive foundation. These elements establish the room's multi-level layout characteristic of Dreamy Room Level 64.
Step 27. Position Stairs
Place the stairs connecting the elevated gaming platform to the lower couch area. These steps with pink trim enable easy movement between zones in Dreamy Room Level 64.
Step 28. Mount Game Controller Icon
Install the game controller icon decoration on the upper left wall. This subtle gaming symbol reinforces the room's theme in Dreamy Room Level 64.
Step 29. Add Star Decorations in Dreamy Room Level 64
Attach the star decorations to the upper left wall area near the ventilation panel. These small star shapes add whimsical touches to Dreamy Room Level 64's cosmic gaming atmosphere.
Step 30. Organize Small Containers
Place the small containers on the drawer cabinet and desk surfaces. These storage solutions keep small items organized throughout Dreamy Room Level 64.
Step 31. Add Notepad and Pencil Holder
Position the notepad and pencil holder on the desk surface near the keyboard. These stationery items are essential for jotting down game strategies in Dreamy Room Level 64.
Step 32. Place Headphones in Dreamy Room Level 64
Set the headphones on the desk or hang them on a wall mount near the gaming station. This audio equipment is crucial for immersive gaming experiences in Dreamy Room Level 64.
Step 33. Add Joystick
Position the joystick on the small table or drawer cabinet. This classic gaming controller adds retro appeal to the modern setup of Dreamy Room Level 64.
Step 34. Place Storage Boxes
Position the storage box, wooden crate, and teal box in the lower right area near the entrance. These containers provide additional storage while adding texture variety to Dreamy Room Level 64.
Step 35. Install Pink Trim Accents in Dreamy Room Level 64
Apply the pink trim along platform edges and architectural features. This decorative element ties together the room's color scheme in Dreamy Room Level 64.
Step 36. Mount Clock Display
Install the clock display on the retro radio unit. This digital time readout helps track gaming sessions in Dreamy Room Level 64.
Step 37. Add Shelf Decorations
Arrange the shelf decorations throughout the bookshelf compartments. These small ornamental items personalize the storage space in Dreamy Room Level 64.
Step 38. Position Mouse Pad in Dreamy Room Level 64
Place the mouse pad on the desk surface under the mouse. This essential accessory ensures smooth cursor control during intense Dreamy Room Level 64 gaming sessions.
Step 39. Install Monitor Stand
Set up the monitor stand beneath the computer monitor to achieve optimal viewing height. Proper ergonomics are essential for comfortable gaming in Dreamy Room Level 64.
Step 40. Organize Cable Management
Implement the cable management system along the desk back and wall areas. Keeping cables tidy maintains the clean aesthetic of Dreamy Room Level 64.
Step 41. Install Wall Mount
Attach the wall mount brackets for supporting shelves or equipment. These structural elements provide stability for mounted items in Dreamy Room Level 64.
Step 42. Add Corner Decorations in Dreamy Room Level 64
Place the corner decorations in various room corners to soften angular spaces. These accent pieces enhance the cozy atmosphere of Dreamy Room Level 64.
Step 43. Install Lighting Fixture
Mount the lighting fixture on the ceiling or wall to provide ambient illumination. Proper lighting is crucial for reducing eye strain during extended Dreamy Room Level 64 gaming sessions.
Step 44. Position Mini Fridge
Place the mini fridge near the small table or drawer cabinet. This convenient appliance keeps beverages cold for marathon gaming sessions, completing the self-sufficient setup of Dreamy Room Level 64.
Tips and Tricks
Common Mistakes to Avoid
- Don't overlook the small containers and decorative items hidden behind larger furniture pieces in Dreamy Room Level 64
- Be careful when placing items on the multi-level platform - the stairs area can block proper placement
- Watch for the hexagon wall art pieces that must be positioned precisely above the desk
- The neon border requires careful alignment along all wall edges to achieve the complete glowing effect
- Ensure the circular rug is centered under the gaming chair before placing smaller desk items in Dreamy Room Level 64
Useful Placement Techniques
- Start with the neon border and floor tiles to establish the room's framework before adding furniture
- Use the platform base elevation differences as visual guides for furniture positioning
- When placing multiple small items like figurines and decorative balls, position them in a single sweep from left to right
- Align the gaming desk parallel to the hexagon wall art for perfect symmetry
- Leverage the item snap feature when positioning the gaming chair to ensure it aligns perfectly with the desk
- For clustered items like books and shelf decorations, place larger items first then fill gaps with smaller pieces
- The cable management system works best when installed after all electronic devices are positioned in Dreamy Room Level 64