Dreamy Room Level 2
Level 2 guide walkthrough, helping players solve puzzles and explore the wonderful world of Dreamy Room.
Dreamy Room Level 2 Walkthrough Guide
Room Story
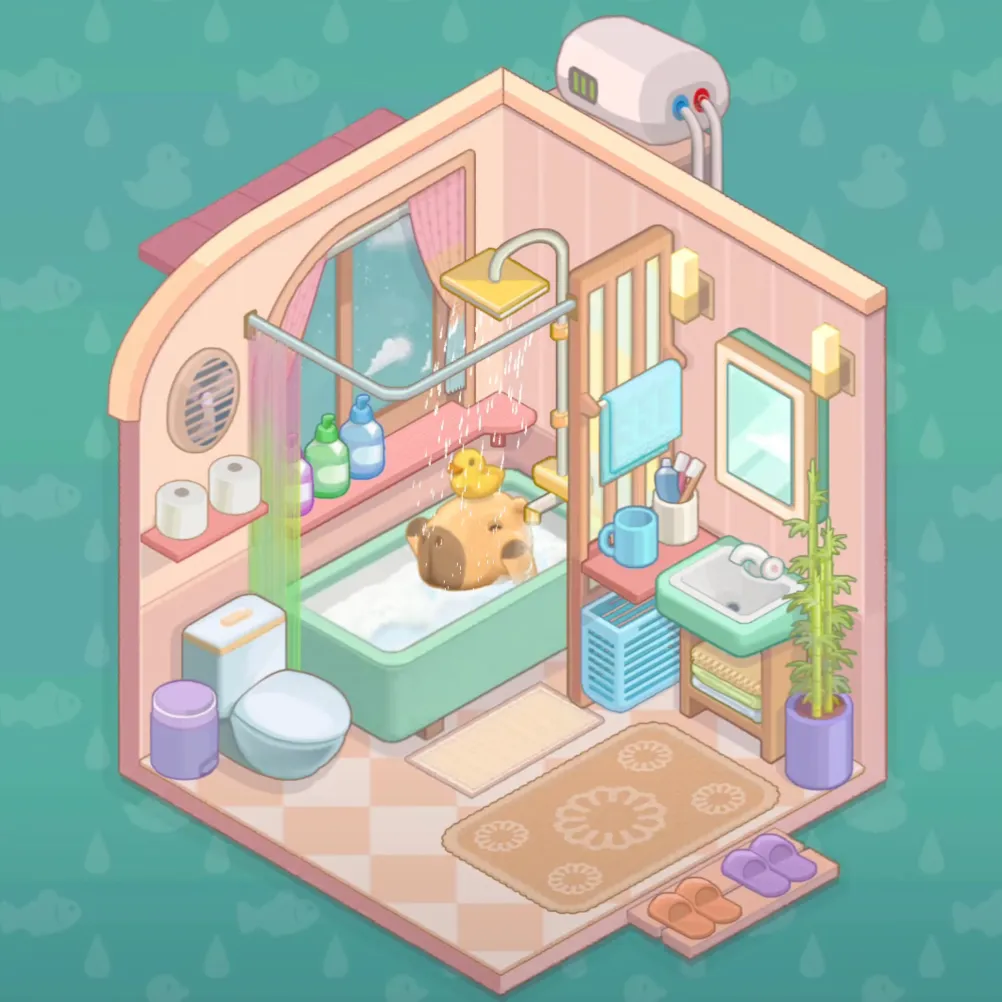
Every morning, sunlight streams through the window into this dreamy bathroom, awakening the sleeping rubber duck. Steam rises from the mint green bathtub, bamboo sways gently in the breeze, as if telling the philosophy of peaceful living. This is a sanctuary from the busy city life, where pink walls embrace gentle moments, and every small item carries the owner's longing for quality living. Orange and purple slippers are neatly arranged, witnessing the daily ritual of relaxation after coming home. In this small, intimate space, time becomes slow and precious.
Step-by-Step Placement Guide
Step 1: Install the Window on the Back Wall
Begin by placing the large rectangular Window on the back wall of the bathroom. This bright window features a clean white frame and allows natural light to flood into the space, creating an airy and fresh atmosphere. The window serves as the focal point and provides essential ventilation for the bathroom environment.
Step 2: Position the Bathtub in the Center-Left Area
Place the spacious mint green Bathtub in the central-left portion of the room. This elegant oval-shaped tub features a soft aqua color that perfectly complements the pink walls. The bathtub is positioned at an angle to maximize space utilization while creating an inviting centerpiece for relaxation and daily bathing routines.
Step 3: Install the Toilet on the Far Left Side
Mount the clean white Toilet in the left corner of the bathroom, positioned against the back wall. This modern toilet features a comfortable height and compact design that fits perfectly into the available space. The strategic placement ensures privacy while maintaining easy access to plumbing connections.
Step 4: Set Up the Sink and Washbasin on the Right Side
Install the mint green Sink/Washbasin on the right side of the bathroom, matching the bathtub's color scheme beautifully. This circular sink sits atop a wooden vanity counter, providing both functionality and aesthetic appeal. The raised design creates storage space underneath while offering a convenient washing area.
Step 5: Mount the Mirror Above the Sink Area
Hang the rectangular Mirror directly above the washbasin, centered perfectly to create symmetry. The mirror features a simple white frame that matches the window and reflects light throughout the space, making the bathroom appear larger and brighter. This essential fixture serves both practical and decorative purposes.
Step 6: Install the Shower Head and Plumbing System
Attach the chrome Shower Head system above the bathtub, complete with flexible hose and mounting bracket. The polished metal finish adds a modern touch while providing versatile shower functionality. The adjustable head allows for comfortable bathing whether sitting in the tub or standing for a quick rinse.
Step 7: Place the Water Heater on the Exterior Wall
Mount the compact white Water Heater on the upper right exterior wall area. This essential appliance features indicator lights and provides reliable hot water for all bathroom needs. The elevated placement keeps it safely out of the way while ensuring easy access for maintenance.
Step 8: Add the Exhaust Fan to the Ceiling Area
Install the small white Exhaust Fan on the ceiling to provide proper ventilation. This important fixture helps remove humidity and maintain air quality, featuring a simple grille design that blends seamlessly with the room's aesthetic while performing essential ventilation functions.
Step 9: Position Towel Storage Under the Sink
Place neatly folded white Under-Sink Towel in the open storage area beneath the washbasin. These clean, fluffy towels are easily accessible and add to the organized appearance of the space. The under-sink storage maximizes space efficiency while keeping essentials within arm's reach.
Step 10: Install the Towel Rack on the Right Wall
Mount the wooden Towel Rack on the wall near the sink area. This natural wood fixture provides a designated space for hanging bath towels and washcloths, adding warmth to the color scheme while promoting proper towel drying and organization.
Step 11: Hang a Fresh Towel on the Rack
Drape a clean blue Towel over the wooden towel rack, adding a pop of color that coordinates beautifully with the mint green fixtures. The folded towel should hang evenly, ready for immediate use after washing hands or face.
Step 12: Place Toilet Paper Rolls for Easy Access
Position white Toilet Paper 1 and Toilet Paper 2 both on the floor near the toilet and in the storage area. Having multiple rolls ensures you never run out, and the strategic placement keeps them dry and easily accessible when needed.
Step 13: Set Up the Shower Caddy with Toiletries
Install the Shower Caddy system near the bathtub area and fill it with essential bath products. Add the green and blue Shampoo Bottle and Body Wash Bottle, arranging them for easy reach during bathing. The organized storage keeps toiletries neat and prevents bottle clutter around the tub edge.
Step 14: Position the Laundry Basket Near the Entrance
Place the blue woven Laundry Basket in an easily accessible spot, providing a designated place for dirty clothes and towels. The basket's attractive design and color complement the bathroom's palette while serving an essential organizational function.
Step 15: Add the Bamboo Plant for Natural Beauty
Position the tall Bamboo Plant in a purple pot near the window area. This living element brings natural beauty and air-purifying qualities to the space, while the vertical growth pattern adds height interest without taking up floor space.
Step 16: Set the Drinking Cup on the Counter
Place a blue drinking Cup on the washbasin counter area, providing convenient access to fresh water for drinking or rinsing. The cup's color coordinates with the bathroom's cool-toned palette while serving a practical daily function.
Step 17: Position the Toothbrush Cup Near the Sink
Set a white Toothbrush Cup on the counter near the mirror, creating a designated spot for dental hygiene tools. This organized approach keeps toothbrushes clean, dry, and easily accessible for daily oral care routines.
Step 18: Add the Trash Can in a Corner Space
Place the purple cylindrical Trash Can in a convenient corner location where it's accessible but not obtrusive. The compact design and coordinating color maintain the room's aesthetic while providing essential waste disposal functionality.
Step 19: Install Window Treatments for Privacy
Hang soft Curtains or window treatment on the window to provide privacy options while still allowing natural light to filter through. The light, airy fabric should complement the room's gentle color scheme and create a cozy, intimate atmosphere.
Step 20: Lay Down the Bath Mat Near the Tub
Position the decorative Bath Mat/Rug with floral patterns on the floor beside the bathtub. This soft, absorbent mat provides a safe, non-slip surface for stepping out of the bath while adding decorative flair with its beautiful mandala-style design.
Step 21: Place the Main Carpet in the Center
Unroll the larger beige Carpet in the central floor area, covering the main walking space. This neutral-toned rug ties the room together while providing warmth and comfort underfoot, featuring subtle patterns that complement the overall design scheme.
Step 22: Add the First Pair of Slippers
Place the purple house Slippers 1 near the entrance area, providing comfortable footwear for bathroom visits. These soft slippers help maintain cleanliness and comfort while adding a pop of color that coordinates with other purple accents in the room.
Step 23: Position the Second Pair of Slippers
Set the orange house Slippers 2 in an alternate location, perhaps near the bathtub area. Having multiple pairs ensures comfort for different family members while the warm orange color adds energy and vibrancy to the cool-toned color palette.
Notes and Precautions
- Ensure each item "snaps into" the correct position before releasing
- Maintain proper bathroom ventilation flow, don't block areas around the exhaust fan
- Keep electrical appliances like the water heater away from water sources to avoid safety hazards
- Place towels and fabric items in dry, well-ventilated locations
Tips and Tricks
- Use the mint green and pink color combination to create a comfortable and cozy atmosphere
- Arrange toiletries near the mirror for improved efficiency
- Utilize vertical storage space to keep the floor clean and organized
- Add plants and decorative items to create a spa-like relaxing environment