Dreamy Room Level 122
Level 122 guide walkthrough, helping players solve puzzles and explore the wonderful world of Dreamy Room.
Dreamy Room Level 122 Walkthrough Guide
Dreamy Room Level 122: Room Story
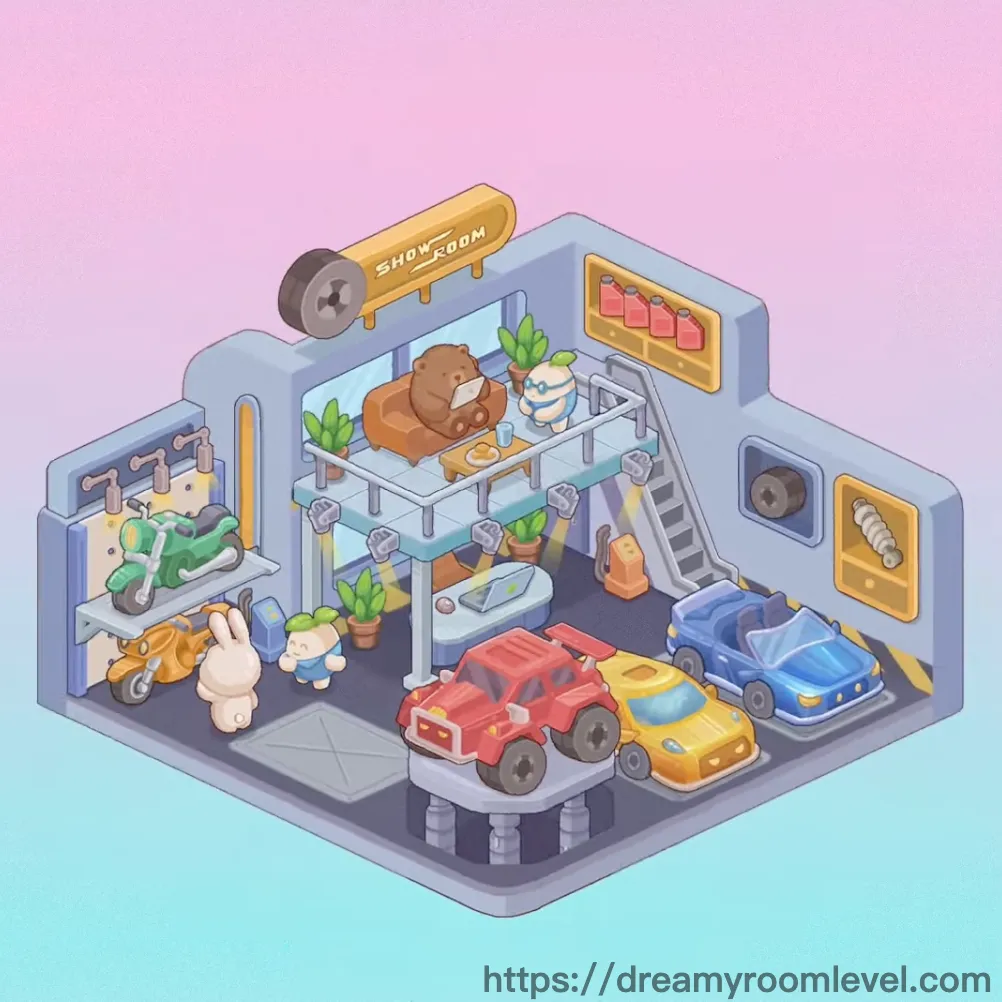
Welcome to the miniature vehicle showroom in Dreamy Room Level 122, where childhood dreams come alive in a cozy exhibition space. This charming display features adorable toy cars, colorful scooters, and friendly plush companions gathered around a rotating showcase platform. A little white rabbit and cheerful blue character manage this delightful showroom, serving tea to teddy bear visitors while surrounded by vibrant potted plants and carefully arranged product displays on the upper seating deck.
Dreamy Room Level 122: Step-by-Step Placement Guide
Step 1. Install the Ceiling and Wall Panels
Begin by placing the ceiling structure at the top of the room. Then position the wall panel sections to form the exhibition space walls. The walls in Dreamy Room Level 122 create the foundation for your showroom layout.
Step 2. Lay Down Floor Tiles and Warning Stripes
Place the floor tiles across the ground level to create a clean showroom base. Add the yellow stripe, gray stripe, and warning stripe markings on the floor near the platform area. These stripes indicate the vehicle display zone in Dreamy Room Level 122.
Step 3. Set Up the Rotating Platform in Center
Drag the rotating platform to the center-front area of the showroom floor. This circular display stand will hold the main vehicle exhibits, serving as the focal point of the Dreamy Room Level 122 layout.
Step 4. Install Door Frame and Window Structures
Position the door frame on the left side wall for the showroom entrance. Then place the window, glass window, and display window on the back wall to create an open, bright exhibition atmosphere.
Step 5. Attach the Showroom Sign
Mount the showroom sign above the entrance area on the upper wall. This golden curved sign reads "SHOWROOM" and announces the purpose of this space in Dreamy Room Level 122.
Step 6. Build the Escalator and Stairs System
Install the escalator on the right side leading to the upper platform. Add the stairs structure alongside it. Attach the handrail and railing to both sides for safety in this multilevel Dreamy Room Level 122 design.
Step 7. Position the Upper Platform Deck
Place the upper platform on the elevated area above the ground floor. This creates a seating area and leisure area for visitors to relax while viewing the vehicle display below.
Step 8. Place Red Car on Rotating Platform
Drag the red car onto the left side of the rotating platform. Position its car headlight facing forward. This bright red vehicle becomes the first featured exhibit in your Dreamy Room Level 122 showroom.
Step 9. Add Yellow Car Next to Red Car
Position the yellow car beside the red car on the rotating platform, placing it slightly to the right. These colorful toy vehicles create an appealing display together.
Step 10. Park the Blue Truck Behind the Cars
Place the blue truck on the right rear section of the rotating platform. Position the truck cabin facing outward. This larger vehicle completes the main miniature cars display trio following Dreamy Room Level 122 arrangement principles.
Step 11. Install Green Scooter on Left Wall Display
Mount the green scooter on the left wall motorcycle stand. Angle it slightly forward to showcase its design. This two-wheeler adds variety to the Dreamy Room Level 122 vehicle collection.
Step 12. Mount Orange Scooter Below Green One
Position the orange scooter on the lower left wall display stand, beneath the green scooter. These matching motorcycle displays create visual balance in this section of the showroom.
Step 13. Place White Rabbit Character Near Entrance
Drag the white rabbit figure to the floor area near the left entrance. Position this adorable plush toys character as if greeting visitors entering Dreamy Room Level 122.
Step 14. Position Blue Character by Vehicle Display
Place the blue character on the ground floor near the center, facing the rotating platform. This friendly figure appears to be managing the showroom in Dreamy Room Level 122.
Step 15. Set Teddy Bear on Upper Platform
Lift the teddy bear to the upper seating platform. Position it near the back railing area as if enjoying the view of the vehicle displays below.
Step 16. Install Wall Shelf on Right Side
Mount the wall shelf on the right upper wall. This display rack serves as both a shelf unit and storage shelf for product bottles in your Dreamy Room Level 122 showroom.
Step 17. Arrange Product Bottles on Wall Shelf
Place the red bottle and multiple pink bottle items on the wall shelf. Arrange these product bottles in a neat row as part of the product display.
Step 18. Position White Sofa on Upper Platform
Drag the white sofa to the upper platform seating area, placing it against the back railing. Add the cushion on top. This creates a comfortable viewing spot in Dreamy Room Level 122.
Step 19. Place Wooden Table in Front of Sofa
Set the wooden table on the upper platform in front of the white sofa. Position its table surface facing the seating area to create a functional rest zone.
Step 20. Arrange Tea Service on Wooden Table
Place the tea cup and plate on the wooden table surface. Add the food item to the plate. This tea service arrangement adds a cozy touch to the Dreamy Room Level 122 leisure area.
Step 21. Add Potted Plants Around the Showroom
Distribute the potted plant containing a green plant near the entrance area. Place another plant pot with leafy plant on the upper platform near the table. Position the cactus in its flower pot on the ground floor. These plants bring life to your Dreamy Room Level 122 exhibition space.
Step 22. Install Display Board and Signage
Mount the display board on the available wall space. Add the signage elements to guide visitors through the showroom following Dreamy Room Level 122 design standards.
Step 23. Add Vehicle Wheels and Tires as Decorative Elements
Place the vehicle wheels, tire, and wheel components in strategic locations around the showroom floor. These automotive parts serve as themed decorative items in the exhibition space.
Step 24. Position Traffic Cones for Safety Markings
Place the orange cone and additional traffic cone near the rotating platform area. These safety markers define the vehicle display boundaries in your Dreamy Room Level 122 layout.
Step 25. Add Wall Decorations and Mount Fixtures
Attach the wall decoration elements to empty wall spaces. Install the wall mount fixtures where needed. Position the lighting fixture to illuminate the showroom floor properly, completing the atmospheric details of Dreamy Room Level 122.
Tips and Precautions
Important Notes
- Watch for the small plant pots that can be easily overlooked in the upper platform corners near the sofa area
- The rotating platform must be placed before adding any vehicles, or the cars will not snap properly into position
- Don't confuse the escalator and stairs - they occupy different positions on the right side of the showroom
- The wall shelf bottles have specific color arrangements (red on left, pink bottles following) that must be maintained
- Vehicle headlights and wheels need precise angle alignment to match the Dreamy Room Level 122 display aesthetic
Practical Tips
- Drag the rotating platform from above at a slight downward angle to ensure it locks into the correct floor position
- When placing small decorative items like tea cups and plates, zoom in closely to see the exact table surface placement points
- Position the teddy bear and characters last after all furniture is set, as they're easier to adjust without obstruction
- Use the window frames as reference points when aligning the upper platform railing and sofa placement
- For the scooter wall mounts, drag from the side rather than straight on to avoid the "bounce back" effect
- The traffic cones snap best when dragged in an arc motion toward their designated floor stripe markers
Following this comprehensive guide will help you successfully complete Dreamy Room Level 122 and create a charming vehicle showroom that delights both collectors and casual visitors alike.