Dreamy Room Level 60
Level 60 guide walkthrough, helping players solve puzzles and explore the wonderful world of Dreamy Room.
Dreamy Room Level 60 Walkthrough Guide
Dreamy Room Level 60 Room Story
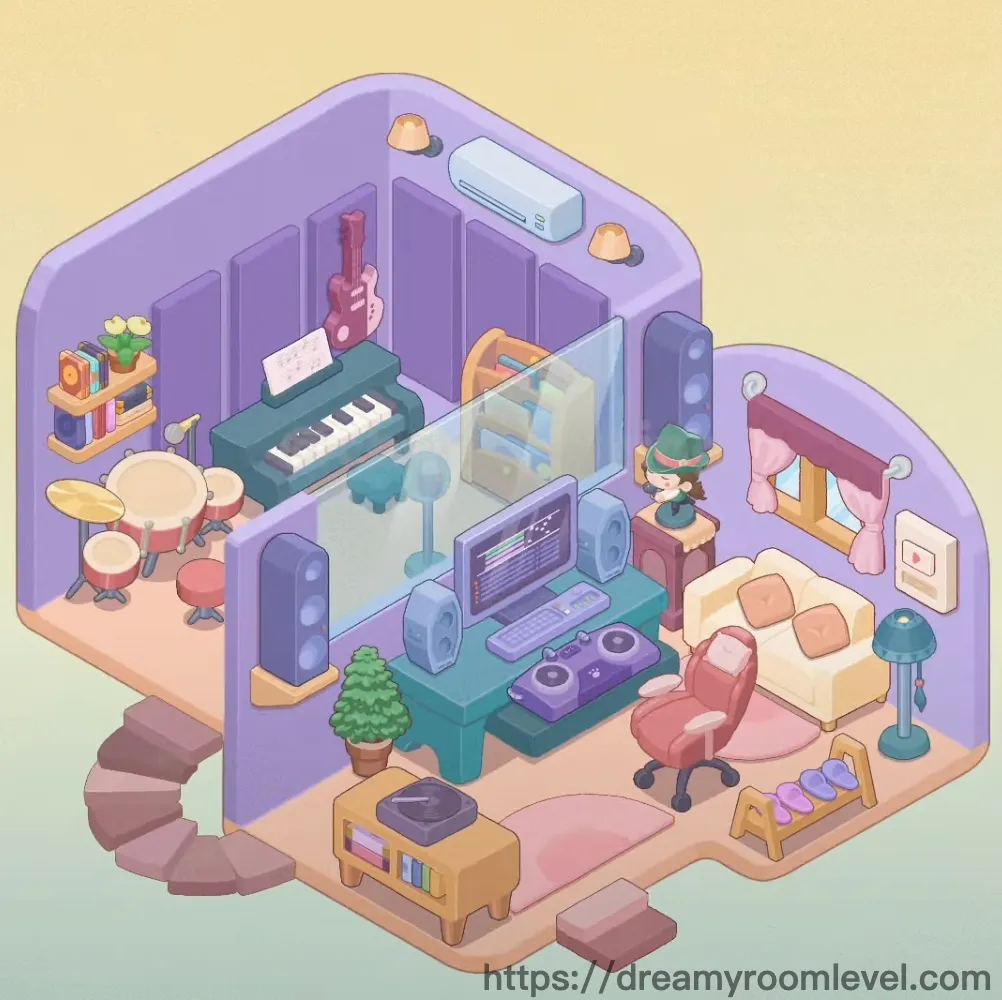
In this cozy music creator's sanctuary, a passionate artist has transformed their space into the perfect blend of creativity and comfort. The soft purple walls embrace the room like a warm hug, while instruments and technology harmoniously coexist. Here, melodies are born on the keyboard, beats pulse from the drum set, and late-night coding sessions blend with musical inspiration. This is where dreams take shape in Dreamy Room Level 60, a space that celebrates both the art of music and the comfort of home.
Step-by-Step Placement Guide
Step 1. Install Purple Walls as Foundation
Begin by placing the purple walls around the room perimeter. These walls form the base structure and should be aligned to create the distinctive L-shaped layout shown in the reference image. The walls extend from floor to ceiling, creating defined boundaries for your Dreamy Room Level 60 music studio space.
Step 2. Lay Down the Beige Floor
Position the beige floor across the entire room surface. This flooring creates a warm neutral base that complements the purple walls perfectly. Ensure the floor tiles align seamlessly with the wall edges for Dreamy Room Level 60's clean aesthetic.
Step 3. Add Wall Panels for Acoustic Treatment
Install the wall panels along the upper portions of the purple walls. These panels serve both decorative and acoustic purposes, positioned in a grid pattern to add depth and texture. Place them evenly spaced across the back wall in Dreamy Room Level 60.
Step 4. Mount Air Conditioner Above
Attach the air conditioner to the upper center portion of the back wall, between the wall panels. This essential unit should be positioned high up, ensuring optimal air circulation throughout your creative space in Dreamy Room Level 60.
Step 5. Install Window with Natural Light
Place the window on the right side wall, positioned at mid-height. This window allows natural light to illuminate the workspace. The window frame should align flush with the wall surface for Dreamy Room Level 60's polished look.
Step 6. Hang Curtains on Window
Drape the curtains over the window you just installed. These soft fabric curtains should hang from a rod above the window frame, adding a cozy textile element. Position the curtain rod slightly above the window's top edge in Dreamy Room Level 60.
Step 7. Position Desk in Work Area
Place the desk in the central workspace area, slightly toward the right side of the room. This sturdy desk serves as the primary workstation, providing ample surface area for equipment. Orient it to face slightly toward the center in Dreamy Room Level 60.
Step 8. Set Up Computer Setup on Desk
Arrange the computer equipment on the desk surface. Position the tower unit toward the back corner of the desk. This setup forms the technical heart of your creative workspace in Dreamy Room Level 60.
Step 9. Add Monitor Screen for Display
Position the monitor screen on the desk, facing the seating area. Place it at eye level, centered on the desk surface. The screen displays coding interface, essential for technical work in Dreamy Room Level 60.
Step 10. Install Laptop Next to Monitor in Dreamy Room Level 60
Place the laptop on the desk surface, positioned to the left of the main monitor. This portable device adds flexibility to the workspace setup. Angle it slightly for easy access while working in Dreamy Room Level 60.
Step 11. Add Speakers for Audio Output
Position the speakers on either side of the monitor screen. These audio devices should face forward, creating optimal stereo sound. Space them evenly for balanced audio in Dreamy Room Level 60.
Step 12. Place DJ Controller on Desk
Set the DJ controller in front of the monitor, near the desk's front edge. This equipment features control knobs and buttons for music mixing. Position it within easy reach for creative sessions in Dreamy Room Level 60.
Step 13. Position Office Chair at Desk in Dreamy Room Level 60
Place the office chair directly in front of the desk, facing the computer setup. This pink ergonomic chair should be positioned to allow comfortable access to all desk equipment. Tuck it partially under the desk in Dreamy Room Level 60.
Step 14. Set Up Keyboard Near Work Area
Position the keyboard on its stand in the left area of the room, near the workspace. This musical keyboard should face toward the center, easily accessible from the office chair. Place it at comfortable playing height in Dreamy Room Level 60.
Step 15. Add Keyboard Stand for Support
Install the keyboard stand beneath the keyboard, providing stable support. This stand should be adjusted to the proper height, typically around waist level. Ensure it's locked in position for stability in Dreamy Room Level 60.
Step 16. Position Guitar in Display Area in Dreamy Room Level 60
Place the guitar on its stand in the upper left corner of the room. This red electric guitar should be positioned vertically, leaning back slightly on the stand. The guitar serves as both functional instrument and decorative element in Dreamy Room Level 60.
Step 17. Add Guitar Stand for Proper Storage
Set the guitar stand beneath the guitar, providing secure upright support. This stand keeps the instrument accessible while protecting it from damage. Position it firmly on the floor in Dreamy Room Level 60.
Step 18. Assemble Drum Set in Music Corner
Construct the drum set in the far left corner of the room. This complete percussion setup includes multiple drums and cymbals arranged in standard configuration. Position it against the wall to maximize floor space in Dreamy Room Level 60.
Step 19. Position Bass Drum as Foundation in Dreamy Room Level 60
Place the bass drum as the centerpiece of the drum set. This large drum sits on the floor with the kick pedal attached in front. Orient it facing forward for proper playing position in Dreamy Room Level 60.
Step 20. Add Snare Drum to Set
Position the snare drum on its stand between the drummer's legs area, centered above the bass drum. This drum should be at comfortable stick height. Angle it slightly toward the player in Dreamy Room Level 60.
Step 21. Mount Cymbals on Stands
Attach the cymbals to their respective stands around the drum set. Position hi-hats to the left, crash cymbals above, ensuring proper spacing. These metallic discs should be angled for optimal sound in Dreamy Room Level 60.
Step 22. Place Drum Stool Behind Set in Dreamy Room Level 60
Position the drum stool behind the drum set, centered for comfortable playing. This round seat should be adjusted to proper height, allowing the drummer to reach all components. Place it securely on the floor in Dreamy Room Level 60.
Step 23. Position Sofa in Relaxation Area
Place the sofa in the lower right section of the room, facing toward the center. This comfortable seating provides a rest area away from work and music zones. The cream-colored cushions should face forward in Dreamy Room Level 60.
Step 24. Add Cushions to Sofa
Arrange the cushions on the sofa surface. Place them evenly spaced along the backrest and seating area. These soft accessories add comfort and visual appeal to the relaxation zone in Dreamy Room Level 60.
Step 25. Place Coffee Table Near Sofa in Dreamy Room Level 60
Position the coffee table in front of the sofa, within easy reach. This low table provides surface space for drinks or items. Place a record player on top for entertainment access in Dreamy Room Level 60.
Step 26. Add Record Player to Coffee Table
Set the record player on the coffee table surface. This vintage-style turntable faces toward the sofa area, ready for vinyl playback. Position it centered on the table in Dreamy Room Level 60.
Step 27. Install Floor Lamp for Ambient Lighting
Position the floor lamp in the right corner near the sofa. This tall blue standing lamp provides ambient lighting for the relaxation area. Place the base firmly on the floor in Dreamy Room Level 60.
Step 28. Set Up Easel with Canvas in Dreamy Room Level 60
Place the easel in the central area between the keyboard and desk. This wooden stand holds the canvas at an angle for painting or display. Position it where it's visible but not obstructing pathways in Dreamy Room Level 60.
Step 29. Mount Canvas on Easel
Attach the canvas to the easel's holding clips. This blank or artwork surface should rest securely on the easel's ledge. Angle it back slightly for optimal viewing in Dreamy Room Level 60.
Step 30. Hang Picture Frame on Wall
Mount the picture frame on the right wall near the window. This decorative frame should be positioned at eye level, displaying artwork or photos. Ensure it hangs straight and secure in Dreamy Room Level 60.
Step 31. Add Bookshelf in Storage Area in Dreamy Room Level 60
Install the bookshelf against the left wall near the drum set. This multi-tiered storage unit provides space for items and decorations. Position it flush against the wall for stability in Dreamy Room Level 60.
Step 32. Arrange Books on Shelves
Place the books on the bookshelf's various levels. Arrange them vertically and horizontally in colorful stacks. These reading materials add personality and function to the space in Dreamy Room Level 60.
Step 33. Add Storage Shelf for Organization
Position the storage shelf on the lower level of the bookshelf. This additional storage provides space for smaller items and supplies. Stock it with organized materials in Dreamy Room Level 60.
Step 34. Install Spiral Stairs for Access in Dreamy Room Level 60
Construct the spiral stairs in the lower left corner of the room. These circular steps provide access to another level, featuring burgundy treads. Position them securely anchored to the floor in Dreamy Room Level 60.
Step 35. Place Character in Scene
Position the character in the room, sitting at the desk or standing near equipment. This animated figure represents the room's creator, adding life to the space. Place them in a natural working pose in Dreamy Room Level 60.
Step 36. Lay Pink Rug Under Sofa Area
Spread the pink rug on the floor beneath and in front of the sofa. This soft textile defines the relaxation zone with its warm color. Center it under the seating area in Dreamy Room Level 60.
Step 37. Position Round Carpet in Workspace in Dreamy Room Level 60
Place the round carpet on the floor near the desk and office chair area. This circular rug adds comfort and defines the workspace zone. Center it beneath the computer desk area in Dreamy Room Level 60.
Step 38. Add General Rug for Floor Coverage
Lay the rug in the main floor areas not covered by other carpets. This larger floor covering adds warmth and reduces echo. Position it to complement the room's layout in Dreamy Room Level 60.
Step 39. Place Potted Plant for Greenery
Position the potted plant on the floor near the spiral stairs. This leafy decoration brings nature indoors, with green foliage in a ceramic pot. Place it where it receives ambient light in Dreamy Room Level 60.
Step 40. Add Small Plant Decoration in Dreamy Room Level 60
Set the small plant decoration on elevated surfaces like shelves or the bookshelf. This compact greenery adds life to higher areas. Position it where it's visible but not intrusive in Dreamy Room Level 60.
Step 41. Position Small Tree Plant
Place the small tree plant in a corner or near seating areas. This slightly larger potted plant adds vertical greenery. Set it firmly on the floor in a stable position in Dreamy Room Level 60.
Step 42. Arrange Slippers Near Entrance
Position the slippers on the floor near the room's entrance or by the stairs. These comfortable footwear items should be placed side by side, ready for use. Keep them accessible in Dreamy Room Level 60.
Step 43. Add Slipper Rack for Organization in Dreamy Room Level 60
Place the slipper rack near the entrance area on the floor. This organizational item holds multiple pairs of slippers neatly. Position it along the wall edge in Dreamy Room Level 60.
Step 44. Install Light Bulbs Decoration
Hang the light bulbs decoration near the keyboard area on the upper wall. These decorative string lights add warm ambient lighting. Drape them naturally along the wall in Dreamy Room Level 60.
Step 45. Add Decorative Lights Throughout
String the decorative lights around the room's upper edges or along walls. These soft lights create ambiance and highlight the purple walls. Position them to enhance the room's atmosphere in Dreamy Room Level 60.
Step 46. Mount Wall Art for Visual Interest in Dreamy Room Level 60
Hang the wall art on available wall spaces at eye level. This artwork adds personality and visual interest to blank walls. Ensure pieces are evenly spaced and straight in Dreamy Room Level 60.
Step 47. Display Music Poster
Attach the music poster to the wall near music equipment. This decorative piece celebrates musical themes and inspires creativity. Mount it securely at comfortable viewing height in Dreamy Room Level 60.
Step 48. Install Audio Equipment Connections
Connect the audio equipment between devices like speakers, keyboard, and computer. These cables and interfaces enable sound routing throughout the studio. Route them neatly along walls in Dreamy Room Level 60.
Step 49. Add Turntable to Setup in Dreamy Room Level 60
Position the turntable near the coffee table or on another surface. This vinyl playback device complements the record player setup. Place it on a stable surface in Dreamy Room Level 60.
Step 50. Display Coding Screen Content
Set up the coding screen interface on the monitor display. This digital element shows programming work, reflecting the room's tech-creative fusion. Ensure it's visible on the main monitor in Dreamy Room Level 60.
Step 51. Arrange Wooden Furniture Throughout
Position the wooden furniture pieces including tables and stands around the room. These natural wood elements add warmth and complement the purple walls. Distribute them to balance the space in Dreamy Room Level 60.
Tips and Important Notes
Important Considerations
- Check behind larger furniture pieces like the sofa and desk for hidden placement spots, as small decorative items can easily be overlooked in Dreamy Room Level 60's densely furnished layout
- The drum set area requires careful attention to cymbal positioning - each piece has specific height requirements and can overlap visually, making proper placement challenging
- Wall-mounted items like the air conditioner and picture frames need precise alignment with the purple wall panels to avoid awkward gaps
- Musical equipment cables and audio equipment connections should be placed after main instruments to avoid obstruction issues in Dreamy Room Level 60
- The spiral stairs occupy significant floor space - ensure all nearby items like the potted plant and bookshelf are positioned before finalizing stair placement
Practical Strategies
- For tight spaces around the desk area, drag items from the side rather than straight down to avoid collision with the office chair and existing equipment
- When placing the keyboard and guitar, position their stands first to establish stable anchor points for the instruments in Dreamy Room Level 60
- Small decorative items like slippers and plant decorations are best placed using a zoomed-in view to identify exact floor positions
- Rugs and carpets have subtle "snap points" - drag them slowly across floor areas until you feel the magnetic pull indicating correct placement
- For overlapping items like cushions on the sofa, place the sofa base completely first, then add cushions individually from front to back in Dreamy Room Level 60
- The drum set components benefit from a back-to-front placement order: bass drum first, then snare, followed by cymbals and finally the drum stool for optimal arrangement