Dreamy Room Level 46
Level 46 guide walkthrough, helping players solve puzzles and explore the wonderful world of Dreamy Room.
Dreamy Room Level 46 Walkthrough Guide
Dreamy Room Level 46 Room Story
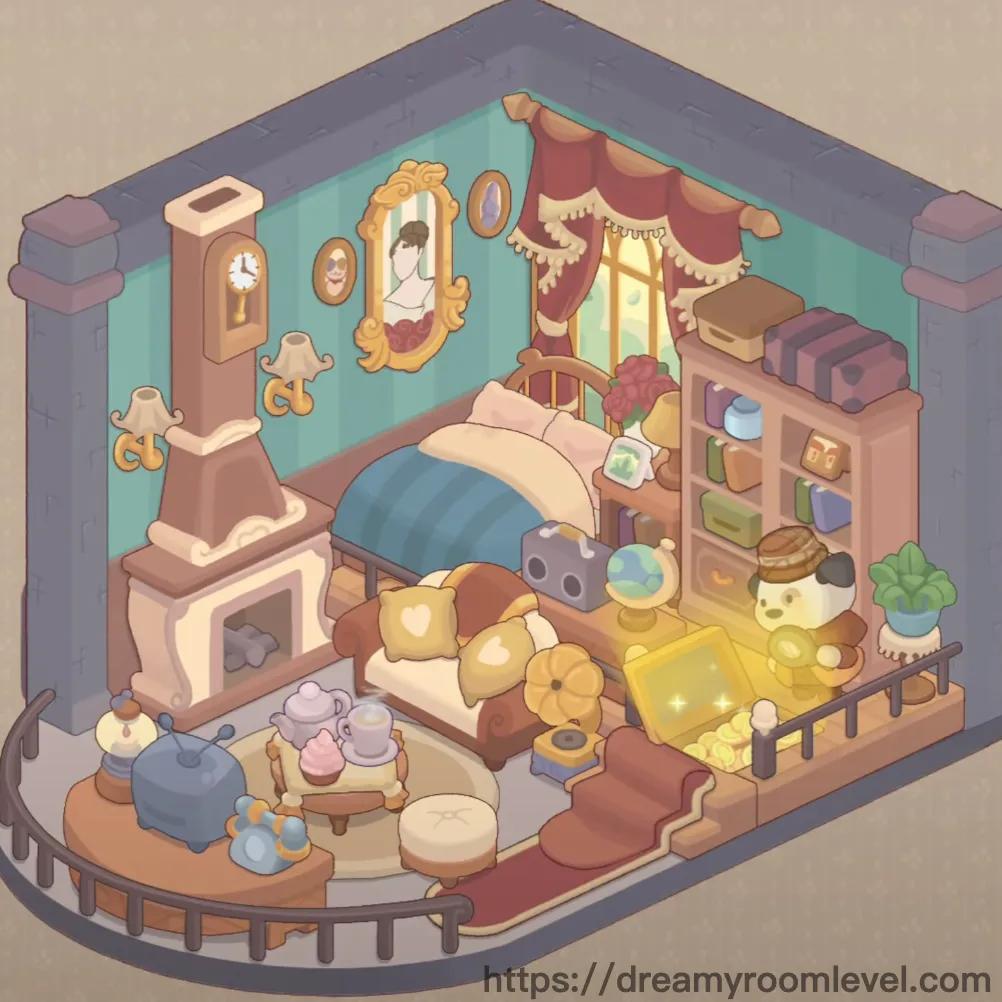
In this enchanting Victorian-inspired bedroom, a young artist has created her perfect creative sanctuary. The teal walls reflect the calming ocean hues she loves, while the cozy loft above serves as her reading nook. Her loyal companion, a cheerful dog with a magnifying glass, helps her discover hidden treasures in old books. Warm afternoon light filters through the arched window, illuminating the room where dreams and creativity flourish in Dreamy Room Level 46.
Complete Step-by-Step Guide
Step 1. Install the Teal Wall Background
Position the teal wall as the primary back wall of the room. This wall provides the main color foundation for the entire Dreamy Room Level 46 space and should be placed first to establish the room's boundaries.
Step 2. Add the Mauve Wall Section
Place the mauve wall section as the lower wall trim along the bottom portion of the room. This creates a two-tone wall effect that's essential for Dreamy Room Level 46 design.
Step 3. Lay Down the Wooden Floor
Drag the wooden floor to cover the entire ground area of the room. Ensure it extends to all corners and aligns properly with the wall edges for a seamless foundation in this Dreamy Room Level 46 challenge.
Step 4. Set the Gray Ceiling
Install the gray ceiling at the top of the room structure. This neutral ceiling completes the room's shell and provides the base for hanging elements later.
Step 5. Mount the Arched Window
Position the arched window on the back wall, centered and elevated. Following Dreamy Room Level 46 design principles, this ornate window becomes the focal point of the room.
Step 6. Attach the Window Frame
Place the window frame directly around the arched window opening. Ensure it snaps into place perfectly to create the elegant Gothic-style window characteristic of this level.
Step 7. Position the Loft Structure in Dreamy Room Level 46
Drag the loft structure to the upper right corner of the room. This creates the second-floor reading area and must be placed before adding the bed below it.
Step 8. Install the Wooden Beam
Place the wooden beam as the ceiling support for the loft area. It should align horizontally across the top of the loft opening on the right side.
Step 9. Add the Ladder
Attach the ladder to the right side of the loft structure, connecting the main floor to the upper reading area. This placement is essential for Dreamy Room Level 46 accessibility.
Step 10. Install Stair Railing and Balcony Railing
Place the stair railing along the edge of the loft opening and position the balcony railing around the loft's perimeter for safety and decorative purposes.
Step 11. Set Up the Bed Frame and Headboard
Position the bed frame in the center-right area of the room, directly below the loft. Attach the bed headboard to the frame, ensuring it faces outward toward the room's main viewing angle in Dreamy Room Level 46.
Step 12. Layer the Blue Blanket
Drape the blue blanket over the bed frame, covering the mattress completely. This cozy blanket should cascade naturally over the edges.
Step 13. Arrange Pillows on the Bed
Place the white pillow and yellow pillow at the head of the bed against the headboard. Following Dreamy Room Level 46 layout requirements, position them side by side for a comfortable arrangement.
Step 14. Add Decorative Pillows and Throw Pillows
Layer the decorative pillows and throw pillows on top of the bed, arranging them artistically near the headboard and scattered across the blanket for a lived-in, cozy appearance.
Step 15. Install the Decorative Canopy in Dreamy Room Level 46
Hang the decorative canopy from the ceiling above the bed area. Position the bed canopy to drape elegantly over the bed's head section, and add the curtain drape to complete the romantic canopy effect.
Step 16. Position the Bookshelf
Place the bookshelf against the right wall near the bed. This tall storage unit should stand upright and align flush with the wall in this Dreamy Room Level 46 setup.
Step 17. Add the Storage Cabinet
Position the storage cabinet next to the bookshelf or integrated within it. This piece provides additional storage and display space for decorative items.
Step 18. Place the Wooden Dresser
Drag the wooden dresser to the right side of the room near the bookshelf. Ensure it's accessible and doesn't block pathways according to Dreamy Room Level 46 requirements.
Step 19. Set Up the Shelf Unit
Install the shelf unit on the wall or as a standing piece near the bookshelf area. This provides additional display space for collectibles and decorative objects.
Step 20. Hang the Ornate Mirror
Mount the ornate mirror on the left wall at eye level. This decorative piece should be prominently displayed to reflect light and create visual depth in Dreamy Room Level 46.
Step 21. Display the Portrait Painting
Hang the portrait painting on the teal wall section, typically between or near the ornate mirror. Position it at an aesthetically pleasing height.
Step 22. Mount the Oval Mirror
Place the oval mirror on another wall section, creating a gallery-style arrangement. This placement is essential for Dreamy Room Level 46 decorative balance.
Step 23. Install Wall Decorations and Picture Frames
Arrange the wall decorations and picture frames across various wall spaces. Distribute them evenly to create visual interest without cluttering in this Dreamy Room Level 46 space.
Step 24. Position the Grandfather Clock
Place the grandfather clock in the left corner of the room against the wall. This tall timepiece should stand upright and serve as a statement piece.
Step 25. Hang the Wall Clock
Mount the wall clock on the upper wall section near the loft area or above the fireplace. According to Dreamy Room Level 46 design, it should be easily visible from the main floor.
Step 26. Install the Fireplace and Mantle
Position the fireplace on the lower left wall area. Attach the fireplace mantle on top to complete this cozy heating feature that's central to Dreamy Room Level 46 comfort.
Step 27. Arrange Seating: Armchairs and Sofa
Place the armchair and blue armchair in the lower left area near the fireplace. Position the cream sofa on the lower floor area, creating a cozy seating arrangement for this Dreamy Room Level 46 living space.
Step 28. Add Footstool and Ottoman in Dreamy Room Level 46
Place the footstool near the armchair and position the ottoman in front of the seating area for comfortable foot rest and additional seating.
Step 29. Position Coffee Table and Side Table
Set the coffee table in the center of the seating arrangement on the lower floor. Place the side table next to an armchair or sofa for convenient surface space.
Step 30. Install Wall Sconce and Wall Lamp
Mount the wall sconce on the wall near the seating area or staircase. Position the wall lamp at another strategic wall location to provide ambient lighting in Dreamy Room Level 46.
Step 31. Add Table Lamp and Ceiling Lamp
Place the table lamp on the side table or dresser for task lighting. Hang the ceiling lamp from the center of the ceiling to provide overall illumination for this level.
Step 32. Position Luggage: Beige and Purple Suitcases
Stack the beige suitcase and purple suitcase on top of the bookshelf or dresser. These vintage travel pieces add character to the Dreamy Room Level 46 design.
Step 33. Arrange Storage Boxes
Place the storage boxes on shelf units or tucked beside furniture. These practical items should blend seamlessly with the room's vintage aesthetic.
Step 34. Display Books Throughout the Room
Scatter the books across bookshelves, side tables, and coffee tables. Completing Dreamy Room Level 46 requires books to appear naturally placed as if being actively read.
Step 35. Arrange the Tea Set Components
Position the tea set on the coffee table or side table. Place the teacup and teapot together to create a charming afternoon tea display in this cozy space.
Step 36. Place the Radio and Stereo System
Set the radio on the dresser or shelf unit. Position the stereo system nearby to create an entertainment corner in Dreamy Room Level 46.
Step 37. Display the Globe in Dreamy Room Level 46
Place the globe on a side table, dresser, or bookshelf. This educational decoration should be prominently displayed to reflect the room owner's curiosity.
Step 38. Add Greenery: Potted Plant and Succulent
Position the potted plant on the floor near the balcony railing or in a corner. Place the succulent plant on a shelf or table to add life to the room.
Step 39. Arrange Flowers and Vase
Fill the vase with the flowers and position them on the coffee table or side table. This fresh arrangement brings color and natural beauty to Dreamy Room Level 46.
Step 40. Lay Down Area Rug and Yellow Rug
Place the area rug under the seating arrangement on the lower floor. Position the yellow rug beside the bed or in another floor area to add warmth and texture.
Step 41. Position the Stuffed Toy
Place the stuffed toy on the bed among the pillows or on a chair. This adorable companion adds a playful touch to the room design.
Step 42. Add the Dog Character in Dreamy Room Level 46
Position the dog character on the floor near the balcony railing or by the bookshelf. This charming figure with its magnifying glass adds personality and whimsy to the space.
Step 43. Place the Magnifying Glass
Set the magnifying glass near the dog character or on a table surface. This detective tool suggests the room's owner enjoys mysteries and exploration.
Step 44. Position the Yellow Cube
Place the yellow cube in the lower right corner of the room near the floor edge. This mysterious object appears in every Dreamy Room Level 46 completion and serves as a collectible marker.
Step 45. Add the Wooden Crate
Position the wooden crate in a corner or beside furniture. This rustic storage piece adds to the vintage character of the room while providing practical function.
Tips and Precautions
Precautions
- The loft structure must be placed before the bed to avoid blocking placement points underneath
- Small decorative items on the bookshelf can be obscured by the suitcases, so place shelf items first
- The dog character near the balcony railing requires precise positioning to avoid falling through the floor texture
- The tea set components are small and can be difficult to see against the wooden table surface
- Wall-mounted items like the ornate mirror may block placement of nearby wall decorations if not positioned carefully
- The yellow cube in the corner is easily missed due to its placement behind the balcony railing structure
Practical Tips
- Start with large furniture pieces to establish the room layout before adding decorative items
- Use the loft railing as a visual guide when positioning items on the upper level
- When placing pillows on the bed, work from back to front to layer them naturally
- The area rug serves as an excellent alignment guide for positioning the coffee table and seating arrangement
- Zoom in when placing small items like the tea set to ensure accurate positioning
- The dog character's magnifying glass detail helps identify the correct orientation when placing it
- In Dreamy Room Level 46, utilizing the snap-to-grid feature for furniture placement ensures perfect alignment
- Items with warm colors yellow pillows, yellow rug should be distributed to balance the cool teal walls
- Success in Dreamy Room Level 46 comes from working in zones: complete the lower seating area, then the bed area, then the loft level
- The fireplace area serves as a natural starting point for arranging the lower floor seating group