Dreamy Room Level 527
Level 527 guide walkthrough, helping players solve puzzles and explore the wonderful world of Dreamy Room.
Dreamy Room Level 527 Walkthrough Guide
Dreamy Room Level 527 Room Story
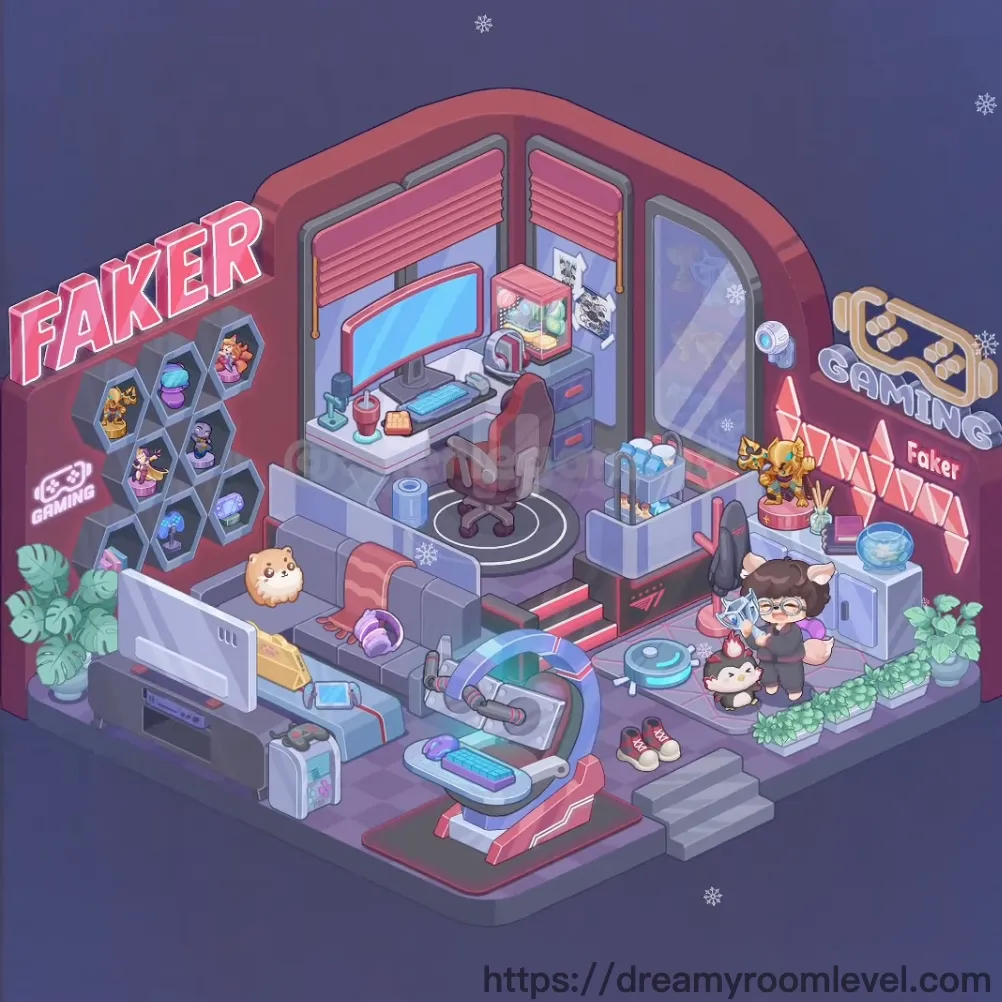
In this cyberpunk gaming sanctuary, a passionate streamer named Faker has built the ultimate setup where dreams and pixels collide. Neon lights pulse with energy as trophies line the walls, celebrating countless victories. The cozy cats curl nearby while snowflakes drift outside, creating a perfect blend of warmth and digital excitement. Dreamy Room Level 527 captures the essence of modern gaming culture in a space where every detail fuels the competitive spirit.
Dreamy Room Level 527: Step-by-Step Placement Guide
Step 1. Build the Main Platform Structure
Position the main platform structure as the foundation of this gaming studio. This elevated platform with pink and gray tones should be centered, creating the multi-level layout that defines Dreamy Room Level 527.
Step 2. Lay Checkered Floor Tiles
Install the checkered floor tiles across the platform surface. These purple-toned diamond-pattern tiles should cover the main floor area, establishing the base for all furniture placement.
Step 3. Set Up Pink Walls and Ceiling
Place the pink walls around the studio perimeter, then add the ceiling with neon trim overhead. The coral-pink walls with neon edge lighting should create the signature cyberpunk atmosphere.
Step 4. Install Faker Neon Sign in Dreamy Room Level 527
Mount the faker neon sign left on the left exterior wall. This bold pink illuminated text should be prominently displayed, branding the gaming space with the streamer's identity.
Step 5. Add Gaming Neon Sign
Install the gaming neon sign right on the right exterior wall. This glowing "GAMING" text with controller icon should complement the Faker sign, completing the neon branding.
Step 6. Mount Hexagonal Display Shelf
Attach the hexagonal display shelf to the left interior wall. This honeycomb-pattern shelving unit should be positioned prominently to showcase the collection of gaming memorabilia in Dreamy Room Level 527.
Step 7. Display Trophy Figurines and Collectibles
Arrange the trophy figurines and collectible items in hexagons within the hexagonal shelf compartments. Fill each hexagon with colorful gaming figures, trophies, and collectibles to celebrate achievements.
Step 8. Add Gaming Controller Icon
Place the gaming controller icon in one of the hexagonal compartments. This decorative controller symbol should be prominently displayed among the collectibles.
Step 9. Position Main Desk in Dreamy Room Level 527
Drag the main desk to the center-back area of the studio. This L-shaped gaming desk with drawers should face forward, serving as the command center for streaming and gaming activities.
Step 10. Set Up Gaming Monitor
Place the gaming monitor on the desk surface. This large display screen should be centered on the desktop, angled for optimal viewing during gaming sessions.
Step 11. Add Keyboard and Mouse
Position the keyboard in front of the monitor, then place the mouse to the right side. These gaming peripherals should be arranged ergonomically for comfortable gameplay in Dreamy Room Level 527.
Step 12. Place Desk Lamp and Drink Cup
Set the desk lamp red on the left side of the desk, then add the drink cup with straw nearby. The red lamp provides task lighting while the drink keeps the gamer refreshed.
Step 13. Add Desk Organizer and Drawers
Install the desk organizer on the desktop to hold supplies, and ensure the desk drawers are properly positioned beneath the desk surface for storage.
Step 14. Position Gaming Chair
Place the gaming chair in front of the desk. This ergonomic red and black chair should be centered at the desk, ready for long gaming sessions in Dreamy Room Level 527.
Step 15. Lay Floor Mat Under Chair
Position the floor mat under chair beneath the gaming chair. This circular mat with geometric pattern should protect the floor while defining the seating zone.
Step 16. Place Computer Tower
Set the computer tower beside or under the desk. This gaming PC case should be positioned for easy access while maintaining cable management.
Step 17. Install Side Shelf Unit in Dreamy Room Level 527
Position the side shelf unit on the right side of the room. This white storage unit should stand against the wall, providing additional display and storage space.
Step 18. Arrange Storage Boxes and Decorative Items
Place storage boxes on shelf and decorative items on shelf on the side shelf unit. Organize these items neatly to maintain the studio's aesthetic.
Step 19. Mount Wall Screen
Attach the wall mounted screen to the back wall. This secondary display should be positioned for monitoring streams or displaying additional content.
Step 20. Install Pink Roller Shutters
Mount the pink roller shutter left and pink roller shutter right on the upper walls. These decorative shutters should frame the interior space, adding industrial style to Dreamy Room Level 527.
Step 21. Add Glass Door Panel
Install the glass door panel at the entrance area. This transparent door should provide access while maintaining visibility into the gaming studio.
Step 22. Build Entrance Stairs and Railings
Construct the entrance stairs leading up to the platform, then add the stair railings along the sides. These steps should provide safe access to the elevated studio space.
Step 23. Set Bottom Platform Base
Position the bottom platform base at the lower level. This foundation area should support the entrance and additional gaming equipment.
Step 24. Place Gaming Console Front in Dreamy Room Level 527
Set the gaming console front on the lower platform area. This gaming system should be positioned for easy access during console gaming sessions.
Step 25. Add Console Controllers and Accessories
Arrange the console controllers, gaming keyboard bottom, vr headset, and gaming accessories around the console area. These peripherals should be organized for quick access.
Step 26. Position Character Figures
Place the character figure main in the studio. This anime-style character should be positioned as the room's owner or streamer avatar.
Step 27. Add Pet Characters in Dreamy Room Level 527
Position the cat character white, cat character black, and hamster pet around the studio. These adorable companions should be placed near the desk or on the floor, adding life to the space.
Step 28. Place Potted Plants
Set the potted plant left and potted plant right at the studio's exterior corners. These green plants should bring natural elements to the tech-heavy environment.
Step 29. Add Shoes and Floor Cushion
Place the shoes pair near the entrance and position the floor cushion in a comfortable spot. These items add lived-in authenticity to Dreamy Room Level 527.
Step 30. Install Cable Management and LED Lights
Arrange the cable management system to organize wires, then add led strip lights along edges. Install snowflake decorations, wall posters, and merchandise display to complete the gaming studio atmosphere.
Tips and Important Notes
Important Notes
- The hexagonal display shelf must be mounted before adding collectibles, as the figurines attach to specific compartment positions
- Neon signs should be placed on exterior walls first to establish the room's branding before interior decoration begins
- The gaming chair and floor mat must be positioned together, as the mat defines the chair's placement zone in Dreamy Room Level 527
- Cable management should be addressed after all electronic devices are placed to avoid tangled wires blocking placement
- Pet characters have small footprints; zoom in to position them precisely on floor tiles or furniture edges
Useful Tips
- Start with structural elements (platform, walls, ceiling) before adding furniture to establish the studio's framework
- When arranging the hexagonal shelf collectibles, place larger trophy items first, then fill remaining hexagons with smaller figures
- The desk setup follows an ergonomic order: monitor first, then keyboard/mouse, finally accessories like lamp and drink
- Position the main character figure near the gaming chair to create a natural streaming setup composition
- LED strip lights and neon signs create the cyberpunk atmosphere; place them last to see how they illuminate the completed space
- If small items like controllers or accessories bounce back, try dragging them to flat surfaces rather than angled areas for better snap points in Dreamy Room Level 527