Dreamy Room Level 55
Level 55 guide walkthrough, helping players solve puzzles and explore the wonderful world of Dreamy Room.
Dreamy Room Level 55 Walkthrough Guide
Dreamy Room Level 55 Room Story
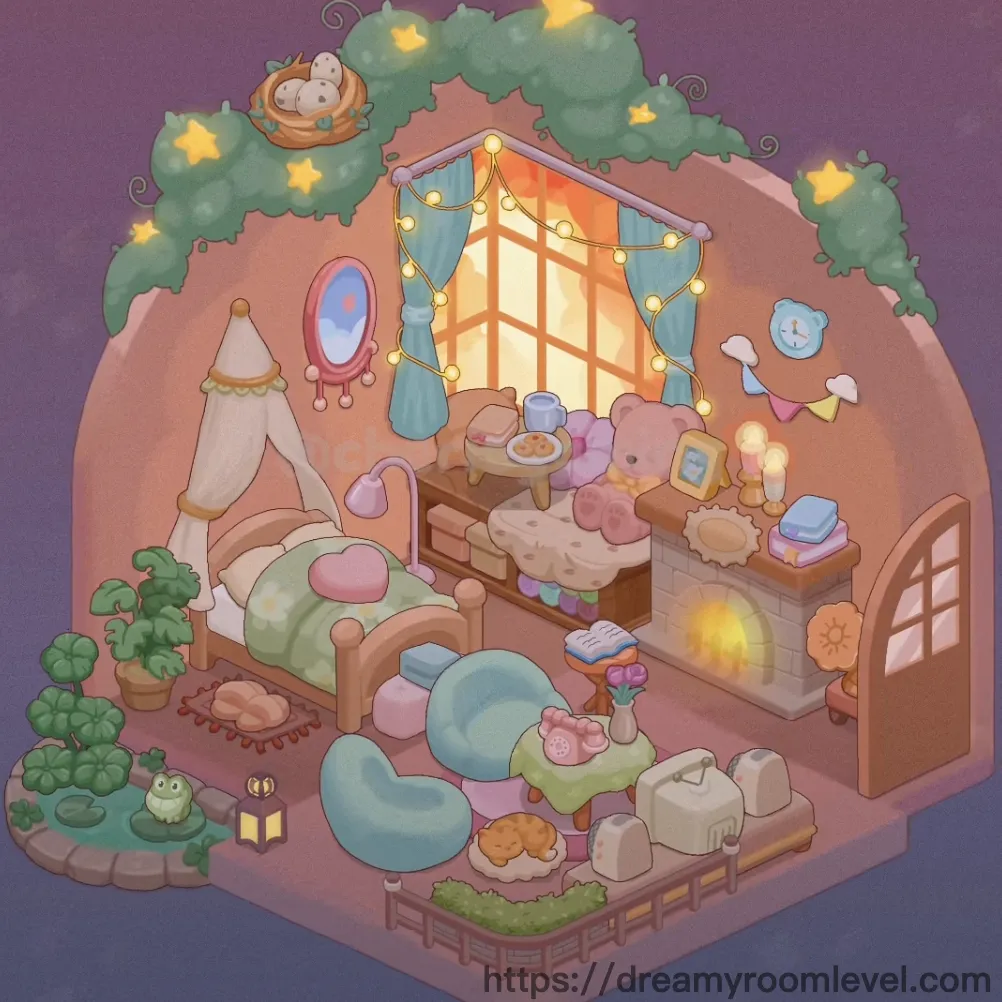
In a cozy corner where dreams take flight, a young artist has crafted her sanctuary in Dreamy Room Level 55. Soft pink and blue hues dance across plush cushions, while twinkling stars peek through leafy branches overhead. A sleeping cat curls beside steaming tea, baby birds nestle in their cozy home, and fairy lights cast a warm glow over this enchanted haven where creativity and comfort intertwine.
Step-by-Step Walkthrough
Step 1. Place the Door
Position the door at the bottom-right corner of the room to establish the main entrance. Align it flush with the right wall, ensuring it opens naturally into the living space for optimal flow in Dreamy Room Level 55.
Step 2. Install the Window
Drag the window to the upper-center section of the back wall. This large gridded window becomes the focal point, allowing natural light to illuminate the entire bedroom setup according to Dreamy Room Level 55 design.
Step 3. Hang the Blue Curtains
Attach the blue curtains directly onto the window frame you just placed. The flowing fabric with decorative tie-backs should drape elegantly on both sides, framing the window symmetrically in Dreamy Room Level 55.
Step 4. Add String Lights to Window
Drape the string lights across the top of the window and curtains. The warm bulbs should create a gentle arc, adding magical ambiance to the upper section of this Dreamy Room Level 55 bedroom.
Step 5. Position the Bed
Place the large bed in the center-right area of the room. This is the main furniture piece in Dreamy Room Level 55, so ensure it's angled slightly to create visual interest while leaving space for other elements.
Step 6. Add Pink Bedding
Layer the pink bedding onto the bed you just positioned. The soft pink sheets and blanket should cover the mattress completely, creating the cozy foundation for Dreamy Room Level 55's sleeping area.
Step 7. Arrange Pillows on Bed
Add the pillows including the pink pillow, green pillow, and white pillow against the headboard. Stack them in a visually appealing arrangement to complete the bed setup in Dreamy Room Level 55.
Step 8. Place the Bedside Table
Position the bedside table immediately to the left of the bed. This small wooden table should be close enough for easy reach, serving as a functional element in Dreamy Room Level 55.
Step 9. Set Up the Table Lamp
Place the table lamp on top of the bedside table. The soft glow from this lamp provides perfect reading light and adds warmth to the Dreamy Room Level 55 bedroom atmosphere.
Step 10. Stack Books on Bedside Table
Arrange the books neatly on the bedside table next to the lamp. These stacked volumes add a literary touch and demonstrate the room owner's love for reading in Dreamy Room Level 55.
Step 11. Position the Blue Chair
Place the blue chair in the lower-left section of the room near the tent area. This comfortable seating creates a cozy reading nook essential to Dreamy Room Level 55's design.
Step 12. Add Pink Chair Cushion
Set the pink chair cushion on the blue chair seat. The soft pink cushion provides extra comfort and ties together the color scheme of Dreamy Room Level 55.
Step 13. Set Up Small Round Table
Position the small round table directly in front of the blue chair. This creates a perfect tea time setup in the lower-left area of Dreamy Room Level 55.
Step 14. Place Teapot and Tea Cup
Set the teapot and tea cup on the small round table. Arrange them as if ready for afternoon tea, adding a charming detail to Dreamy Room Level 55.
Step 15. Lay Down the Pink Rug in Dreamy Room Level 55
Spread the pink rug in the center floor area beneath the chair and table setup. This soft rug defines the seating zone and adds warmth to the lower section of the room.
Step 16. Arrange Floor Cushions
Place the floor cushions, specifically the blue floor cushion and pink floor cushion, on and around the pink rug. These provide extra seating for a cozy gathering space in Dreamy Room Level 55.
Step 17. Set Up the White Tent
Position the white tent in the upper-left corner of the room. This charming play tent creates a magical hideaway spot, adding whimsy to the Dreamy Room Level 55 layout.
Step 18. Hang the Pink Mirror
Mount the pink mirror on the left wall between the tent and the door. The oval-shaped mirror with decorative frame adds functionality and elegance to Dreamy Room Level 55.
Step 19. Place the Hat Stand
Position the hat stand near the pink mirror on the left wall. This practical accessory provides storage while maintaining the room's aesthetic in Dreamy Room Level 55.
Step 20. Install the Hanging Lamp in Dreamy Room Level 55
Suspend the hanging lamp from the ceiling in the center of the room. This large decorative lantern with warm lighting becomes a stunning centerpiece for the entire space.
Step 21. Add the Potted Plant
Place the potted plant in the bottom-left corner near the door. The lush green foliage brings natural elements into Dreamy Room Level 55's design.
Step 22. Position the Tree with Stars
Set up the tree with stars in the back-left corner behind the bed. This magical tree with twinkling yellow stars creates an enchanted canopy effect in Dreamy Room Level 55.
Step 23. Add the Bird Nest and Baby Birds
Place the bird nest with baby birds in the upper branches of the star tree. These adorable creatures add life and charm to the nature-inspired elements of Dreamy Room Level 55.
Step 24. Scatter Yellow Star Decorations in Dreamy Room Level 55
Distribute the yellow star decorations throughout the tree branches and upper areas. These glowing stars enhance the magical atmosphere throughout the room.
Step 25. Place the Sleeping Cat
Position the sleeping cat curled up on one of the floor cushions or near the small table. This peaceful feline adds a cozy, lived-in feeling to Dreamy Room Level 55.
Step 26. Add the Bee
Place the small bee near the potted plant or flowers in the lower-left area. This tiny detail brings the garden theme to life in Dreamy Room Level 55.
Step 27. Install the Shelf Unit
Mount the shelf unit on the right wall above the bed area. This storage piece provides display space for decorative items in Dreamy Room Level 55.
Step 28. Hang the Picture Frame in Dreamy Room Level 55
Place the picture frame on the shelf unit or right wall. The framed artwork adds personal touches and visual interest to the room's decor.
Step 29. Add the Stuffed Bear
Position the stuffed bear on the shelf unit or bed. This cuddly companion adds warmth and personality to Dreamy Room Level 55's collection.
Step 30. Place the Wooden Fence
Set up the wooden fence along the bottom front edge of the room platform. This decorative border defines the room's boundary in Dreamy Room Level 55.
Step 31. Lay the Grass Mat
Spread the grass mat along the front area inside the wooden fence. This green texture adds to the garden-inspired theme of Dreamy Room Level 55.
Step 32. Position the Lantern in Dreamy Room Level 55
Place the lantern on the grass mat or near the wooden fence. The soft glow from this light source enhances the cozy outdoor-meets-indoor vibe.
Step 33. Set Up the Fireplace
Install the fireplace in the right-center area near the bed. This warm feature adds comfort and serves as a focal point in Dreamy Room Level 55.
Step 34. Place the Basket
Position the basket near the fireplace or tent area. This woven storage piece maintains organization while adding rustic charm to Dreamy Room Level 55.
Step 35. Add Decorative Lights
String the decorative lights along various areas including the tent, shelves, or ceiling. These twinkling lights create ambient illumination throughout Dreamy Room Level 55.
Step 36. Install Wall Decorations in Dreamy Room Level 55
Hang the wall decorations on available wall spaces. These artistic pieces personalize the room and complete the visual story.
Step 37. Place the Candle
Set the candle on the small table, shelf, or bedside table. The soft candlelight adds romantic ambiance to Dreamy Room Level 55.
Step 38. Add the Small Table
Position the additional small table wherever needed for balance. This versatile piece provides extra surface space in Dreamy Room Level 55.
Step 39. Hang Fluffy Clouds Decoration
Suspend the fluffy clouds decoration from the ceiling or upper corners. These whimsical elements enhance the dreamy atmosphere of the room.
Step 40. Place the Pink Ottoman in Dreamy Room Level 55
Position the pink ottoman near the seating area or at the foot of the bed. This soft footrest provides additional comfort and seating.
Step 41. Add Marshmallow Decorations
Scatter the marshmallow decorations on shelves, tables, or cushions. These sweet-themed accents complete the cozy, whimsical aesthetic of Dreamy Room Level 55.
Notes and Tips
Important Notes
- The tree with stars in the upper-left corner contains multiple small elements (bird nest, baby birds, star decorations) that can be easily missed - carefully check all branches
- The pink and blue color scheme requires precise cushion placement - ensure the pink floor cushion and blue floor cushion complement each other without color clashing
- Small items like the bee, candle, and marshmallow decorations are easily overlooked - systematically scan the entire room after placing larger furniture
- The hanging lamp's central position may block access to items beneath it - place ceiling decorations after completing floor-level arrangements
- When arranging the three different pillows on the bed, layer them properly to avoid one obscuring another's placement zone
Practical Tips
- For the tent area in the lower-left corner, place the tent structure first, then add surrounding cushions and small items to avoid repositioning
- The star tree branches have specific attachment points for the nest - drag from below and release when you feel the snap-in sensation
- When placing multiple decorative lights and string lights, start with the window lights first to establish the illumination hierarchy in Dreamy Room Level 55
- The wooden fence along the front edge requires precise alignment - drag horizontally while watching for the green highlight indicator
- For clustered items on the bedside table (lamp, books), place the larger lamp first to establish the anchor point, then stack books beside it
- The fireplace area tends to have tight spacing - approach from the right side and release when the placement ghost turns from red to green, completing your Dreamy Room Level 55 setup successfully