Dreamy Room Level 117
Level 117 guide walkthrough, helping players solve puzzles and explore the wonderful world of Dreamy Room.
Dreamy Room Level 117 Walkthrough Guide
Dreamy Room Level 117 Room Story
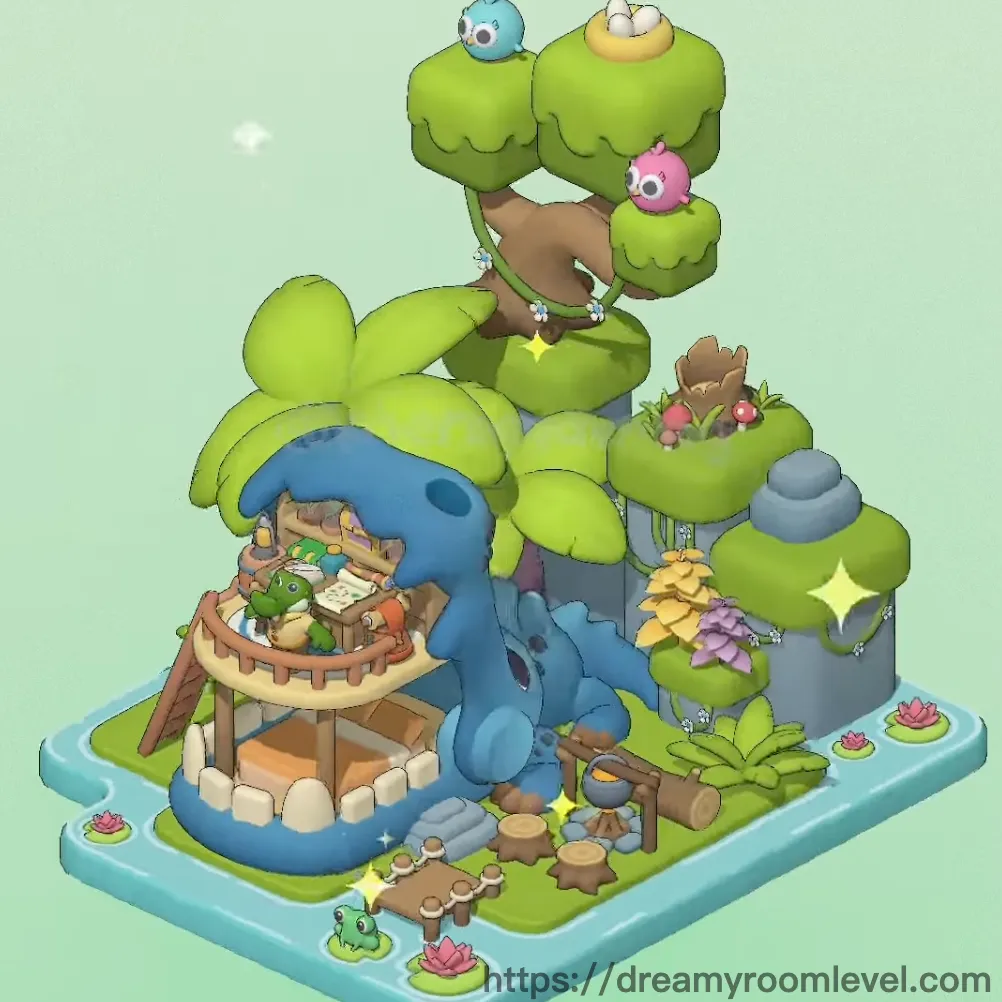
In a magical forest clearing, a whimsical tree house stands as a sanctuary for woodland creatures. Blue and pink birds chirp melodiously from their cozy nest while a friendly frog lounges by the lotus pond below. This enchanted dwelling, built around a magnificent tree, features winding bridges, stone pillars, and lush green platforms that create a perfect harmony between nature and architecture in Dreamy Room Level 117. The scene sparkles with life and wonder.
Dreamy Room Level 117: Step-by-Step Placement Guide
Step 1. Position the Main Tree Structure
Place the tree at the center-right area of the base platform. The tree trunk should anchor firmly to the ground while the tree crown extends upward naturally. This central element defines the entire layout structure and serves as the foundation for all other components in Dreamy Room Level 117.
Step 2. Install Gray Stone Support Pillars
Drag the gray stone pillar elements to form vertical supports on the right side of the tree. Position multiple gray stone pieces and rock components in descending heights. These pillars create the structural framework needed for the elevated platforms.
Step 3. Set Up Large Green Leaf Platform in Dreamy Room Level 117
Place the large green leaf platform at ground level, occupying the lower-left corner. This spacious green platform serves as the main foundation area. Ensure it aligns perfectly with the base edge to maximize usable space.
Step 4. Position Upper Level Platforms
Arrange multiple small green leaf platform pieces at various heights along the stone pillars. Stack them in ascending order from bottom to top, creating a multi-level terrace system that follows Dreamy Room Level 117 design principles.
Step 5. Build the Tree House Structure
Attach the tree house to the upper-left section of the tree crown. This wooden platform dwelling should nestle securely among the branches. Position it so it appears naturally integrated with the tree's architecture.
Step 6. Install Wooden Bridge Connection
Place the wooden bridge horizontally across the middle section, connecting the tree house area to the stone pillar platforms. The wooden planks should align with both endpoints to create a stable walkway essential for Dreamy Room Level 117 navigation.
Step 7. Add Wooden Fence and Railings in Dreamy Room Level 117
Install the wooden fence along the outer edge of the ground-level platform. Position fence railing sections around the perimeter to define the boundary. These safety barriers add both function and aesthetic appeal.
Step 8. Position Wooden Stairs and Ladder
Attach the wooden stairs connecting the ground level to the first elevated platform. Place the ladder vertically between upper platforms. These access points enable vertical movement throughout the structure.
Step 9. Add Support Beams and Structural Elements
Insert wooden beam and support beam pieces beneath platforms and bridges. These reinforcement elements ensure structural integrity and follow proper construction logic in Dreamy Room Level 117.
Step 10. Create the Ground Level Pond
Position the pond at the lower-left corner of the base platform. The water element should fill this area naturally, creating a serene aquatic feature that completes the natural environment.
Step 11. Place Lotus Flowers in Water in Dreamy Room Level 117
Arrange multiple lotus flower pieces floating on the pond surface. Add several pink lotus blooms throughout the water area. These delicate flowers add vibrant color to the aquatic scene.
Step 12. Add Lily Pads
Scatter lily pad elements across the pond surface between the lotus flowers. These flat green pads create visual variety and provide landing spots for the frog character.
Step 13. Position the Green Frog Character
Place the green frog on a lily pad or at the pond's edge. This frog character adds personality and life to the water feature, serving as a charming inhabitant of Dreamy Room Level 117.
Step 14. Install Bird Nest at Tree Top
Position the bird nest in the highest section of the tree crown, nestled among the foliage. Place the eggs carefully inside the nest. This creates a cozy home for the bird characters.
Step 15. Add Blue and Pink Birds in Dreamy Room Level 117
Place the blue bird perched on the upper-left branch or platform edge. Position the pink bird on a different middle-level platform. These colorful avian residents bring the scene to life.
Step 16. Position Table and Chair Set
Place the table on the ground-level wooden platform area. The wooden table should sit near the fence edge. Add the chair beside it, positioning the small stool at the opposite side for a complete seating arrangement.
Step 17. Add Mushrooms Throughout the Scene
Scatter various mushroom pieces across ground-level and lower platforms. Place red mushroom and small mushroom varieties in clusters near the tree base and along platform edges for natural woodland ambiance in Dreamy Room Level 117.
Step 18. Install Hanging Vines and Ropes in Dreamy Room Level 117
Attach vine elements to upper platforms, allowing hanging vine strands to drape downward. Add chain and rope elements for decorative suspension details between levels.
Step 19. Position Tree Stump and Wooden Logs
Place the tree stump on the lower-right platform section as a natural accent piece. Arrange wooden log elements nearby or stacked to add rustic detail.
Step 20. Add Foliage and Leaves in Dreamy Room Level 117
Distribute leaves and foliage elements throughout the tree crown and around platforms. This greenery fills gaps and creates a lush, organic appearance essential to the forest setting.
Step 21. Plant Grass and Ground Coverage
Spread grass and green grass across all platform surfaces. Add bushes in corners and edges to create natural ground coverage throughout Dreamy Room Level 117.
Step 22. Position Purple and Yellow Flowers
Attach purple flowers as hanging flowers from upper platforms or bridge undersides. Scatter yellow flowers across ground-level areas for colorful accents.
Step 23. Add Small Plants and Branches in Dreamy Room Level 117
Place various small plant elements in corners and along edges. Position branch and twig pieces naturally around the tree trunk and platforms to enhance the woodland aesthetic.
Step 24. Install Floor Boards
Lay floor boards across the wooden platform areas to create solid walking surfaces. These boards should align with the platform edges and connect seamlessly with stairs and bridges.
Step 25. Add Blue Decoration Sculpture
Position the blue decoration piece prominently on a middle platform. This blue sculpture with its distinctive dinosaur shape serves as a unique focal point in Dreamy Room Level 117.
Step 26. Apply Moss to Surfaces in Dreamy Room Level 117
Add moss and green moss to stone pillars, wooden beams, and platform edges. This organic growth adds age and character to the structure, enhancing the natural appearance.
Step 27. Add Magical Sparkle Effects
Place white sparkle elements throughout the scene, particularly around the tree house and upper platforms. Position star effect pieces to create a magical, twinkling atmosphere that completes Dreamy Room Level 117's enchanted forest ambiance.
Tips and Precautions
Precautions
- The bird nest and eggs are easily overlooked in the dense tree crown foliage; carefully scan the upper-right section when placing these small elements according to Dreamy Room Level 117 requirements
- Stone pillars must be positioned before platforms to avoid placement conflicts; attempting to add pillars after platforms will cause items to bounce back
- Small mushrooms near the tree base can be hidden by larger elements; place them early in the sequence before adding extensive ground coverage
- The blue sculpture has a specific orientation; if it appears misaligned, rotate it slightly before releasing to lock into the correct position
- Chain and rope elements require precise attachment points; zoom in when placing these thin decorative items to ensure they connect properly
Practical Tips
- Begin with larger structural elements and progress to smaller decorative items for efficient completion of Dreamy Room Level 117 challenges
- Use the tree trunk as your central reference point when positioning platforms and pillars at various heights
- Drag vines and hanging flowers downward slowly to trigger the snap mechanism that automatically positions them correctly
- For dense flower clusters, place items from back to front to create natural layering without overlap issues
- The frog and birds have subtle hover zones; approach placement spots from above rather than sideways for better accuracy in Dreamy Room Level 117
- Save small plants, moss, and sparkle effects for final touches after all major elements are secured, ensuring these details don't obstruct larger placements