Dreamy Room Level 50
Level 50 guide walkthrough, helping players solve puzzles and explore the wonderful world of Dreamy Room.
Dreamy Room Level 50 Walkthrough Guide
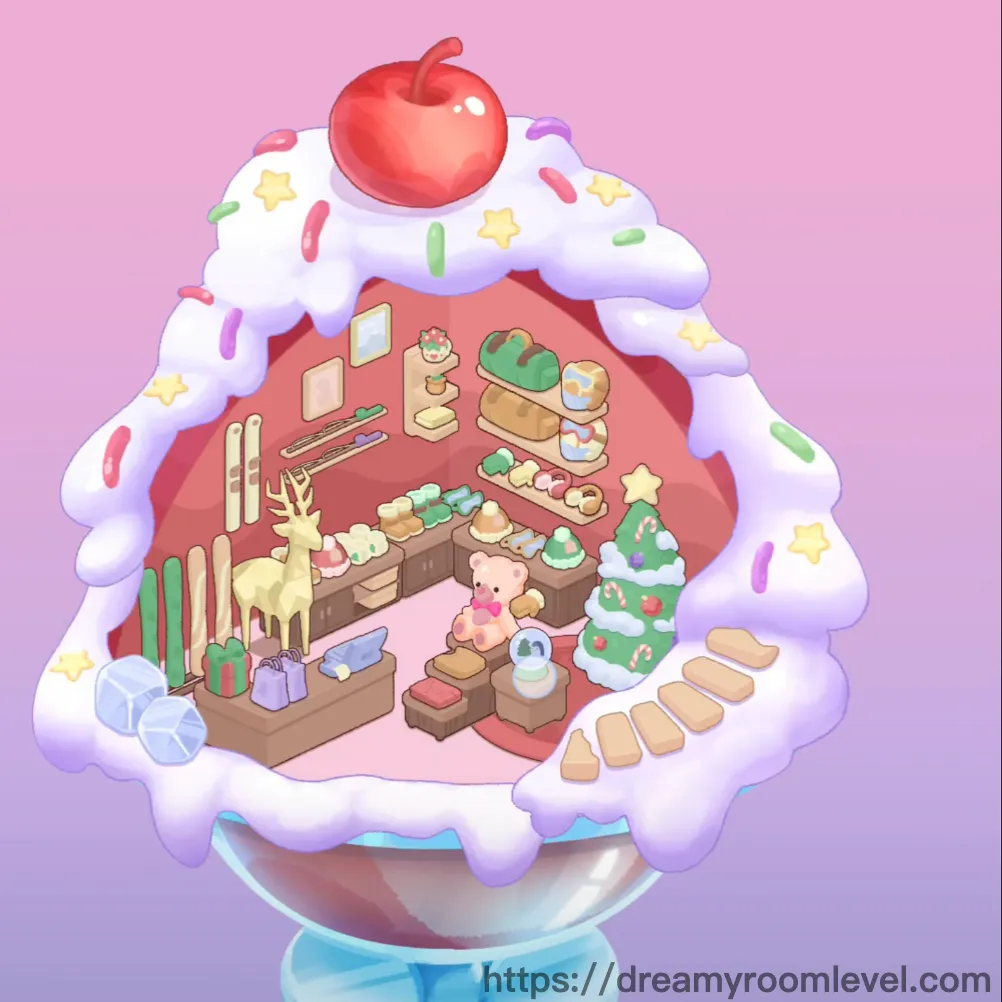
Dreamy Room Level 50 Room Story
In a cozy winter wonderland, a young baker dreams of creating the perfect holiday cottage. The pink walls glow warmly as snowflakes drift outside, while inside, Christmas decorations mingle with sweet treats. Each carefully placed item in Dreamy Room Level 50 tells the story of a magical season where festive celebrations meet culinary artistry, transforming a simple cottage into a delightful gingerbread-inspired masterpiece topped with whipped cream clouds and candy dreams.
Step-by-Step Placement Guide
Step 1. Place the Purple Cube
Position the purple cube at the center-bottom of the pink floor area. This glowing cube serves as the starting point, so drag it directly to the middle of the floor platform where it will anchor perfectly.
Step 2. Set Up Brown Storage Box and Drawer Unit
Drag the brown storage box to the left side of the room, placing it against the pink wall. Add the drawer unit as an extension, creating a connected storage system. Following Dreamy Room Level 50 design principles, align both pieces flush against the wall for a seamless look.
Step 3. Install Wooden Stairs and Stair Steps
Place the wooden stairs on the right side of the storage unit, creating access to elevated areas. Add the stair steps extending from the base, forming a complete staircase. This placement is essential for Dreamy Room Level 50 success, ensuring proper room flow.
Step 4. Position Pink Carpet
Lay the pink carpet on the floor in front of the storage area, centering it beneath where the stairs meet the ground. Drag it to cover the floor space between furniture pieces, creating a warm foundation for Dreamy Room Level 50.
Step 5. Add Green Slippers
Place the green slippers on the brown storage box surface, positioning them near the front edge. These cozy slippers should sit naturally as if someone just kicked them off after a busy day.
Step 6. Install Wooden Cabinet
Drag the wooden cabinet to connect with the existing storage system, extending the furniture arrangement. According to Dreamy Room Level 50 layout requirements, align it perfectly with adjacent pieces for structural continuity.
Step 7. Place Pink Teddy Bear in Dreamy Room Level 50
Position the pink teddy bear on the stair steps, sitting it upright on the middle step. This adorable companion becomes the room's focal point, adding warmth to the holiday cottage atmosphere.
Step 8. Hang Square Mirror and Square Frame
Mount the square mirror on the left wall section, placing it at eye level above the storage area. Add the square frame nearby on the same wall. Completing Dreamy Room Level 50 requires these decorative elements to be evenly spaced.
Step 9. Position Gold Reindeer and Yellow Deer
Place the gold reindeer on the floor to the left of the storage boxes, standing it upright. The yellow deer serves as an alternative name for the same festive decoration, adding Christmas spirit to this level.
Step 10. Set Up Christmas Tree in Dreamy Room Level 50
Drag the christmas tree to the right side of the room, positioning it prominently near the stairs. This decorated tree with its green tiers and ornaments becomes a centerpiece, essential for the holiday theme.
Step 11. Install Wooden Skis and Ski Poles
Lean the wooden skis against the left wall, propping them vertically near the corner. Add the ski poles beside them, creating a winter sports display. This placement is essential for Dreamy Room Level 50 success.
Step 12. Add Green Present and Red Present
Place the green present on the floor near the Christmas tree base, positioning it as if wrapped and waiting. Add the red present beside it, creating a gift collection. Following Dreamy Room Level 50 design principles, cluster presents together.
Step 13. Position Snow Globe and Blue Ornament
Set the snow globe on the bottom stair step or floor area near the pink teddy bear. Place the blue ornament nearby, adding festive decorative elements to complete the Christmas scene in this level.
Step 14. Install Wooden Beam, Wooden Plank, and Ceiling Beam
Attach the wooden beam horizontally across the upper wall section, creating architectural detail. Add the wooden plank as another horizontal element, and install the ceiling beam at the top. According to Dreamy Room Level 50 layout requirements, these create structural framework.
Step 15. Add Green Plant and Potted Plant in Dreamy Room Level 50
Place the green plant on top of the wooden cabinet surface, adding a touch of nature. The potted plant refers to the same botanical element, bringing fresh greenery to the cozy space.
Step 16. Position Wooden Shelf and Display Shelf
Mount the wooden shelf on the wall above the storage area, creating display space. The display shelf extends this storage system, perfect for showcasing decorative items in this level.
Step 17. Add Cushion Seat
Place the cushion seat on the floor or stair area, providing a comfortable sitting spot. This soft cushion adds functionality and comfort to the cottage setting.
Step 18. Install Tan Stepping Stones, Cookie Path, and Biscuit Steps
Arrange the tan stepping stones creating a path from the staircase extending outward. The and biscuit steps are decorative names for these pathway elements. Completing Dreamy Room Level 50 requires these to form a clear walking route.
Step 19. Position Purple Mug, Blue Cup, and Watering Can in Dreamy Room Level 50
Set the purple mug on the wooden shelf or cabinet surface, placing it upright. Add the blue cup nearby, and position the watering can next to the potted plant, creating a functional display.
Step 20. Add Gift Bag and Shopping Bag
Place the gift bag on the floor near the present collection, adding to the holiday gift display. The shopping bag sits beside it, suggesting recent holiday shopping adventures in this level.
Step 21. Position Floating Box and Ceiling Ornament
Hang the floating box in the upper portion of the room, suspended as a decorative element. Add the ceiling ornament at the top center, creating visual interest. Following Dreamy Room Level 50 design principles, these add whimsical touches.
Step 22. Begin Dessert Transformation with White Frosting and Whipped Cream in Dreamy Room Level 50
Now the magical transformation begins! Drape the white frosting over the upper edges of the pink walls, letting it cascade down like icing. Add generous amounts of whipped cream covering the top rim of the structure, creating a delicious dessert appearance.
Step 23. Add Cloud Decoration and White Clouds
Position the cloud decoration around the frosted edges, creating fluffy cloud-like formations. Layer the white clouds at various points around the exterior, enhancing the dreamy dessert cottage aesthetic. This placement is essential for Dreamy Room Level 50 success.
Step 24. Apply Pink Sprinkles, Purple Sprinkles, and Green Sprinkles
Scatter the pink sprinkles across the white frosting surface, distributing them evenly. Add purple sprinkles in clusters, then sprinkle green sprinkles throughout. According to Dreamy Room Level 50 layout requirements, create a colorful candy topping effect.
Step 25. Position Yellow Stars and Star Decorations in Dreamy Room Level 50
Place the yellow stars on the frosted surface, distributing them like edible decorations. The star decorations add sparkle and festivity to the dessert cottage, creating a magical finishing touch.
Step 26. Add Candy Cane, Striped Candy, and Lollipop
Insert the candy cane into the frosting on the upper right side, making it stand upright. Add the striped candy as another candy element, and position the lollipop nearby. Completing Dreamy Room Level 50 requires these sweet additions.
Step 27. Crown with Red Cherry and Large Apple
Place the red cherry at the very top center of the frosted structure, positioning it as the crowning element. The large apple can be interpreted as an alternative cherry topping. Following Dreamy Room Level 50 design principles, this becomes the focal point.
Step 28. Finalize with Blue Base and Glass Dome in Dreamy Room Level 50
Ensure the blue base is properly positioned at the bottom, supporting the entire structure. The glass dome encases everything beneath, creating a snow globe effect. This final touch completes the magical dessert cottage display.
Step 29. Confirm Pink Background Wall
Verify the pink background wall forms the solid backdrop for the entire scene, providing the warm foundation upon which all other elements rest in this charming level.
Tips and Tricks
Important Notes
- The purple cube must be placed first as it unlocks subsequent items in Dreamy Room Level 50
- Storage furniture should be assembled before adding decorative elements to avoid placement conflicts
- The Christmas tree requires sufficient floor space, so position it before adding surrounding gifts
- White frosting and sprinkles can only be applied after all base furniture and decorations are correctly placed
- The cherry topper is the final element and won't attach until the frosting layer is complete in this level
Practical Tips
- When placing stairs, drag from bottom to top for better alignment with the storage unit
- For the teddy bear, drop it slightly above the step surface and let it settle into position naturally
- Cluster presents together near the tree base for a cohesive gift display appearance
- Apply frosting in sections, starting from the back wall and working forward for even coverage
- Distribute sprinkles by tapping multiple times across the surface rather than dragging continuously
- Successfully completing Dreamy Room Level 50 requires patience during the dessert transformation phase, as each candy element has specific attachment points on the frosted surface