Dreamy Room Level 86
Level 86 guide walkthrough, helping players solve puzzles and explore the wonderful world of Dreamy Room.
Dreamy Room Level 86 Walkthrough Guide
Dreamy Room Level 86 Room Story
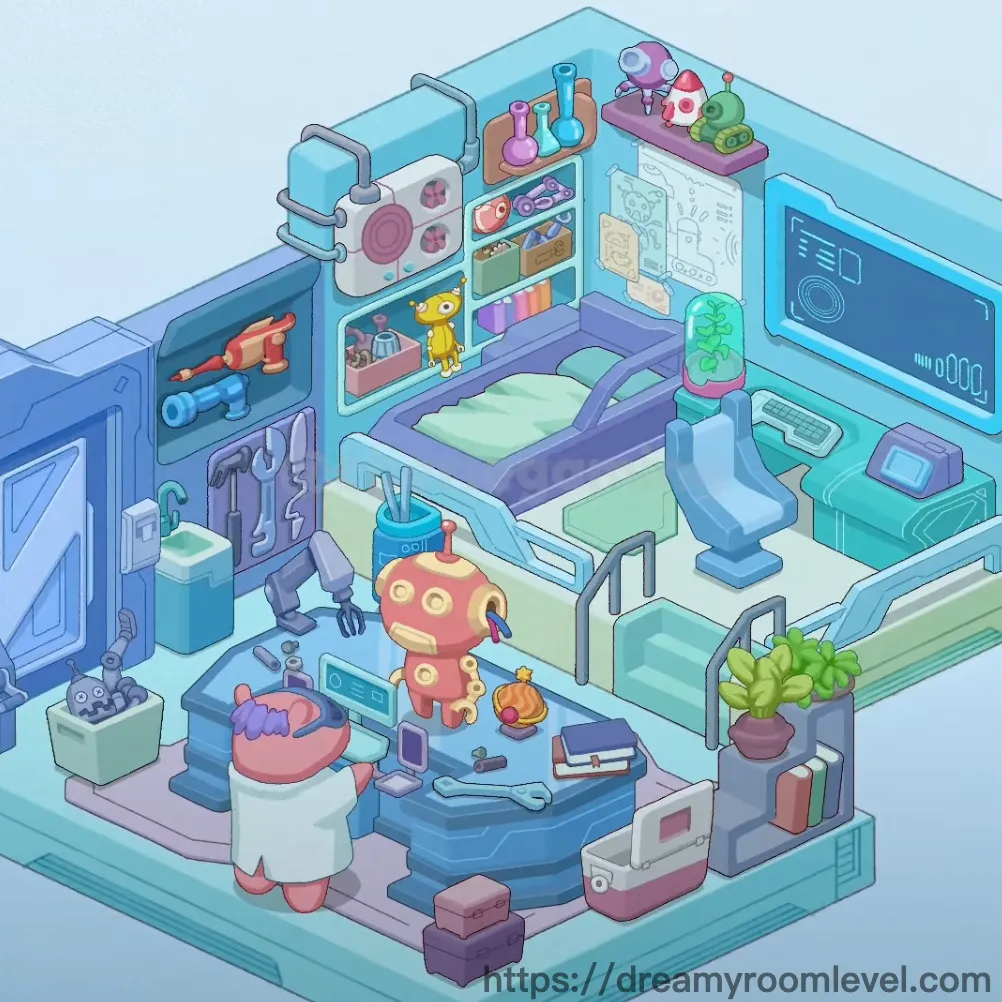
In a cozy corner of the city, young inventor Alex has transformed a small apartment into a magical robot workshop. Every morning, colorful robot companions greet their creator from the shelves, while chemistry experiments bubble quietly on the workbench. The space perfectly blends daily life with creative passion - a comfortable bed for dreaming up new inventions, a bathroom for refreshing breaks, and walls adorned with blueprints of future projects. This is where imagination meets reality in Dreamy Room Level 86, a sanctuary where mechanical wonders come to life.
Dreamy Room Level 86: Step-by-Step Placement Guide
Step 1. Place Window on the Right Wall
Position the window on the upper right wall section. This window provides natural lighting for the entire workshop space. Drag it to align with the wall's edge, ensuring it sits at eye level for optimal room illumination in Dreamy Room Level 86.
Step 2. Install Door at the Room Entrance
Place the door at the left side entrance area. The door should align with the floor level and fit snugly into the doorframe. This serves as the main entry point to complete the room's basic structure.
Step 3. Set Up Wall Panel and Tech Panel
Install the wall panel along the back wall, then attach the tech panel beside it on the right section. These panels create the workshop's tech-focused atmosphere and provide mounting surfaces for equipment in Dreamy Room Level 86.
Step 4. Position Bed in the Sleeping Area
Drag the bed to the lower right corner of the room. Place it parallel to the right wall, leaving space between the bed and wall for accessibility. The bed should be positioned where the sleeping area naturally forms.
Step 5. Arrange Pillow and Blanket on Bed
Place the pillow at the head of the bed, then drape the blanket across the mattress. The pillow goes at the top end while the blanket covers the middle section, creating a cozy sleeping space essential for Dreamy Room Level 86.
Step 6. Set Up Desk and Chair in Work Area
Position the desk along the right wall near the window, then place the chair directly in front of it. Ensure the chair faces the desk for a functional workspace layout that follows Dreamy Room Level 86 design principles.
Step 7. Install Computer Monitor and Keyboard
Mount the computer monitor on the desk surface near the back edge, then position the keyboard in front of it. This creates the main workstation for programming and design work in the tech lab.
Step 8. Place Bathtub in Bathroom Corner
Drag the bathtub to the lower left corner near the entrance. Position it against the corner walls to maximize floor space. This placement is essential for Dreamy Room Level 86 bathroom functionality.
Step 9. Install Toilet and Sink
Place the toilet beside the bathtub on the right side, then position the sink next to it. These fixtures should align along the bathroom wall to create a compact and functional bathroom area.
Step 10. Mount Bookshelf with Books
Install the bookshelf on the back wall's middle section, then fill it with books. The shelf should be at mid-wall height with books arranged on multiple levels, following Dreamy Room Level 86 storage requirements.
Step 11. Set Up Cabinet and Drawer Storage
Place the cabinet along the left wall, then position the drawer unit beneath or beside it. These storage units provide essential organization space for tools and materials in the workshop area.
Step 12. Install Pipes and Ceiling Pipes
Attach the pipes to the lower wall sections, then mount the ceiling pipes overhead. These industrial elements run horizontally across the upper portion, adding authentic workshop character to Dreamy Room Level 86.
Step 13. Position Robotic Arm on Upper Shelf
Mount the robotic arm on the upper left shelf area near the toolbox section. This mechanical component should be angled forward as if ready to grab tools, completing the automated workshop feel of Dreamy Room Level 86.
Step 14. Arrange Purple, Yellow, and Orange Robots
Place the purple robot on the top right shelf, the yellow robot on the middle bookshelf, and the orange robot on the floor near the center. These colorful companions bring life to different areas of the room.
Step 15. Position Green and Pink Robots
Set the green robot on the upper right shelf beside the purple robot, then place the pink robot on the top shelf as well. Group these robot toys together to create a collection display in Dreamy Room Level 86.
Step 16. Place Additional Robot Toy Collection
Position the remaining robot toy on any available shelf space near other robots. This completes the mechanical companions collection that makes the workshop feel alive and friendly.
Step 17. Set Up Chemistry Set with Flasks
Arrange the chemistry set on the upper left shelf, then add the pink flask, blue flask, and orange flask around it. These colorful containers should be grouped together to create a mini laboratory section following Dreamy Room Level 86 layout.
Step 18. Arrange Beaker and Test Tubes
Place the beaker beside the chemistry set, then position the test tubes in holders nearby. These scientific instruments complete the experimental area on the shelf system.
Step 19. Position Microscope for Lab Work
Set the microscope on the desk or nearby shelf surface. Place it in a stable position where it can be easily accessed for detailed examination work in Dreamy Room Level 86.
Step 20. Organize Tools - Wrench, Drill, and Hammer
Place the wrench on the left wall tool area, position the drill beside it, and hang the hammer nearby. These primary tools should be easily accessible on the tool wall section.
Step 21. Arrange Toolbox and Additional Tools
Set the toolbox on the lower left shelf or floor area, keeping additional tools organized inside or beside it. This creates a centralized tool storage following Dreamy Room Level 86 organization principles.
Step 22. Position Mechanical Gears
Place the gear and mechanical gear on the desk or shelf surfaces near other mechanical parts. These components add industrial detail and suggest ongoing projects in the workshop space.
Step 23. Hang Blueprints and Wall Posters
Attach the blueprints to the right wall section, then hang the wall poster beside it. Add the science poster to another wall area. These decorative elements showcase the inventor's projects in Dreamy Room Level 86.
Step 24. Install Control Panel and Screen Display
Mount the control panel on the right desk area, then position the screen display above or beside it. These tech interfaces should be at eye level for easy monitoring of workshop systems.
Step 25. Set Up Lamp and Desk Lamp
Position the lamp on the floor or side table for ambient lighting, then place the desk lamp on the desk corner. These lighting fixtures illuminate work areas effectively in Dreamy Room Level 86.
Step 26. Arrange Radio for Entertainment
Place the radio on the upper left shelf area near the chemistry set. This vintage-style device adds character and provides music while working, fitting the retro-tech aesthetic of the room.
Step 27. Position Potted Plant and Plant Decor
Set the potted plant on the floor in the lower right area, then add the smaller plant on a shelf or desk. These green elements bring natural life to the tech-focused environment of Dreamy Room Level 86.
Step 28. Place Teddy Bear on Bed
Position the teddy bear on the bed beside the pillow or blanket. This cuddly companion adds warmth to the sleeping area and shows the human side of the inventor's space.
Step 29. Arrange Toy Car and Toy Tank
Place the toy car on a shelf or floor area, then position the toy tank nearby. These playful toys suggest the inventor's interests extend beyond just robots in Dreamy Room Level 86.
Step 30. Add Rainbow Decoration and Color Palette
Hang the rainbow decoration on the wall or shelf edge, then place the color palette on the desk or nearby surface. These artistic elements add vibrant personality to the workshop space.
Step 31. Organize Storage Boxes and Containers
Position storage boxes on shelves or floor areas, then arrange various containers, bottles, and jars throughout the room. These organizational items keep small parts and supplies tidy following Dreamy Room Level 86 storage system.
Step 32. Set Up Shelf and Wall Shelf Systems
Install the shelf units along walls where needed, then mount the wall shelf sections for additional storage. These create the multi-level display system essential for organizing the workshop's many items.
Step 33. Position Cart and Storage Cart
Place the cart in the central floor area for mobile storage, then position the storage cart nearby or against a wall. These wheeled units provide flexible organization in Dreamy Room Level 86.
Step 34. Add Decorative Ball Accent
Place the decorative ball on a shelf or in a corner as a colorful accent piece. This playful element adds visual interest and completes the room's cheerful atmosphere.
Step 35. Arrange Purple and Blue Furniture
Position the purple furniture piece in its designated area, then place the blue furniture component where it fits best. These colored furniture items tie together the room's vibrant tech aesthetic.
Step 36. Place Rug and Floor Mat
Lay the rug in the central floor area to define the main activity space, then position the floor mat near the entrance or bathroom. These soft elements add comfort underfoot in Dreamy Room Level 86.
Step 37. Install Final Switch
Mount the switch on the wall near the door or lighting fixtures. This control element completes the room's electrical system and allows for easy light management in the workshop.
Tips and Tricks for Dreamy Room Level 86
Common Mistakes to Avoid
- Don't overlook the small bottles and jars scattered throughout the shelves - they're easy to miss between larger items but essential for completion
- Avoid placing the robotic arm too close to the wall; it needs clearance space to maintain its reaching pose without clipping
- Be careful with the ceiling pipes placement - they should run parallel to the ceiling without intersecting with wall-mounted items
- Don't confuse the different colored robots; each has a specific shelf location based on their design and color scheme
- Watch for the subtle difference between the regular cart and storage cart - they have different wheel configurations
Placement Strategies
- Start with the bathroom fixtures first since they anchor the lower left corner and create clear boundaries for other items
- Group all robot toys together before placing them to visualize the collection display effectively in Dreamy Room Level 86
- Place chemistry equipment from largest to smallest to avoid accidentally covering up tiny test tubes with larger flasks
- Use the window as a reference point when positioning the desk and chair - they should face the natural light source
- The tool wall on the left requires precise vertical alignment; place the wrench first as an anchor point for other tools
- For densely packed shelves, place background items first, then layer smaller objects in front to prevent overlapping issues