Dreamy Room Level 123
Level 123 guide walkthrough, helping players solve puzzles and explore the wonderful world of Dreamy Room.
Dreamy Room Level 123 Walkthrough Guide
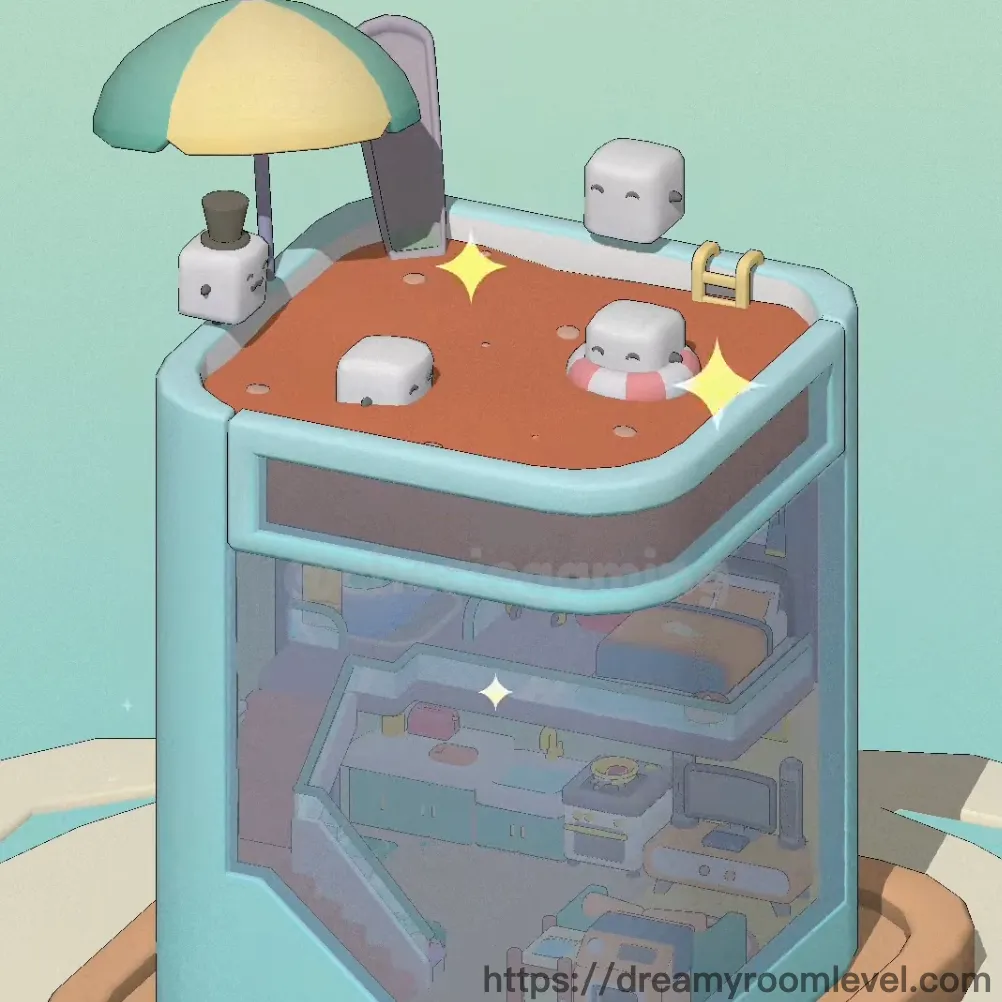
Dreamy Room Level 123 Room Story
In the heart of the city stands a charming duplex apartment where Emma, a young architect, crafted her dream sanctuary. The first floor welcomes you with a cozy kitchen bathed in mint-green cabinetry and a living space adorned with purple accents. Ascending the wooden stairs reveals her private retreat—a loft bedroom with a luxurious bathtub overlooking the space below. Every corner of this Dreamy Room Level 123 reflects Emma's vision: functional elegance meets whimsical comfort, creating a harmonious dwelling where creativity and relaxation intertwine beneath the soft glow of ceiling lamps.
Dreamy Room Level 123: Step-by-Step Placement Guide
Step 1. Establish the Room Frame and Floor
Position the room frame to define the apartment boundaries, creating the hexagonal container structure. Lay the floor foundation across both levels to establish the base surface for all furniture placement in Dreamy Room Level 123.
Step 2. Install Walls and Wall Panels
Set up the walls to form the interior divisions between living areas. Add decorative wall panels to the second-floor bedroom area, featuring vertical striping in soft gray tones that create visual depth.
Step 3. Build the Stairs and Second Floor Platform
Construct the stairs along the left wall, ensuring each step aligns properly for access between floors. Install the second floor platform above the kitchen area, creating the elevated bedroom space that defines Dreamy Room Level 123's duplex layout.
Step 4. Attach the Railing
Secure the railing along the edge of the second-floor platform, positioning it to prevent falls while maintaining an open, airy feel. The mint-green guard rail should align perfectly with the platform edge.
Step 5. Place Kitchen Counter and Cabinets
Position the kitchen counter against the back wall on the first floor, featuring mint-green cabinets below. Mount the upper cabinets above the counter with glass-fronted doors, creating essential storage in Dreamy Room Level 123.
Step 6. Install Kitchen Appliances
Place the sink in the left section of the counter for dishwashing functionality. Position the stove and oven unit in the center-right portion, ensuring proper alignment with the counter cutout.
Step 7. Add Kitchen Accessories
Set the toaster on the countertop near the stove, featuring a coral-pink color. Place the dish rack beside the sink for drying dishes, and position the kettle near the back corner.
Step 8. Add Cooking Essentials
Place the cooking pot on the stove surface, ready for meal preparation. Set the cutting board on the counter space between appliances for food preparation tasks in Dreamy Room Level 123.
Step 9. Install Bathroom Fixtures
Position the toilet in the left corner of the first floor, creating a compact bathroom area. Mount the bathroom shelf above for towel storage, and attach the toilet paper holder on the adjacent wall.
Step 10. Place Living Room Seating
Center the sofa in the living area facing outward, upholstered in mint-green fabric. Position the purple bench in front of the stairs, and place the small round table near the bathroom entrance.
Step 11. Set Up Stools
Place the yellow stool beside the purple bench, providing additional seating. Position the purple stool on the second floor near the bed, creating a cohesive color scheme throughout Dreamy Room Level 123.
Step 12. Install Entertainment Center
Place the TV stand along the right wall of the living area, featuring cream and mint-green colors. Mount the TV on top, angling it toward the sofa for optimal viewing.
Step 13. Add Floor Coverings and Decorative Elements
Lay the rug beneath the living room furniture in soft mint-green with wave patterns. Place the plant pot on the purple bench, adding greenery to the space according to Dreamy Room Level 123 design.
Step 14. Install Second Floor Bedroom Furniture
Position the bed on the right side of the second floor platform, ensuring the headboard faces the back wall. The bed should feature orange and blue bedding for a warm, inviting appearance.
Step 15. Add Luxury Bathroom Feature
Place the bathtub on the left side of the second floor, creating a spa-like feature. The white tub with curved fixtures should face toward the interior, adding elegance to Dreamy Room Level 123.
Step 16. Set Up Vanity Area
Position the vanity table between the bathtub and bed, featuring a coral-pink surface. Mount the mirror on the wall above in a circular frame with orange accent, and place the dresser nearby for storage.
Step 17. Add Personal Care Items
Arrange bottles on the vanity table surface, including cosmetics and perfumes. Place additional bottles on the dresser to complete the bedroom's functional setup in Dreamy Room Level 123.
Step 18. Install Window and Curtains
Mount the window on the right wall of the second floor, providing natural light. Hang curtains in golden-yellow fabric, creating privacy while maintaining the warm aesthetic.
Step 19. Add Dining Furniture
Place the dining table in the center of the first floor living area, featuring an orange top. Position the chair beside the table, upholstered in yellow tones for comfortable dining.
Step 20. Place Storage Solutions
Set the yellow box on the floor outside the room frame as the delivery container. Position the storage box near the base, ready to receive new items throughout Dreamy Room Level 123.
Step 21. Add Decorative Wall Features
Mount the wall shelf on the kitchen wall above the counters, displaying decorative items. Hang various wall decorations including the circular piece above the sink and items throughout the space.
Step 22. Install Lighting Fixtures
Suspend the ceiling lamp from the first floor ceiling, featuring a brown fixture for ambient lighting in Dreamy Room Level 123. Ensure proper placement to illuminate the living and kitchen areas evenly.
Step 23. Add Mysterious Element
Place the red glowing cube on the second-floor platform near the bed, featuring electrical patterns and a pink-red glow. This decorative element adds a magical touch to the bedroom space.
Step 24. Position Construction Materials
Set the wooden plank on the second floor platform between furniture pieces, appearing as part of the construction aesthetic that characterizes Dreamy Room Level 123's design process.
Step 25. Install Door
Mount the door in the entryway of the first floor, ensuring it swings properly for access. The door should align with the room frame opening.
Step 26. Add Utility Features
Position the light switch on the wall near the door for convenient lighting control. Place the ladder leaning against the bathroom area if needed for maintenance access.
Step 27. Install Roof Features
Position the roof terrace platform on top of the apartment structure. Add the umbrella to the terrace in yellow and mint-green colors, creating an outdoor relaxation space in Dreamy Room Level 123.
Step 28. Add Chimney Element
Install the chimney pipe extending from the roof terrace, featuring a purple-colored tube design. This decorative element adds character to the building's exterior profile.
Step 29. Place Character Figure
Position the character figure on the roof terrace, representing Emma enjoying her outdoor space. The white cubic character should be placed near the umbrella.
Step 30. Add Floor Accessories
Place slippers on the first floor near the bathroom entrance, in blue and pink colors. This practical detail adds a lived-in feel to Dreamy Room Level 123.
Step 31. Install Drawer Hardware
Attach drawer handles to all cabinet and dresser fronts throughout the apartment, featuring golden-yellow hardware that matches the overall color scheme in Dreamy Room Level 123.
Step 32. Add Final Decorative Elements
Integrate sparkle effects throughout the room, particularly around newly placed items and the red glowing cube. These visual effects indicate successful placement and add magical ambiance to Dreamy Room Level 123 completion.
Tips and Tricks for Dreamy Room Level 123
Common Mistakes to Avoid
- Don't overlook the small bottles on the vanity table—they're easy to miss behind larger furniture but essential for completion
- The purple stool on the second floor can be blocked by the railing if placed incorrectly; ensure it's positioned slightly back from the edge
- Wall decorations must be hung before placing tall furniture nearby, or they'll be difficult to access in Dreamy Room Level 123
- The wooden plank on the second floor appears decorative but has a specific placement spot near the bed
- Don't forget the drawer handles on cabinets—these tiny elements are often the last items needed for 100% completion
Placement Strategies
- Start with the room frame and structural elements before adding furniture to establish proper boundaries
- Place large furniture first (bed, sofa, kitchen counter) to define functional zones, then fill in smaller items
- The second floor requires careful angle adjustment when placing items due to the platform's height—drag from below and release when the item "snaps" into position
- For overlapping items like the vanity area, place the mirror after the table to ensure proper layering in Dreamy Room Level 123
- Use the sparkle effects as confirmation indicators—if an item doesn't sparkle after placement, try adjusting its position slightly
- The roof terrace items are best placed last, allowing you to focus on completing the main living spaces first before decorating the outdoor area