Dreamy Room Level 107
Level 107 guide walkthrough, helping players solve puzzles and explore the wonderful world of Dreamy Room.
Dreamy Room Level 107 Walkthrough Guide
Dreamy Room Level 107 Room Story
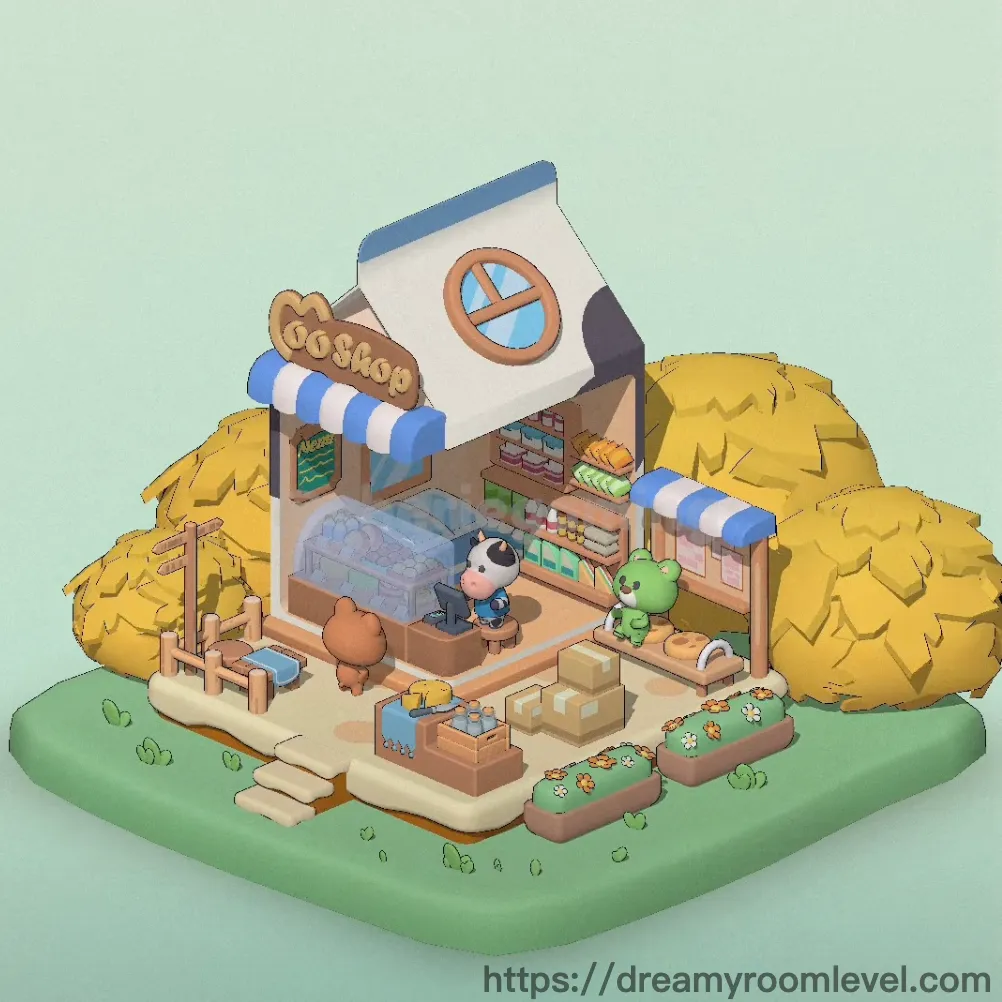
In the heart of a golden autumn forest, a cozy corner shop awakens each morning. The shopkeeper, a friendly cow in a blue apron, arranges fresh bread while her companions - a cheerful bear and a gentle green dinosaur - help prepare for the day. Through the round window, warm sunlight filters in, casting a honeyed glow over shelves filled with colorful goods. Outside, orange and white flowers bloom in neat garden plots, and wooden crates rest peacefully by the entrance. This charming scene in Dreamy Room Level 107 captures the essence of a peaceful autumn day, where friendship and simple joys create the perfect sanctuary.
Dreamy Room Level 107: Step-by-Step Placement Guide
Step 1. Place Green Grass Platform as Base Foundation
Drag the green grass platform to form the entire base layer. This creates the fundamental ground surface for Dreamy Room Level 107, ensuring all other elements have a stable foundation to rest upon.
Step 2. Install Stone Foundation and Wooden Steps
Position the stone foundation in the center-front area, then attach the wooden steps leading up to the shop entrance. Align the steps with the foundation's edge to create a smooth transition for the shop's front entrance in this level.
Step 3. Build Shop Main Structure with Walls and Roof
Place the shop building main structure on top of the foundation. Add the white walls to form the shop's exterior, then secure the brown roof and blue roof tiles top section. The roof should align perfectly with the wall edges, completing the main building structure for Dreamy Room Level 107.
Step 4. Add Round Window and Door Frame Entrance
Install the round window on the front white wall, positioning it slightly above center. Place the door frame entrance at ground level, centered on the front wall. These openings bring natural light and accessibility to the shop interior.
Step 5. Set Up Blue Striped Awnings on Both Sides
Attach the blue striped awning left and blue striped awning right to the exterior walls. Position them above the window and door areas, angled outward to provide shade. The striped pattern adds a charming shop-like appearance essential to Dreamy Room Level 107's aesthetic.
Step 6. Install Wooden Sign Coshop Above Entrance
Mount the wooden sign coshop directly above the left awning area. The sign should hang prominently where customers can easily spot it, displaying the shop's name clearly in this cozy autumn setting.
Step 7. Place Wooden Flooring Inside Shop
Lay down the wooden flooring throughout the interior space. Cover the entire shop floor area, ensuring it fits wall-to-wall and creates a warm, polished surface for all interior furniture and fixtures.
Step 8. Install Ceiling Lamp Inside
Hang the ceiling lamp from the center of the ceiling interior. Position it to provide even lighting across the shop floor, illuminating the counter and display areas below.
Step 9. Set Up Wooden Counter in Center
Place the wooden counter in the central interior area, facing toward the entrance. This becomes the main transaction point, positioned where the shopkeeper can easily serve customers in Dreamy Room Level 107.
Step 10. Add Glass Display Case Near Counter
Position the glass display case to the left side of the counter. Align it parallel to the counter's edge, creating an attractive showcase area for premium goods.
Step 11. Install Wooden Shelves on Interior Walls
Mount the wooden shelf left inside on the left interior wall and the wooden shelf right inside on the right wall. Position them at eye level, ensuring they're securely attached and level. Add shelf dividers to organize the storage sections properly.
Step 12. Place Cash Register on Counter
Set the cash register on the wooden counter's right side. Position it where the shopkeeper can easily access it while serving customers, making it a functional centerpiece of the shop operations.
Step 13. Arrange Green Containers on Left Shelf
Stock the green containers on shelf along the left wooden shelf. Arrange them in a neat row, ensuring they're evenly spaced and clearly visible to customers browsing the shop.
Step 14. Display Pink and Yellow Items on Right Shelf
Place the pink items on shelf and yellow items on shelf on the right wooden shelf. Mix the colors for visual appeal, creating an attractive product display that catches the eye in Dreamy Room Level 107.
Step 15. Add Product Labels on Shelves
Attach product labels on shelves to identify the items. Place them below or beside each product group, helping customers identify goods easily.
Step 16. Stock Bottles and Bread on Counter
Arrange the bottles on counter near the cash register area. Place the bread on counter beside them, creating an appetizing display of fresh goods for customers.
Step 17. Add White Cushions on Display Shelf
Position the white cushions on shelf in the lower section of the display case. Stack them neatly to showcase comfort items available in the shop.
Step 18. Place Cow Character Inside Shop
Position the cow character in shop behind the wooden counter, facing toward the entrance. This is the shopkeeper's position, ready to greet and serve customers entering Dreamy Room Level 107.
Step 19. Position Green Dinosaur Character Inside
Place the green dinosaur character to the right side of the counter area. Position them as if helping organize goods or assisting the shopkeeper with daily tasks.
Step 20. Set Brown Bear Character Outside Left
Position the brown bear character outside on the left exterior area, near the wooden bench. Place them as if they're a friendly visitor or helper preparing the outdoor space.
Step 21. Place Wooden Bench with Blue Cushion Outside
Set the wooden bench outside left on the left front area of the shop. Add the blue cushion on bench on top for comfort, creating a cozy seating spot for visitors.
Step 22. Arrange Wooden Crate with Bottles Outside
Position the wooden crate with bottles near the bottom left area, close to the bench. Place it as if ready for stocking or delivery in this autumn shop setting.
Step 23. Stack Wooden Boxes Outside Shop
Place the wooden boxes stacked in the front-left exterior area. Stack them neatly in a pyramid formation, as if storing supplies or recent deliveries.
Step 24. Position Cardboard Boxes in Center Front
Set the cardboard boxes center in the middle front area, between the shop entrance and garden plots. Stack them as if they're waiting to be unpacked or organized.
Step 25. Add Blue Blanket in Wooden Crate
Drape the blue blanket in crate over one of the wooden crates. Let it hang naturally, adding a touch of color and suggesting cozy comfort items available in the shop.
Step 26. Install Yellow Autumn Trees on Both Sides
Plant the yellow autumn trees left on the left side and yellow autumn trees right on the right side of the scene. Position them in the background to frame the shop and create the signature autumn atmosphere of Dreamy Room Level 107.
Step 27. Place Wooden Fences on Left and Right
Install the wooden fence left on the far left edge and wooden fence right on the far right edge. These define the property boundaries and add rustic charm to the outdoor area.
Step 28. Create Garden Plots on Right Side
Position the garden plot right front and garden plot right back in the right exterior area. Arrange them in a tiered formation to create a small garden section.
Step 29. Plant Orange and White Flowers in Garden
Add the flowers orange in garden and flowers white in garden to the garden plots. Mix the colors for a vibrant autumn display that enhances the natural beauty of the scene.
Step 30. Add Mushrooms to Garden Area
Place the mushrooms in garden within the garden plots. Scatter them naturally among the flowers, adding whimsical detail to the garden landscape.
Step 31. Scatter Small Plants Around Scene
Distribute the small plants scattered throughout the grassy areas. Place them randomly around the base, shop perimeter, and near the fences to create a lived-in, natural appearance for Dreamy Room Level 107.
Step 32. Install Wooden Signpost Outside
Position the wooden signpost in the left front area, near the bench. Place it as a directional marker or shop indicator, angled slightly toward the entrance.
Step 33. Place Yellow Box at Bottom Right
Set the yellow box bottom right in the lower right corner of the scene. Position it as if it's a delivery item or storage waiting to be moved inside.
Step 34. Add Brown Box Near Yellow Box
Place the brown box bottom right next to the yellow box in the bottom right area. Stack or arrange them together to complete the delivery area setup.
Step 35. Add Sparkle Effects at Bottom Left
Apply the sparkle effects bottom left to the lower left corner of the scene. These decorative sparkles add magical charm and draw attention to the completed cozy shop atmosphere in Dreamy Room Level 107.
Tips and Tricks
Common Mistakes
- The round window placement often confuses players - ensure it's centered on the front wall above the door, not on the side walls where awnings are located
- Players frequently misalign the blue roof tiles with the brown roof base, causing visual gaps. Make sure the tiles sit flush on top without overhanging
- The garden plots must be placed in tiered formation on the right side only. Placing them on the left near the bench creates incorrect layout in Dreamy Room Level 107
- Shelf dividers are small and easy to overlook - they must be installed on both wooden shelves before adding products, or items may appear misaligned
- Characters have specific positions: cow inside behind counter, dinosaur inside near right shelf, and bear outside left. Switching their locations breaks the scene's logic
Placement Strategies
- Start with the grass platform and stone foundation before anything else - this prevents other elements from "floating" when placed
- Build from bottom to top: foundation, walls, roof, then interior fixtures. This follows natural construction order and prevents item overlap issues
- When placing the two awnings, drag them from slightly above their final position and let them "snap" into place on the wall edges for perfect alignment
- For the garden flowers and mushrooms, place larger items first (orange flowers), then fill gaps with smaller elements (white flowers, mushrooms) for natural distribution
- The wooden counter and glass display case should align parallel - use the shop's interior walls as reference lines to ensure they face the entrance properly
- Small scattered plants work best when placed after all major elements are set. This allows you to fill empty spots and balance the overall composition of Dreamy Room Level 107