Dreamy Room Level 121
Level 121 guide walkthrough, helping players solve puzzles and explore the wonderful world of Dreamy Room.
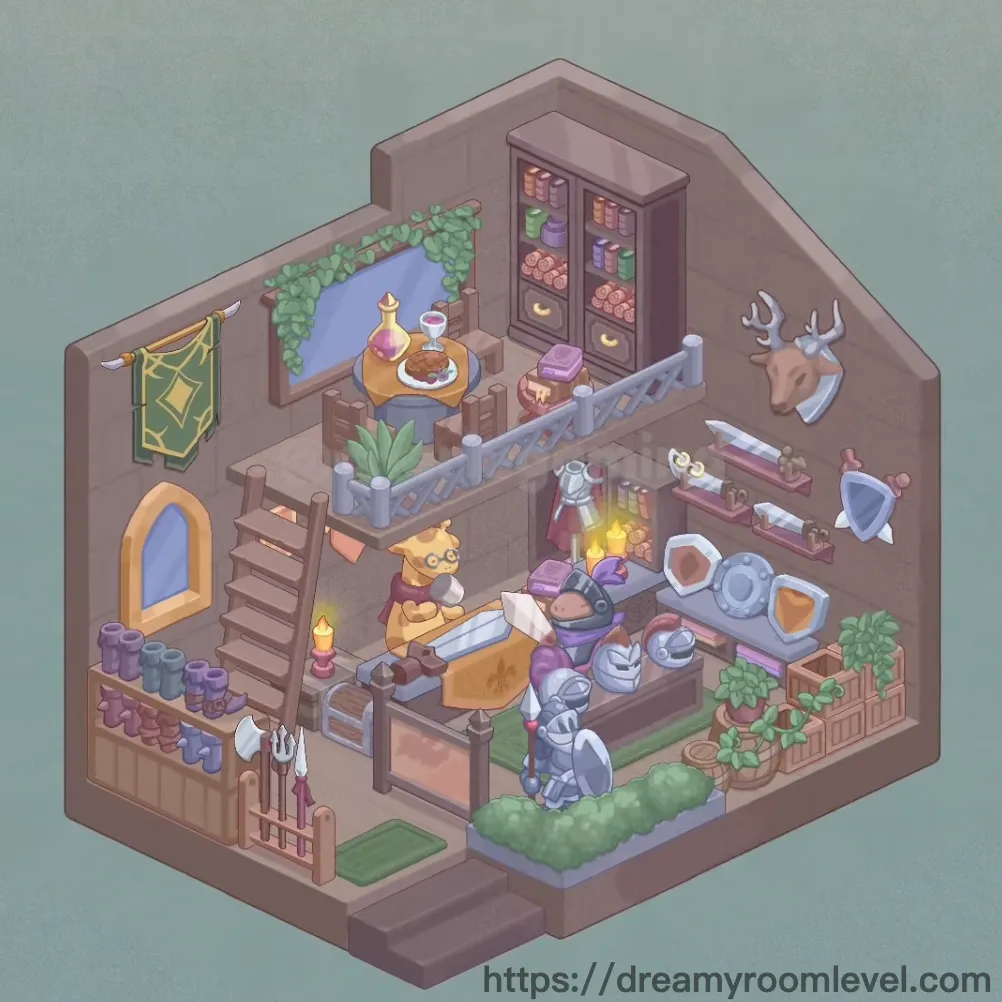
Dreamy Room Level 121 Walkthrough Guide
Dreamy Room Level 121 Room Story
In a cozy corner of the medieval town, master craftsman Gerald runs his workshop where armor meets artistry. Sunlight streams through arched windows, illuminating rows of gleaming helmets and shields. Above his sturdy workbench hang tools of trade, while ivy creeps along stone walls, softening the workshop's rugged charm. After long hours of hammering metal, Gerald retreats to his dining nook—a simple table adorned with roasted meat, wine, and warm candlelight. This Dreamy Room Level 121 sanctuary blends craftsmanship with comfort, where every armor piece tells a story and every meal celebrates another day's honest work.
Dreamy Room Level 121: Step-by-Step Placement Guide
Step 1. Place the Stone Wall and Wooden Floor Planks
Set the foundation by placing stone wall panels around the room's perimeter, creating the medieval atmosphere. Then lay down wooden floor planks across the entire floor space. These structural elements form the base for all furniture placement in this craftsman's space.
Step 2. Install the Arched Window and Window Frame
Position the arched window on the left wall, aligned vertically with proper spacing from the floor. Add the window frame around it to complete the opening. This window brings natural light essential for detailed craftwork.
Step 3. Build the Wooden Stairs
Drag the wooden stairs to the left side of the room, positioned below the window and against the wall. The stairs lead to an upper level storage area, creating vertical dimension in the workshop layout.
Step 4. Add Stone Steps and Stone Fence
Place stone steps at the room's entrance on the lower right. Install the stone fence as a decorative barrier running horizontally across the middle-right section, separating the dining area from the workspace.
Step 5. Position the Tall Wooden Cabinet in Dreamy Room Level 121
Move the tall wooden cabinet to the upper right corner against the back wall. This substantial storage piece anchors the dining area and provides essential storage for supplies and ingredients needed in the workshop.
Step 6. Set Up the Wooden Dining Table
Drag the wooden dining table to the upper middle area, positioned just left of the tall cabinet and behind the stone fence. Following Dreamy Room Level 121 design principles, this creates the perfect dining nook for the craftsman's meals.
Step 7. Place the Work Bench in Dreamy Room Level 121
Position the work bench in the center-bottom area of the workshop. This is the craftsman's primary workspace where armor repairs and metalwork happen, making it the functional heart of the room.
Step 8. Install the Wooden Shelf and Cabinet Drawer
Mount the wooden shelf on the right wall at mid-height for displaying finished goods. Place the cabinet drawer unit on the lower right wall section for storing small tools and materials.
Step 9. Add the Wooden Chest and Wooden Stool
Set the wooden chest on the floor near the work bench for storing raw materials. Place the wooden stool beside the work bench, providing seating for detailed craftwork in this Dreamy Room Level 121 setup.
Step 10. Install the Armor Display Stand
Position the armor display stand on the left side between the stairs and window. This vertical stand showcases the craftsman's finest armor pieces and serves as a prominent display feature.
Step 11. Hang the Green Banner and Decorative Mirror
Drape the on the upper left wall near the ceiling, displaying the workshop's emblem. Mount the decorative mirror with ornate frame on the back wall above the dining table for checking armor fit.
Step 12. Mount the Deer Head Trophy in Dreamy Room Level 121
Attach the deer head trophy to the right wall above the stone fence. This hunting trophy adds personality to the workshop and demonstrates the craftsman's other skills beyond metalworking.
Step 13. Place the Full Armor Set
Carefully position the full armor set on the armor display stand installed earlier. Ensure all pieces align properly to showcase the complete suit of armor as the workshop's centerpiece.
Step 14. Add Individual Armor Pieces
Place the armor chest piece on the work bench for current repair work. Set armor leg pieces on the wooden shelf display. This placement is essential for Dreamy Room Level 121 success.
Step 15. Position the Metal Helmet, Shield, and Sword
Arrange the metal helmet on the wooden shelf's upper section. Lean the metal shield against the right wall near the armor display. Place the sword on the work bench beside the chest piece.
Step 16. Hang Tools on the Wall
Attach the hanging axe to the left wall hooks near the stairs. Mount hanging tools (hammers and tongs) on wall pegs above the work bench for easy access during crafting sessions in this Dreamy Room Level 121 workshop.
Step 17. Add the Hanging White Cloth
Drape the hanging white cloth on the right wall near the wooden shelf. This fabric piece adds softness to the rugged metalwork environment and may be used for polishing armor.
Step 18. Install the Hanging Tapestry
Mount the hanging tapestry on the wall behind the work bench, adding color and warmth to the stone walls. According to Dreamy Room Level 121 layout requirements, this decorates the workspace area.
Step 19. Set the Roasted Meat on the Dining Table
Place the roasted meat on a platter in the center of the wooden dining table. This hearty meal represents the craftsman's well-earned dinner after a productive day's work.
Step 20. Add Wine Bottle, Wine Glass, and Dinner Plate
Position the wine bottle and wine glass beside the roasted meat on the dining table. Set the dinner plate in front of the meal arrangement, completing the dining setup in Dreamy Room Level 121.
Step 21. Place Bread Loaves
Set multiple bread loaves on the wooden shelf and one on the dining table. These fresh loaves complement the meal and add rustic charm to the medieval atmosphere.
Step 22. Add Cushions to the Dining Area
Toss the purple cushion and pink cushion onto the floor near the stone fence and dining table. These soft textiles provide comfortable seating options for the craftsman.
Step 23. Arrange Colored Potion Bottles in Dreamy Room Level 121
Place the colored potion bottles on the tall wooden cabinet's shelves. Distribute them by color for visual appeal and easy identification of different oils and treatments used in metalwork.
Step 24. Position Small Potion Bottles
Scatter small potion bottles across the work bench surface. These contain specialized solutions for tempering metal and treating leather, essential for Dreamy Room Level 121 crafting tasks.
Step 25. Organize Ingredient Jars on Shelf
Line up ingredient jars on shelf containing various powders and materials. Place them on the wooden shelf's lower section, easily accessible from the work bench area.
Step 26. Add Storage Jars and Books
Place storage jars on the tall cabinet's lower shelves for bulk materials. Stack books on the cabinet's middle shelf—these contain armor design patterns and metalworking techniques.
Step 27. Set Copper Pot and Silver Pot
Position the copper pot on the floor beside the work bench for quenching hot metal. Place the silver pot on the wooden shelf for mixing polishing compounds.
Step 28. Arrange Blue, Red, and Green Bottles
Organize blue bottles, red bottles, and green bottles on the tall cabinet's top shelf. Following Dreamy Room Level 121 design principles, color-code them for different metal treatments and dyes.
Step 29. Place the Craftsman Character
Position the craftsman character standing beside the work bench, actively engaged in his craft. This brings life to the workshop and shows the space in active use.
Step 30. Add Ivy Plant Decoration
Attach ivy plant decoration to the upper left corner where the wall meets the ceiling, allowing it to cascade down naturally. This greenery softens the stone architecture in Dreamy Room Level 121.
Step 31. Install Climbing Ivy
Add climbing ivy trailing along the top edge of the decorative mirror frame and across the back wall. This creates continuity with the ivy decoration and adds organic movement.
Step 32. Place Potted Plant and Wooden Planter Box
Set the potted plant on the floor in the lower left corner near the stairs. Position the wooden planter box on the floor in the lower right area, both bringing nature indoors.
Step 33. Add Green Moss Patches
Scatter green moss patches at the base of walls and in corners where moisture naturally collects. Completing Dreamy Room Level 121 requires these organic touches that suggest the workshop's age.
Step 34. Place Candles Throughout the Room
Set the yellow candle on the dining table for mealtime lighting. Position the purple candle on the work bench. Add the general candle on the wooden shelf for ambient workshop lighting.
Step 35. Install Wall Torch Holder
Mount the wall torch holder on the left wall between the banner and mirror. This provides additional lighting for evening work sessions in this Dreamy Room Level 121 craftsman's space.
Step 36. Add Rope Decoration
Drape rope decoration along the stone fence top and near the hanging tools. This authentic medieval detail adds texture and visual interest to the workshop's utilitarian spaces.
Step 37. Position the Wooden Ceiling Beam
Install the wooden ceiling beam running horizontally across the upper portion of the room. This structural element supports the upper level and adds architectural depth to the space.
Notes and Practical Tips
Important Notes
- The armor display stand must be placed before adding the full armor set, as the stand provides the mounting structure needed for proper display in Dreamy Room Level 121
- Small potion bottles on the work bench can easily be obscured by larger items like the armor chest piece, so place bottles first before positioning armor pieces
- The ivy plant decoration and climbing ivy are separate elements that should be positioned to create a cohesive natural look flowing across walls
- Stone fence placement creates a functional barrier between dining and work areas, but leave adequate space for character movement around the work bench
- Color-coded bottles (blue, red, green) should be organized systematically on shelves for visual clarity and game completion recognition
Practical Tips
- When placing the tall wooden cabinet in the corner, drag from a slightly elevated angle to ensure it snaps flush against both walls without gaps
- For precise armor piece alignment on the display stand, zoom in slightly and place the chest piece first, then add limb sections working from center outward
- The dining table items have specific arrangement requirements—place the meat platter first as the centerpiece, then position wine bottle and glass to the right, dinner plate to the left
- Hanging wall items like the axe and tools require precise positioning on designated wall hooks; if items bounce back, adjust the dragging angle slightly upward
- Small decorative elements like moss patches and candles are easiest to place after all large furniture is positioned, allowing you to fill gaps naturally
- Successfully completing Dreamy Room Level 121 requires attention to layering—place background elements (walls, windows) first, then furniture, then small details for optimal visual depth