Dreamy Room Level 101
Level 101 guide walkthrough, helping players solve puzzles and explore the wonderful world of Dreamy Room.
Dreamy Room Level 101 Walkthrough Guide
Dreamy Room Level 101 Room Story
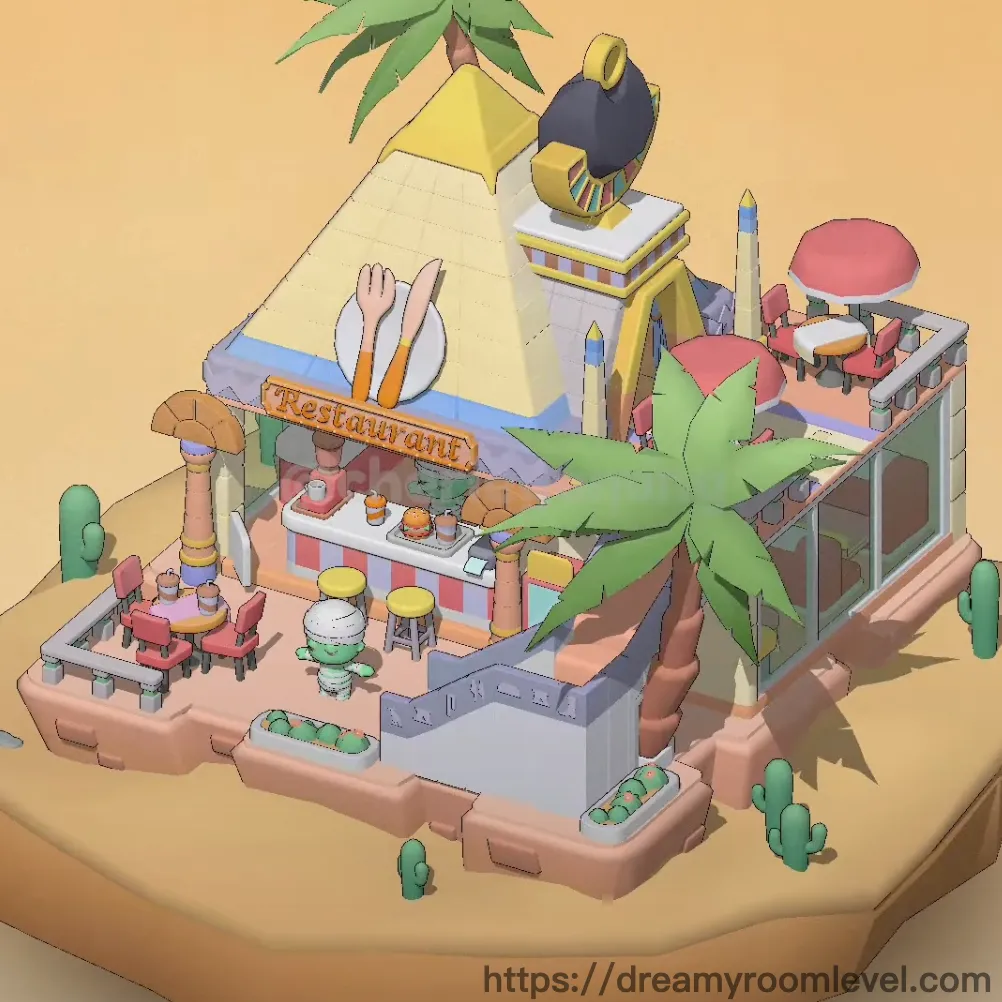
Under the golden desert sun, Maria's little restaurant stands as a vibrant oasis of flavors and warmth. The cheerful pink building, adorned with colorful umbrellas and palm trees, welcomes weary travelers with promises of refreshing drinks and delicious meals. Every morning, she arranges the bar stools, sets fresh food trays, and watches the ceiling fan spin lazily while desert cacti keep silent watch. This is where Dreamy Room Level 101 transforms simple ingredients into cherished memories, one guest at a time.
Dreamy Room Level 101: Step-by-Step Placement Guide
Step 1. Place Restaurant Building Foundation
Position the restaurant building at the center of the sandy platform. This pink multi-story structure forms the base of Dreamy Room Level 101, with visible attachment points for walls and decorative elements. Align it with the platform edges to ensure proper spacing for outdoor elements.
Step 2. Install Roof Structure
Attach the roof to the top of the restaurant building, ensuring the yellow pyramid section aligns with the front facade. The roof should snap into place above the balcony area, creating the distinctive silhouette visible in Dreamy Room Level 101.
Step 3. Add Front Door and Windows
Place the door at the ground level entrance, centered on the front wall. Install the window left and window right on either side of the upper balcony section, maintaining symmetrical spacing for proper visual balance.
Step 4. Construct Entrance Stairs
Position the stairs directly in front of the door, extending outward onto the desert platform. The gray staircase should align with the entrance, providing access from ground level to the restaurant door in Dreamy Room Level 101.
Step 5. Install Balcony Platform
Attach the balcony to the upper level of the restaurant, extending from the front facade. This platform sits above the bar counter area and supports the seating arrangement visible in the completed layout.
Step 6. Add Striped Awning
Mount the awning striped above the bar counter section, with red and white stripes facing outward. The awning attaches to the building's front, providing shade for the outdoor dining area below.
Step 7. Place Left Palm Tree
Drag the palm tree left to the far left corner of the platform, near the outdoor seating area. The green palm should stand tall beside the restaurant, adding tropical atmosphere to Dreamy Room Level 101's desert setting.
Step 8. Position Right Palm Tree
Place the palm tree right on the opposite side, near the right edge of the platform. Mirror the left palm's positioning to create balanced greenery framing the restaurant entrance.
Step 9. Install Bar Counter
Position the bar counter along the front of the restaurant, below the striped awning. The white and colored counter should align with the building's facade, featuring multiple serving sections and attachment points for bar stools.
Step 10. Arrange Bar Stools
Place the bar stool yellow left and bar stool yellow right at the left sections of the bar counter. Add the bar stool pink at the right end, spacing them evenly for guest seating in Dreamy Room Level 101.
Step 11. Set Left Outdoor Table
Position the outdoor table left on the left side of the platform, in front of the left palm tree. The small round table should sit on the pink platform section, ready for chair placement.
Step 12. Place Right Outdoor Table
Set the outdoor table right on the right side, near the stairs and front entrance area. Position it to allow comfortable seating space while maintaining pathway access.
Step 13. Add Pink and White Chairs
Drag the outdoor chair pink to face the left outdoor table. Place the outdoor chair white near the right table, ensuring proper alignment for guest seating in this Dreamy Room Level 101 arrangement.
Step 14. Position Blue Chair
Set the outdoor chair blue at another table position, completing the outdoor seating arrangement. The blue chair adds color variety to the desert restaurant's dining area.
Step 15. Install Yellow Umbrella
Mount the umbrella yellow above one of the outdoor tables, with the pole inserting through the table center. The yellow fabric should extend upward, providing shade for diners.
Step 16. Add Blue Umbrella
Position the umbrella blue over the second outdoor table, mirroring the yellow umbrella's placement. The blue shade complements Dreamy Room Level 101's colorful desert theme.
Step 17. Hang Ceiling Fan
Attach the ceiling fan to the underside of the roof overhang, above the bar counter area. The dark blue and yellow fan should hang centrally, visible from the outdoor seating positions.
Step 18. Mount Restaurant Sign
Place the restaurant sign prominently on the front facade, displaying "Restaurant" in orange lettering. Position it below the balcony level where it's clearly visible to approaching customers.
Step 19. Add Knife and Fork Decoration
Attach the knife and fork decoration above the restaurant sign, near the roof area. This white cutlery symbol marks the establishment as a dining venue in Dreamy Room Level 101.
Step 20. Position Food Trays
Arrange food tray 1, food tray 2, and food tray 3 along the bar counter surface. Space them evenly across the serving area, displaying colorful prepared dishes for customers.
Step 21. Set Plates on Counter
Place the plates on counter between the food trays, arranging the dishware for easy service access. The plates should align with the bar counter's serving sections.
Step 22. Install Drink Dispenser
Position the drink dispenser at one end of the bar counter, near the bar stools. This beverage station should be accessible from the serving area in Dreamy Room Level 101.
Step 23. Add Bottle Decoration
Place the bottle decoration on the bar counter or nearby shelf, adding visual interest to the serving area. The bottle should complement the restaurant's colorful desert aesthetic.
Step 24. Hang Left Lantern
Attach the lantern left to the left pillar or overhang structure, near the outdoor seating area. The decorative lantern provides ambient lighting for evening dining.
Step 25. Position Right Lantern
Mount the lantern right on the opposite side, mirroring the left lantern's placement. Balance the lighting elements across Dreamy Room Level 101's outdoor space.
Step 26. Install Decorative Pillars
Position the decorative pillar yellow and decorative pillar blue at structural support points along the building's front. These colorful columns add architectural interest and support the awning.
Step 27. Place Street Lamp
Set the street lamp near the entrance area or along the platform edge, providing illumination for the restaurant's exterior. The lamp should stand upright on the pink platform.
Step 28. Add Left Plant Pot
Position the plant pot left near the left side of the building or outdoor seating area. The green plant adds freshness to the desert restaurant environment in Dreamy Room Level 101.
Step 29. Set Right Plant Pot
Place the plant pot right on the opposite side, maintaining symmetrical greenery distribution. The potted plant complements the palm trees and cacti.
Step 30. Position Small Cacti
Arrange the small cactus left, small cactus right, and small cactus back around the platform perimeter. These desert plants should be scattered naturally on the sandy surface, avoiding walkways.
Step 31. Add Bushes Decoration
Place the bushes decoration near the platform edge or building base, adding ground-level greenery. The bushes fill empty spaces and enhance the oasis atmosphere.
Step 32. Install Outdoor Plant Box
Position the outdoor plant box near the entrance or along the restaurant's front, filled with green plants. The box should sit on the platform surface, adding organized greenery.
Step 33. Add Pink Cushion
Place the pink cushion top on one of the balcony seats or outdoor chairs, adding comfort and color. The cushion should align with the seat surface in Dreamy Room Level 101.
Step 34. Set White Cushion
Position the white cushion on another seating area, matching the placement style of the pink cushion. The white fabric provides a neutral accent to the colorful furniture.
Step 35. Place Customer Character
Add the character/customer near one of the outdoor tables or approaching the entrance. The green-toned character brings life to the restaurant scene.
Step 36. Install Roof Decoration
Attach the roof decoration to the upper roof section, near the yellow pyramid top. This ornamental element adds finishing detail to Dreamy Room Level 101's skyline.
Step 37. Add Menu Board
Position the near the entrance or bar counter area, displaying dining options. The board should be visible to approaching customers.
Step 38. Lay Floor Tiles
Place the floor tiles across the restaurant's interior or patio area, creating a defined dining surface. The tiles should align with the building's footprint in this level.
Step 39. Add Wall Decoration
Attach the wall decoration to the restaurant's exterior or interior walls, adding visual interest. The decoration should complement the desert theme.
Step 40. Place Star Decorations
Position the star decoration elements around the restaurant, on the roof, awning, or near decorative areas. These sparkle accents add magical touches to complete Dreamy Room Level 101.
Tips and Tricks
Common Mistakes to Avoid
- Small cacti are easily overlooked near the platform edges; check all four corners of the sandy base before completing Dreamy Room Level 101
- Food trays and plates can overlap on the bar counter; place trays first, then add plates in the gaps between them
- Lanterns may appear hidden behind decorative pillars; rotate your view to access attachment points on the building's corners
- The ceiling fan requires precise alignment under the roof overhang; drag from below and wait for the snap indicator
- Cushions may slide off chairs if not centered properly; place them after chairs are fully positioned to avoid displacement
Placement Strategies
- Start with the building structure before adding furniture; this prevents items from blocking attachment points needed in Dreamy Room Level 101
- Group similar items together during placement (all stools, then all cacti) to maintain consistent spacing and alignment
- Use the umbrella poles as vertical guides when positioning outdoor tables; tables should center under umbrella shading
- Palm trees create visual landmarks; place them early to help gauge proper spacing for surrounding decorative elements
- Zoom in for precision when arranging small counter items like bottles and plates; the detailed view reveals exact snap points
- Drag decorative pillars from top-down to ensure they align with both floor and ceiling attachment points perfectly