Dreamy Room Level 12
Level 12 guide walkthrough, helping players solve puzzles and explore the wonderful world of Dreamy Room.
Dreamy Room Level 12 Walkthrough Guide
Dreamy Room Level 12 Walkthrough Guide
Room Story
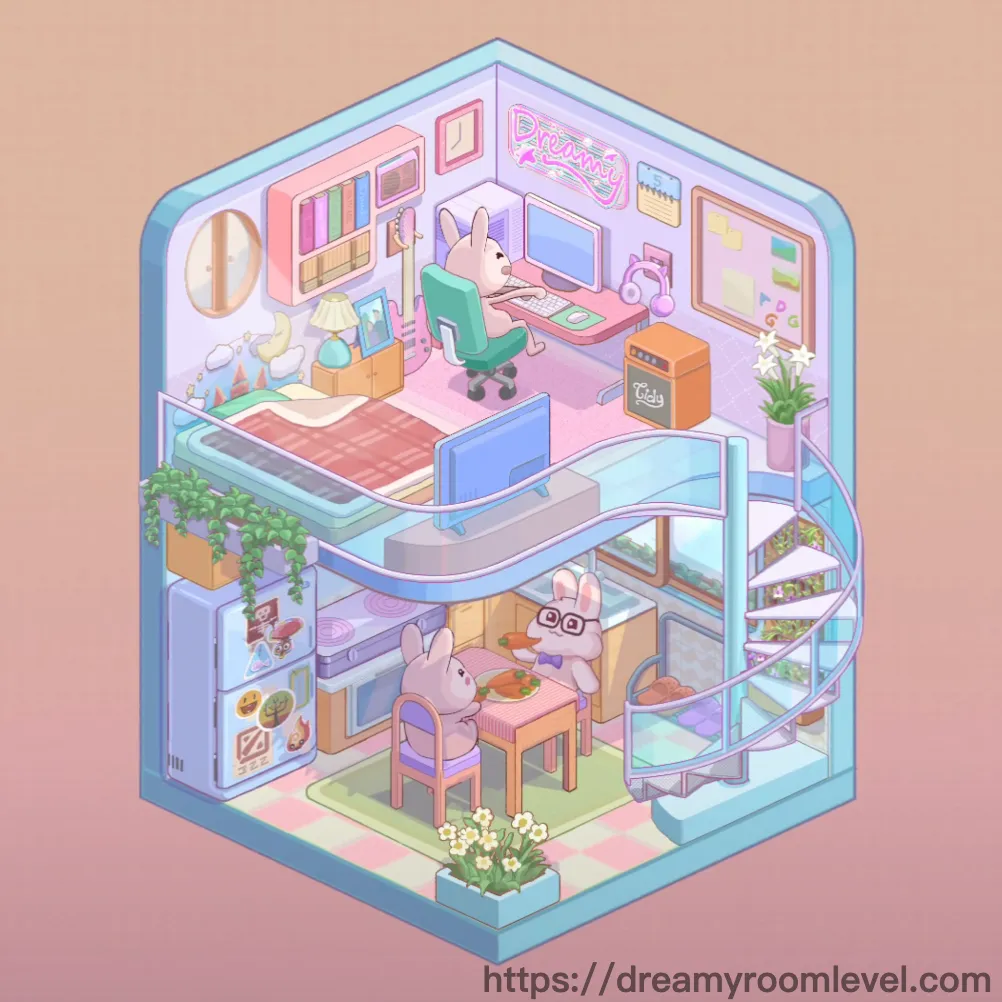
In Dreamy Room Level 12, two adorable bunny friends share a cozy split-level apartment where culinary dreams and digital creativity blend seamlessly. The pink bunny loves cooking hearty meals in the pastel kitchen below, while the glasses-wearing bunny works on creative projects upstairs. Their home features a whimsical slide connecting both floors, turning everyday moments into playful adventures. Every corner reflects their friendship - from shared dinners at the checkered table to collaborative work sessions by the glowing neon sign.
Essential Elements Overview
Before starting Dreamy Room Level 12, locate these key items: kitchen appliances, dual-level furniture pieces, the connecting slide system, decorative plants, wall art, and the special bunny character elements that bring this space to life.
Dreamy Room Level 12 Step-by-Step Placement Guide
Step 1. Place Checkered Floor Foundation
Position the checkered floor tiles as the base layer covering the entire lower level. Align pink and white squares starting from the bottom-left corner, ensuring perfect grid alignment. This creates the foundation for Dreamy Room Level 12's kitchen area.
Step 2. Install Kitchen Cabinets
Mount the kitchen cabinets along the left wall, positioned directly above where the sink will go. These wooden cabinets should align flush with the wall corner. The placement defines the cooking zone layout.
Step 3. Position Refrigerator in Dreamy Room Level 12
Place the purple refrigerator in the far left corner against both walls. Ensure the door faces right for proper access. The fridge displays cute food magnets that add personality.
Step 4. Set Kitchen Sink Below Window
Install the kitchen sink centered under the rectangular window on the back wall. Position it directly beneath the wall cabinets with the faucet facing forward.
Step 5. Place Microwave on Counter
Position the microwave on the counter surface to the right of the sink. Align it against the back wall for stable placement in this Dreamy Room Level 12 setup.
Step 6. Install Dining Table
Center the pink dining table on the green rug in the lower level's middle area. Leave equal spacing from walls for chair placement around all sides.
Step 7. Arrange Dining Chairs in Dreamy Room Level 12
Place two dining chairs on opposite sides of the table. Position them facing inward with backs parallel to the room's walls.
Step 8. Position Green Rug
Lay the green rug beneath the dining set, centered in the kitchen area. Ensure it extends slightly beyond the table and chairs for proper framing.
Step 9. Add Flowers in Vase
Place the flowers in vase as the dining table centerpiece. Position white daisies in the blue planter exactly at the table's center point.
Step 10. Mount Wall Clock in Dreamy Room Level 12
Hang the wall clock on the left wall above the refrigerator at eye level. Center it between the ceiling and appliance top for balanced placement.
Step 11. Install Rectangular Window
Position the rectangular window on the back wall above the sink area. Frame it with brown trim showing the outdoor garden view clearly.
Step 12. Place Food Display
Arrange the food display items on the refrigerator door. Position food magnets and stickers evenly across the surface following Dreamy Room Level 12's playful theme.
Step 13. Set Storage Boxes
Stack storage boxes in the corner near the stairs. Place the brown cardboard box as a base with smaller boxes on top.
Step 14. Install Connecting Slide in Dreamy Room Level 12
Position the curved slide from the upper floor opening down to the lower level. Align the top with the bedroom platform edge and bottom near the dining area.
Step 15. Build Upper Platform
Create the floating platform for the second floor. Ensure it spans the room's width with proper support beams visible underneath.
Step 16. Place Bed Upstairs
Position the bed against the upper level's back wall. Center it with the pink bedding facing forward in this Dreamy Room Level 12 bedroom area.
Step 17. Install Computer Desk
Place the pink computer desk along the upper right wall. Position it perpendicular to the bed with the monitor facing the room center.
Step 18. Set Computer Equipment in Dreamy Room Level 12
Arrange the computer monitor on the desk's center. Add the keyboard directly in front with mouse pad to the right side.
Step 19. Position Office Chair
Place the teal office chair in front of the computer desk. Angle it slightly toward the monitor for ergonomic positioning.
Step 20. Mount Dreams Neon Sign
Install the pink dreams sign on the upper wall above the desk area. Center this glowing neon element as Dreamy Room Level 12's focal point.
Step 21. Add Bookshelf
Position the bookshelf unit against the upper left wall near the bed. Fill shelves with colorful books and decorative items.
Step 22. Arrange Books in Dreamy Room Level 12
Stack books both vertically and horizontally on the bookshelf. Mix sizes and colors for visual interest following the room's aesthetic.
Step 23. Place Desk Lamp
Set the lamp on the computer desk's left corner. Angle the shade toward the keyboard area for proper task lighting.
Step 24. Hang Wall Art
Mount framed wall art pieces on both levels' walls. Space them evenly at eye level for balanced decoration throughout Dreamy Room Level 12.
Step 25. Add Picture Frames
Arrange small picture frames on the desk and shelves. Display photos of bunny friends and memorable moments.
Step 26. Position Potted Plants in Dreamy Room Level 12
Place the potted plant on the lower window sill. Add smaller plants near the dining area for fresh green accents.
Step 27. Install Vertical Garden
Mount the vertical garden panel on the upper right wall near the stairs. This living wall adds natural beauty to the space.
Step 28. Place Bunny Characters
Position the pink bunny character at the dining table's left chair. Set the bunny with glasses at the opposite seat for their meal scene.
Step 29. Set Dining Items
Arrange the plate of food in front of each bunny. Add bowls with soup completing Dreamy Room Level 12's dinner setup.
Step 30. Add Plushies and Toys in Dreamy Room Level 12
Scatter plushies on the bed and shelves. Place small toys as decorative accents throughout both levels.
Step 31. Position Headphones
Hang the pink headphones on the desk chair's back or place them beside the keyboard for easy access.
Step 32. Install Ceiling Light
Mount the modern ceiling light fixture centered on the upper level ceiling. Ensure it illuminates both the bed and desk areas evenly.
Step 33. Place Calendar and Notes in Dreamy Room Level 12
Pin the calendar on the wall near the desk. Arrange colorful sticky notes around it for reminders and schedules.
Step 34. Add Color Swatches
Display color swatches on the wall as decorative elements showing the room's pastel palette inspiration.
Step 35. Final Details
Complete Dreamy Room Level 12 by adjusting all items for perfect alignment. Ensure the slide connects smoothly and all decorative elements enhance the cozy atmosphere.
Important Notes and Tips
Important Notes
- The slide must connect precisely between floors or characters won't use it properly
- Wall-mounted items like the neon sign require exact height placement for visibility
- Bunny characters must be seated before placing food items on the table
- The vertical garden needs wall space clear of other decorations
- Upper platform furniture requires careful edge alignment to prevent falling
Practical Tips
- Drag the slide from multiple angles to achieve the perfect curve connection
- Place larger furniture first to establish the room's layout structure
- Use the checkered floor pattern as a grid guide for furniture alignment
- Position wall art after all furniture to avoid obstruction issues
- Save small decorative items for last to prevent accidental displacement
- The connecting slide is the signature element of Dreamy Room Level 12