Dreamy Room Level 113
Level 113 guide walkthrough, helping players solve puzzles and explore the wonderful world of Dreamy Room.
Dreamy Room Level 113 Walkthrough Guide
Dreamy Room Level 113 Room Story
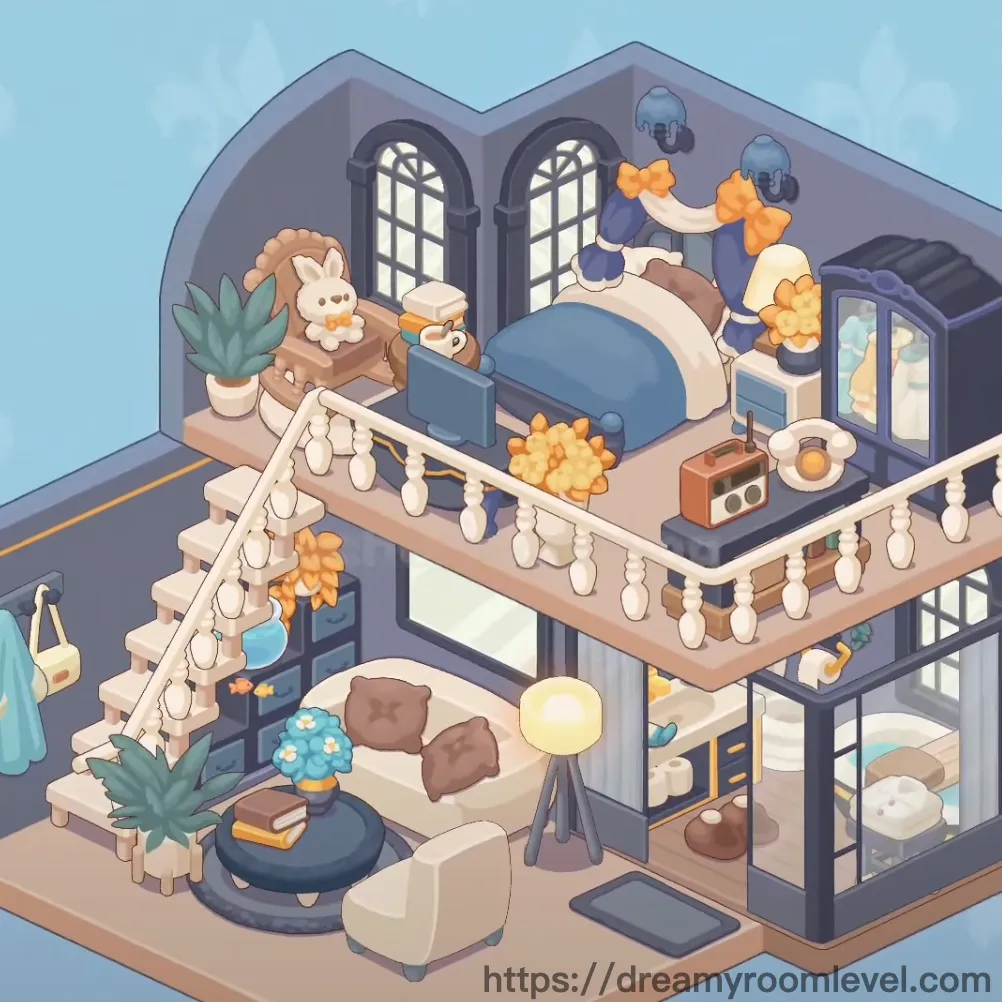
In a charming corner of the city, Emma's two-story loft tells a story of artistic living. The space in Dreamy Room Level 113 features elegant arched windows that bathe the room in natural light, while orange chrysanthemums and delicate bow decorations add warmth. Upstairs, a cozy reading nook with plush cushions invites quiet moments, while downstairs, a vintage radio plays soft melodies near the workspace where creative dreams take shape.
Dreamy Room Level 113: Step-by-Step Placement Guide
Step 1. Install Gray Wall and Wooden Floor Foundation
Begin by placing the gray wall structure to form the room's perimeter. The walls create the distinctive two-story layout. Next, lay down the wooden floor across the entire base area. These foundational elements in Dreamy Room Level 113 establish the room's warm, modern aesthetic.
Step 2. Add Roof and Door Frame Structure
Position the roof above the second floor, ensuring it aligns with the wall edges. Place the door frame at the left side of the ground floor. The door frame should fit flush against the wall opening for Dreamy Room Level 113's proper architectural flow.
Step 3. Build Second Floor Balcony with White Railing
Install the second floor balcony platform at the upper level, positioned toward the right side of the room. Attach the white railing along the balcony's edge. This creates the signature two-story feature that defines Dreamy Room Level 113's unique layout.
Step 4. Place White Staircase Connection
Drag the white staircase to connect the ground floor to the second-floor balcony. Position it on the left side, ensuring the stairs align properly with both floor levels for smooth access in Dreamy Room Level 113.
Step 5. Install Arched Windows with Window Frames
Place the distinctive arched windows on the back wall of the second floor. Add window frames around each window opening. These elegant architectural elements bring natural light into Dreamy Room Level 113's interior space.
Step 6. Hang Decorative Bunting Along Upper Wall
Attach the decorative bunting along the front edge of the second-floor railing. The white ornamental trim adds a charming cottage feel to the balcony area in Dreamy Room Level 113.
Step 7. Position Bed in Lower Right Corner
Place the bed frame in the lower right section of the ground floor, angled against the corner walls. Add the blue bedding on top, followed by the bed pillow. This sleeping area becomes the focal point of Dreamy Room Level 113's cozy ground floor.
Step 8. Add Nightstand Beside Bed
Position the nightstand next to the bed on the left side. This small table should align closely with the bed's edge, providing convenient surface space in Dreamy Room Level 113.
Step 9. Set Up Desk and Drawer Cabinet
Place the desk against the back wall on the ground floor, left of center. Position the drawer cabinet directly beneath or adjacent to the desk. These workspace elements are essential for completing Dreamy Room Level 113's functional layout.
Step 10. Install Glass Shelf Unit in Lower Area
Mount the glass shelf unit on the lower wall area, positioned between the ground floor and visible through the staircase area. This transparent storage adds modern elegance to Dreamy Room Level 113.
Step 11. Place Side Table Near Living Area
Position the side table in the central ground floor area, creating a convenient surface for items. Ensure it's accessible from multiple angles in Dreamy Room Level 113's open layout.
Step 12. Arrange Beige Chair and Round Cushion Seat
Drag the beige chair to face the central living area on the ground floor. Add the round cushion seat nearby, creating comfortable seating arrangements that complete Dreamy Room Level 113's cozy atmosphere.
Step 13. Add Blue Floor Cushion and Small Stool
Place the blue floor cushion on the ground floor for casual seating. Position the small stool near the workspace or seating area. These flexible seating options enhance Dreamy Room Level 113's versatile living space.
Step 14. Install Blue Hanging Lamp and Ceiling Light Fixture
Hang the blue hanging lamp from the second-floor ceiling, centered over the balcony area. Add the ceiling light fixture above to provide ambient lighting throughout Dreamy Room Level 113.
Step 15. Position Yellow Floor Lamp
Place the yellow floor lamp on the ground floor near the seating area or beside the chair. The warm glow adds atmospheric lighting to Dreamy Room Level 113's evening ambiance.
Step 16. Add Table Lamp and Wall Sconce
Position the table lamp on the nightstand or desk surface. Mount the wall sconce on the second-floor wall near the balcony area. These lighting fixtures create layered illumination in Dreamy Room Level 113.
Step 17. Place Television on Stand
Position the television on the desk or entertainment surface, angled for optimal viewing from the seating area. This entertainment element completes the functional aspects of Dreamy Room Level 113.
Step 18. Arrange Green Potted Plant and Indoor Plant
Place the green potted plant on the desk near the workspace. Add another indoor plant on the ground floor in a visible corner. These living elements bring natural beauty into Dreamy Room Level 113.
Step 19. Display Orange Chrysanthemum Arrangements
Position the orange chrysanthemum flowers on the second-floor balcony surfaces. The vibrant orange blooms add cheerful color accents throughout Dreamy Room Level 113.
Step 20. Add Succulent Plant to Desk Area
Place the small succulent plant on the desk or shelf surface. This low-maintenance greenery adds a modern touch to the workspace in Dreamy Room Level 113.
Step 21. Position Blue Flower Pot and Blue Vase
Set the blue flower pot on the ground floor near the entrance or corner. Place the blue vase on the desk or side table. These decorative containers complement Dreamy Room Level 113's color scheme.
Step 22. Place Rabbit Plush on Bed
Position the adorable rabbit plush on the bed surface, nestled among the pillows. This cuddly companion adds a sweet touch to the sleeping area in Dreamy Room Level 113.
Step 23. Stack Books on Surfaces
Arrange stacked books on the desk or shelf. Add individual yellow book and orange book to various surfaces. These reading materials reflect the intellectual atmosphere of Dreamy Room Level 113.
Step 24. Place Vintage Radio Near Seating
Position the vintage radio on the side table or floor near the seating area. This nostalgic piece adds character and suggests music fills the space in Dreamy Room Level 113.
Step 25. Add Coffee Cup and Tea Cup
Place the coffee cup on the nightstand or side table. Position the tea cup on another surface near the seating area. These beverage items suggest cozy moments enjoyed in Dreamy Room Level 113.
Step 26. Display Sandwich on Upper Level
Place the sandwich on the second-floor balcony surface, perhaps on a small table. This snack item adds a lived-in feel to Dreamy Room Level 113's balcony area.
Step 27. Hang Orange Bow Decoration on Balcony
Attach the orange bow decoration to the second-floor railing or wall. This charming ribbon accent adds festive warmth to the upper level of Dreamy Room Level 113.
Step 28. Display Orange Flower Decoration and Garland
Position orange flower decoration pieces on various surfaces. Hang the orange flower garland along the balcony railing or staircase. These floral elements create a cohesive decorative theme throughout Dreamy Room Level 113.
Step 29. Add Star Wall Decoration
Attach the star wall decoration to the wall near the desk area on the ground floor. These twinkling accents add whimsy to Dreamy Room Level 113's atmosphere.
Step 30. Position Decorative Pillar Elements
Place decorative pillar pieces near the staircase or as architectural accents. These vertical elements add structural interest to Dreamy Room Level 113's design.
Step 31. Install Clothes Hanger with Teal Dress
Mount the clothes hanger on the wall near the staircase or in a corner. Hang the elegant teal dress on the hanger. This wardrobe display adds personal style to Dreamy Room Level 113.
Step 32. Place Brown Slippers and Floor Mat
Position the brown slippers beside the bed on the wooden floor. Lay the floor mat near the entrance or under a seating area. These practical items add homey comfort to Dreamy Room Level 113.
Step 33. Position Character Girl on Balcony
Place the character girl figure on the second-floor balcony, perhaps near the railing or sitting area. This avatar brings life and personality to the completed scene in Dreamy Room Level 113.
Tips and Tricks
Common Mistakes to Avoid
Watch for the hidden placement zones on the second-floor balcony where small items like the sandwich and decorative pillows can be tricky to position correctly in Dreamy Room Level 113. The glass shelf unit requires precise alignment with the wall structure, and players often miss its exact attachment point. Be careful not to place the staircase before the balcony platform, as this creates placement conflicts that can block progress. The orange flower decorations have multiple pieces that look similar but belong in different locations, so reference the final image carefully to avoid confusion in Dreamy Room Level 113.
Placement Strategy Tips
For tight corners like the area behind the bed, approach item placement from an angled perspective rather than straight-on to ensure proper positioning in Dreamy Room Level 113. When arranging overlapping items like books and cups on surfaces, place larger items first, then add smaller decorative pieces. The "snap-to" feature works best when you drag items slowly near their target location, allowing the game to recognize the correct placement zone. For the second-floor items, temporarily rotate your view if needed to access difficult angles. Master the technique of placing foundation elements before decorative items to avoid the frustration of items bouncing back to the selection menu.
Conclusion
Completing this artistic two-story loft requires attention to architectural details and careful placement of 52 unique elements. By following this systematic approach and utilizing the placement techniques described, you'll successfully create a charming living space that perfectly captures the cozy, creative spirit of this challenging level. The combination of warm lighting, vibrant floral accents, and comfortable furnishings makes this room a true sanctuary.