Dreamy Room Level 104
Level 104 guide walkthrough, helping players solve puzzles and explore the wonderful world of Dreamy Room.
Dreamy Room Level 104 Walkthrough Guide
Dreamy Room Level 104 Room Story
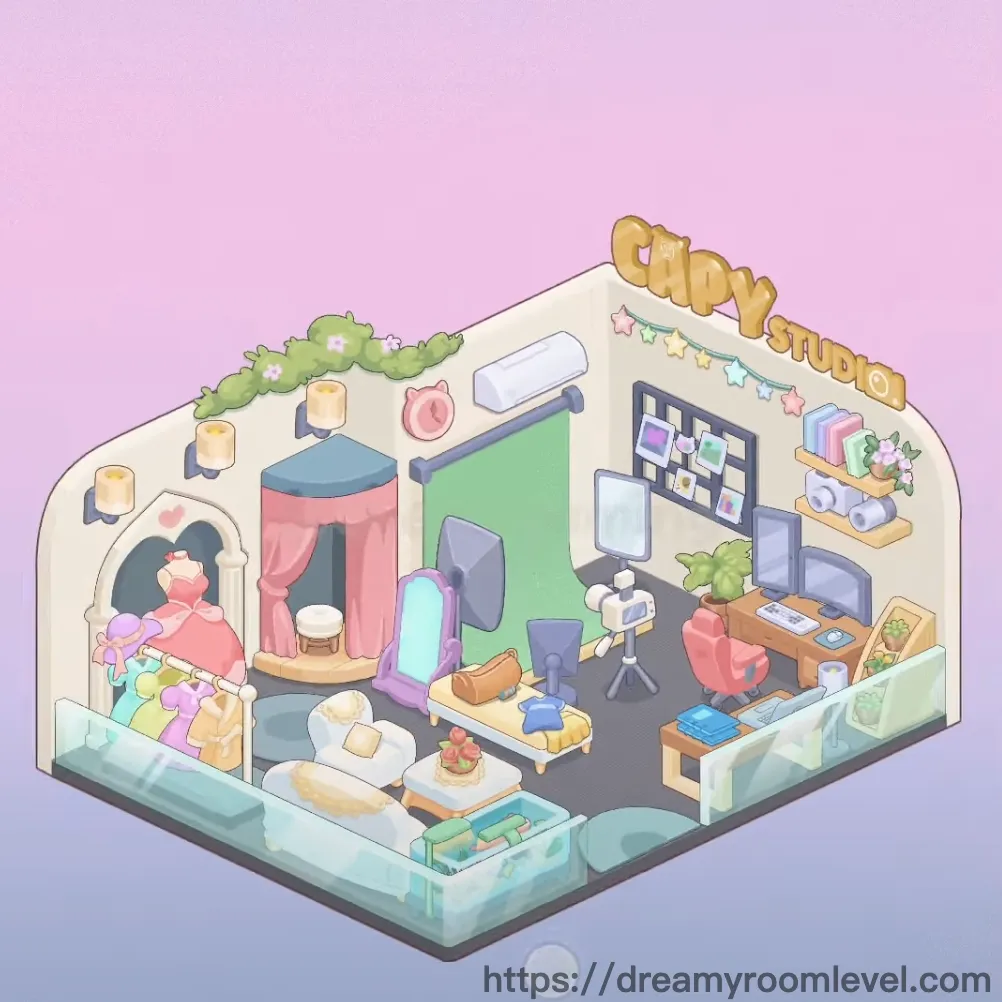
In Dreamy Room Level 104, meet Emma, a creative content creator who transformed her space into a dreamy copy studio. Soft pink walls embrace her workspace where cameras and ring lights stand ready to capture magic. Green vines cascade from above while star garlands twinkle against cream-colored walls. Her cozy reading nook with plush cushions offers respite between filming sessions, and dual monitors display her latest edits. This sanctuary blends productivity with comfort, where creativity flows endlessly.
Dreamy Room Level 104: Step-by-Step Placement Guide
Step 1. Install Green Vine with Flowers Along the Upper Wall
Drag the green vine with flowers to the upper left section of the wall. Position it horizontally so it drapes naturally across the top edge, creating a fresh botanical accent. The vine should align with the wall's upper trim and extend toward the center, framing the entire studio space beautifully in Dreamy Room Level 104.
Step 2. Mount Copy Studio Sign on the Front Wall
Place the copy studio sign on the upper right corner of the front-facing wall. This golden lettering should be positioned prominently above the workspace area, clearly visible and centered above the desk monitors. Ensure it's aligned horizontally for the perfect studio branding effect.
Step 3. Hang Star Garland Below the Studio Sign
Position the star garland directly beneath the copy studio sign, stretching across the right wall section. The colorful stars should drape in a gentle arc, adding playful charm to complete your Dreamy Room Level 104 studio aesthetic. Align it with the desk area below for visual balance.
Step 4. Attach Wall Candles to the Left Wall
Mount the wall candles vertically on the left wall section, spacing them evenly in a column pattern. These cream-colored pillar candles should be positioned near the upper left area, creating ambient lighting points. Place them above the shooting stage area to enhance the cozy atmosphere in Dreamy Room Level 104.
Step 5. Set Up Pink Curtain Stage in the Left Corner
Install the pink curtain stage in the back left corner of the studio. This circular platform with flowing pink drapes serves as the primary filming backdrop. Position it against the rear wall with the curtain opening facing forward, ensuring the round wooden stool can be placed on its platform stage.
Step 6. Position Standing Mirror Near the Stage Area
Place the standing mirror on the floor in front of the pink stage area. This full-length purple-framed mirror should stand upright, angled slightly for optimal reflection. Position it to the right of the stage platform, allowing easy access for quick appearance checks during Dreamy Room Level 104 filming sessions.
Step 7. Set Makeup Case on the Floor
Drop the makeup case directly in front of the standing mirror. This brown cosmetic case should rest on the gray floor, creating a convenient prep station. Position it centrally between the mirror and stage area for easy access to beauty essentials.
Step 8. Install Green Backdrop and Backdrop Stand
Hang the green backdrop on the backdrop stand positioned behind the stage area. Mount the horizontal rod first, then drape the mint green fabric smoothly from top to bottom. Place this setup against the back wall, ensuring the backdrop extends fully for seamless chroma key filming in Dreamy Room Level 104.
Step 9. Position Camera Tripod in Front of Stage
Set the camera tripod in the central floor area, facing the pink curtain stage. This professional three-legged stand should be angled toward the filming area with the camera mount at optimal height. Position it to capture both the stage and green backdrop areas effectively.
Step 10. Place Ring Light Near the Tripod
Install the ring light on its stand next to the camera tripod. This circular lighting equipment should stand at face level, positioned to the right of the tripod. Angle it toward the filming stage to provide even, flattering illumination for all your Dreamy Room Level 104 content creation needs.
Step 11. Arrange Office Chairs Around the Studio
Position the blue office chair at the computer desk on the right side. Place the white chair near the center area, and set the pink chair beside the coffee table. These ergonomic seating options should be distributed throughout the studio, providing comfortable workstations at different zones in Dreamy Room Level 104.
Step 12. Set Up Computer Monitors on the Desk
Place the computer monitor left and computer monitor right side by side on the desk surface. Position them in the right section of the studio against the wall. The dual monitor setup should face forward with the screens angled slightly inward for optimal viewing during editing sessions.
Step 13. Position Main Desk Against the Right Wall
Install the desk along the right wall section of the studio. This wooden workstation should be placed perpendicular to the wall, creating an L-shaped workspace. Ensure sufficient space behind for the office chair and adequate desktop surface for monitors and accessories in Dreamy Room Level 104.
Step 14. Place Keyboard on Desk Surface
Set the keyboard directly in front of the computer monitors on the desk. This white peripheral should be centered between both screens, positioned at a comfortable typing angle. Leave space for the mouse and other desk accessories to complete your Dreamy Room Level 104 workstation.
Step 15. Install Shelf Unit on the Right Wall
Mount the shelf unit on the right wall above the desk area. This multi-tiered storage system should display various items including the bookshelf items. Position it high enough to avoid monitor interference while keeping items within easy reach for your Dreamy Room Level 104 studio organization.
Step 16. Position White Sofa in the Front Area
Place the white sofa in the front center section of the studio. This cream-colored couch should face slightly toward the camera, creating a comfortable seating area. Position it perpendicular to the pink stage area, allowing space for the coffee table in front in Dreamy Room Level 104.
Step 17. Add Yellow Cushion Bed Near the Sofa
Set the yellow cushion bed on the floor next to the white sofa. This low padded seating should be positioned parallel to the couch, creating additional lounging space. Place it with the yellow cushion facing upward, adding a pop of color to the studio's seating arrangement.
Step 18. Place Coffee Table in Front of Sofa
Position the coffee table directly in front of the white sofa. This low wooden table should be centered with the seating area, creating a functional surface for drinks and items. Ensure adequate legroom between the table and sofa for comfortable use in Dreamy Room Level 104.
Step 19. Set Pink Alarm Clock on Side Table
Place the pink alarm clock on the side table positioned beside the seating area. This adorable timepiece should sit on the small table's surface near the pink stage area, adding both function and charm to complete your Dreamy Room Level 104 time management.
Step 20. Position Plant Pots Around the Studio
Set the small plant pot on the desk area and place the large plant pot near the seating zone. These green plants should be distributed to add natural elements throughout the studio. Position them where they receive visual prominence without obstructing workflow in Dreamy Room Level 104.
Step 21. Hang Pink Decorative Frame on the Wall
Mount the pink decorative frame on the left wall near the seating area. This heart-shaped or ornate frame should be positioned at eye level, creating a focal point in the lounge section. Ensure it's centered and level for proper visual balance.
Step 22. Install Picture Board Above the Monitors
Attach the picture board to the wall directly above the computer monitors. This display board should showcase various photos and prints in a grid pattern. Position it high enough to avoid screen glare while remaining visible from the desk chair in Dreamy Room Level 104.
Step 23. Lay Down Rug in the Central Floor Area
Spread the rug across the gray floor in the central studio space. This area rug should cover the zone between the seating area and filming stage, defining the main activity space. Ensure all edges lie flat and the rug is centered for optimal aesthetic in Dreamy Room Level 104.
Step 24. Add Throw Pillows to Seating Areas
Place the throw pillow blue on the white sofa and position the throw pillow pink on the yellow cushion bed. These decorative cushions should be arranged casually, adding comfort and color contrast to the seating zones in Dreamy Room Level 104.
Step 25. Position Pink Ottoman Near Coffee Table
Set the pink ottoman beside the coffee table in the seating area. This plush footrest should be positioned for easy access from the sofa, creating additional seating or a comfortable place to rest feet during relaxation breaks in your Dreamy Room Level 104 studio.
Step 26. Place Decorative Bottles on Surfaces
Arrange the decorative bottles on the desk or shelf unit. These glass containers should be grouped together as an aesthetic accent, adding visual interest to your workspace. Position them where they catch light beautifully without interfering with work activities.
Step 27. Set Up Desk Organizer and Mouse Pad
Position the desk organizer on the right side of the desk surface and place the mouse pad next to the keyboard. These accessories should create an efficient workspace layout, with the organizer holding pens and supplies while the mouse pad provides smooth navigation in Dreamy Room Level 104.
Step 28. Add Pencil Holder to Desk Setup
Set the pencil holder within the desk organizer area or directly on the desk surface. This container should be positioned for easy access to writing instruments, keeping the workspace tidy and organized in your Dreamy Room Level 104 studio.
Step 29. Install Wall Shelf Right Above Desk
Mount the wall shelf right on the right wall section above the workspace. This additional shelf should display decorative items and frequently used supplies. Position it at a convenient height for easy access while maintaining aesthetic appeal.
Step 30. Place Potted Succulent on Desk
Set the potted succulent on the desk surface near the monitors. This small green plant should sit in a corner of the workspace, adding a natural touch without occupying too much valuable desk space in Dreamy Room Level 104.
Step 31. Position Cactus Plant on Shelf
Place the cactus plant on one of the shelf unit levels. This spiky succulent should be positioned safely where it won't be accidentally knocked over, adding desert charm to your Dreamy Room Level 104 studio decor.
Step 32. Hang Hanging Plant from Upper Area
Suspend the hanging plant from the ceiling or upper wall section. This trailing plant should be positioned where its vines can cascade naturally, adding vertical greenery dimension to the studio without taking up floor space in Dreamy Room Level 104.
Step 33. Position Floor Lamp Near Seating Area
Set the floor lamp beside the white sofa or reading area. This standing light should be positioned in the corner of the seating zone, providing ambient lighting for evening work or relaxation in your Dreamy Room Level 104 studio.
Step 34. Place Desk Lamp on Work Surface
Position the desk lamp on the desk near the computer monitors. This task lighting should be angled toward the keyboard and workspace, providing focused illumination for detailed work without creating screen glare in Dreamy Room Level 104.
Step 35. Arrange Photo Prints on Display Board
Attach the photo prints to the picture board above the desk. These images should be arranged in an aesthetic grid or collage pattern, showcasing memorable moments and creative work. Distribute them evenly across the board for visual balance.
Step 36. Add Decorative Cushions to Seating
Place the decorative cushions throughout the seating area on the sofa and cushion bed. These additional pillows should be arranged to enhance comfort and add extra pops of color to your Dreamy Room Level 104 lounge zone.
Step 37. Position Storage Boxes Under or Beside Furniture
Set the storage boxes beneath the desk or beside the shelf unit. These organizational containers should be placed in accessible yet unobtrusive locations, keeping supplies and equipment neatly stored in Dreamy Room Level 104.
Step 38. Drape Fabric Drapes Near Stage Area
Hang the fabric drapes around the filming stage or backdrop area. These flowing fabrics should be positioned to add texture and depth to the shooting zone, creating professional-looking layers for content creation in Dreamy Room Level 104.
Tips and Tricks
Common Mistakes
- Missing the wall candles on the left side - these small items are easily overlooked but essential for completing Dreamy Room Level 104 ambiance
- Placing the backdrop stand too close to the pink stage - ensure adequate spacing between filming equipment for proper shooting angles and movement
- Forgetting to position the round wooden stool on the pink stage platform - this small furniture piece belongs inside the curtained area
- Confusing the placement of multiple plant pots - the large pot goes near seating while small ones accent the desk workspace
- Overlapping the monitors incorrectly - they should sit side by side with slight inward angles, not stacked or too separated
Expert Techniques
- When positioning the camera tripod in Dreamy Room Level 104, drag it from slightly above its final position and let it "snap" into place facing the stage for perfect alignment
- For the dual monitor setup, place the left monitor first then immediately add the right one - they have magnetic positioning that works best when placed sequentially
- The green backdrop requires precise vertical alignment - drag it slowly downward onto the stand until you feel the snap confirmation
- Small desk items like the pencil holder and desk organizer have tight placement zones - zoom in slightly and drop them from directly above their spots for accurate positioning
- The ring light positions best when dragged in a curved path toward the filming area rather than straight across - this utilizes its snap-to-grid feature effectively in Dreamy Room Level 104