Dreamy Room Level 88
Level 88 guide walkthrough, helping players solve puzzles and explore the wonderful world of Dreamy Room.
Dreamy Room Level 88 Walkthrough Guide
Dreamy Room Level 88 Room Story
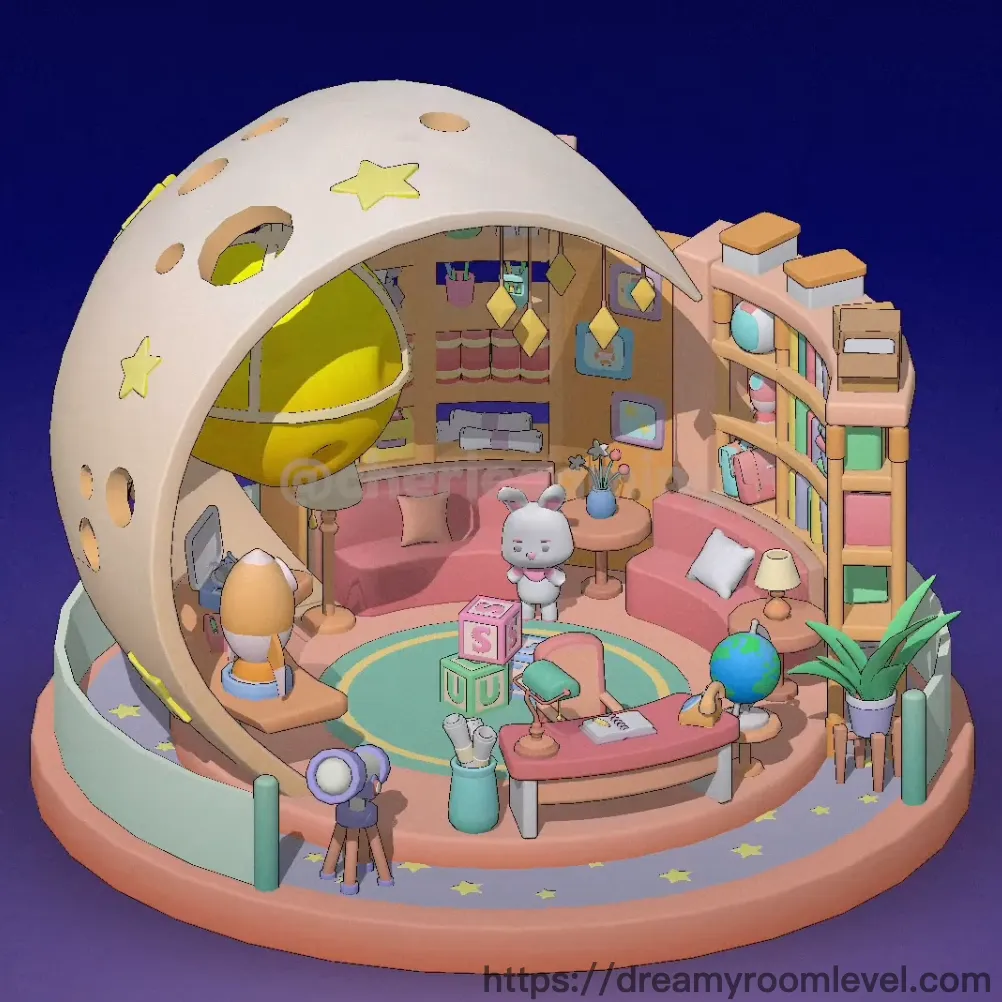
In this magical starlit sanctuary, young Emma's imagination comes alive every night. Her Dreamy Room Level 88 features a whimsical dome ceiling decorated with twinkling stars, where she can gaze through her telescope at distant galaxies. The cozy bunk bed with soft pink bedding becomes a spaceship, while colorful alphabet blocks spell out her dreams. Surrounded by beloved bunny plushies, storybooks, and her favorite yellow sphere chair, this enchanting space perfectly blends learning and play.
Dreamy Room Level 88: Step-by-Step Placement Guide
Step 1. Set Up the Round Platform Foundation
Begin by placing the round platform as the base structure. This circular foundation sits directly on the floor, centered in your view. The platform features a peachy-pink rim that defines the room's boundaries. Align it carefully as all other items will be positioned relative to this base.
Step 2. Add Floor Stars Around Platform Edge
Scatter the floor stars evenly around the outer rim of the platform. These small yellow star decorations create a magical border. Place approximately 20-25 stars with even spacing, following the platform's curved edge for a whimsical touch that defines the play area.
Step 3. Install the Dome Roof Structure
Position the dome roof or tent structure covering the upper half of the room. This cream-colored dome features circular window holes and adorable orange spots pattern. The structure should sit securely on the back edge of the platform, creating a cozy enclosed feeling.
Step 4. Place Bunk Bed in Dreamy Room Level 88
Drag the bunk bed to the back-right section against the curved wall. This wooden furniture piece includes both upper bed and lower bed levels connected by a bunk bed ladder. The bed frame should align parallel to the wall with pink striped mattresses visible on both levels.
Step 5. Add Pink Bedding and Pillows
Layer the pink bedding across both bunk bed levels, ensuring the fabric drapes naturally. Place white pillows at the head of each bed, positioning them against the wall side for a neat, inviting appearance in Dreamy Room Level 88.
Step 6. Position Bookshelf Against Wall in Dreamy Room Level 88
Place the tall bookshelf or wooden shelves unit to the right side of the bunk bed. This multi-tiered storage should stand vertically with several horizontal compartments visible, ready to hold books and decorative items.
Step 7. Arrange Colorful Books on Shelves
Fill the bookshelf with books, including pink books and colorful books. Stack them vertically on different shelf levels, mixing colors for a vibrant display. Some books should lean while others stand upright for visual variety.
Step 8. Set Up Wooden Desk and Study Area
Position the wooden desk in the center-right area of Dreamy Room Level 88, creating a functional study area. The desk should face slightly toward the room's center with enough space around it for chair placement.
Step 9. Add Pink Chair and Curved Seating
Place the pink chair directly in front of the desk for comfortable studying. Add the curved chair nearby as additional seating. These chairs should be easily accessible and positioned for optimal desk use in Dreamy Room Level 88.
Step 10. Install Desk Lamp for Reading Light
Position the desk lamp on the left corner of the wooden desk. This standing lamp with cream shade provides focused lighting for study sessions, angled to illuminate the desk surface perfectly.
Step 11. Place Yellow Lamp for Ambient Lighting in Dreamy Room Level 88
Add the yellow lamp on a small side surface. This bright accent piece provides warm ambient lighting, complementing the desk lamp and creating a cozy study atmosphere.
Step 12. Position Round Rug in Center
Lay the round rug with green rug pattern in the platform's center. This circular floor covering features mint-green color with yellow border, defining the main play area where most activities happen in Dreamy Room Level 88.
Step 13. Add Yellow Ball Chair as Statement Piece
Place the iconic yellow ball chair or sphere chair on the left side of the room. This bright yellow spherical seat with white base stands out as a fun focal point, positioned near the window opening for stargazing.
Step 14. Set Up Telescope and Stand in Dreamy Room Level 88
Position the telescope on its telescope stand or tripod in front of the yellow ball chair. Direct it toward one of the dome's window openings, perfect for observing the starry sky visible through the dome structure.
Step 15. Place Bunny Plush Toys
Add the adorable bunny plush or white bunny on the center of the round rug. This soft toy becomes the room's centerpiece, surrounded by other play items in Dreamy Room Level 88.
Step 16. Arrange Alphabet Blocks Near Bunny
Scatter the alphabet blocks including pink block, green block, and blue block around the bunny. These educational toy blocks spelling pieces should be stacked or arranged to spell simple words.
Step 17. Position Globe on Lower Level in Dreamy Room Level 88
Place the globe or earth globe on a lower shelf or beside the rug. This educational tool features the classic blue and green earth colors, easily accessible for learning geography.
Step 18. Add Wall Star Decorations
Attach the wall star and yellow wall star decorations to the interior dome surface. These should be scattered across the ceiling in an organic pattern, creating a starry night effect throughout Dreamy Room Level 88.
Step 19. Hang Pendant Lights from Ceiling in Dreamy Room Level 88
Install the pendant lights, yellow diamond lights, and hanging lights from the dome's interior. These geometric yellow diamond-shaped fixtures should dangle at varying heights above the play area for enchanting illumination.
Step 20. Add Picture Frame Wall Art
Hang the picture frame and wall art on the bookshelf's back panel or adjacent wall space. These decorative pieces add personality and color to the vertical surfaces in Dreamy Room Level 88.
Step 21. Place Blue Vase with Flowers
Position the blue vase containing colorful flowers on a side table surface. This arrangement brings natural beauty and freshness to the space, with the vase's blue tone complementing the room's color scheme.
Step 22. Add Plant Pot with Green Plant in Dreamy Room Level 88
Set the plant pot with green plant in a corner or on a lower shelf. The leafy plant adds a touch of nature and helps purify the air in this cozy space.
Step 23. Arrange Coffee Cups and Yellow Mug
Place the coffee cups set and yellow mug on a small table surface near the seating area. These play tea party accessories should be arranged as if ready for use in Dreamy Room Level 88.
Step 24. Position Pencil Holder with Pencils
Set the pencil holder filled with pencils on the wooden desk. This organizational item should sit near the lamp, keeping art supplies easily accessible for creative activities.
Step 25. Add Storage Basket and Pink Basket in Dreamy Room Level 88
Place the storage basket and pink basket on lower shelves or floor level. These fabric baskets help organize toys and maintain tidiness in the play area.
Step 26. Position Paper Roll and Tissue Roll
Place the paper roll and tissue roll near the desk or on a shelf. These practical items should be within easy reach for art projects or cleanup needs in Dreamy Room Level 88.
Step 27. Add Colorful Ball Toy
Place the colorful ball or rainbow ball on the rug near the bunny and blocks. This vibrant spherical toy features multiple colors and adds playful energy to the central play area.
Step 28. Position Footstool and Small Table in Dreamy Room Level 88
Add the footstool near seating areas for extra comfort. Place the small table or side table beside chairs to hold drinks, books, or decorative items.
Step 29. Add Cushions and Pink Cushion
Scatter the cushion and pink cushion on the beds and seating areas. These soft accessories provide extra comfort and match the room's pink color theme perfectly in Dreamy Room Level 88.
Step 30. Drape Blanket Over Furniture
Add the blanket draped over the bed or chair. This cozy textile should appear naturally placed, as if recently used, adding warmth to the space.
Step 31. Position Storage Box and Toy Box in Dreamy Room Level 88
Place the storage box and toy box near the bed or against a wall. These containers should be easily accessible for storing toys and maintaining organization.
Step 32. Install Ladder and Stairs Access
Ensure the ladder or stairs leading to the upper bunk is securely positioned. This essential access point should be sturdy and safely attached to the bed frame in Dreamy Room Level 88.
Step 33. Add Railing and Fence Safety Features
Install the railing and fence elements around elevated areas like the upper bunk. These safety features prevent falls while adding to the room's architectural interest.
Step 34. Position Mirror on Wall
Hang the mirror on a wall or shelf at appropriate height. This functional item helps with daily routines and visually expands the space in Dreamy Room Level 88.
Step 35. Add Stuffed Animals Collection in Dreamy Room Level 88
Arrange various stuffed animals throughout the room on beds, shelves, and seating areas. These cuddly companions add personality and comfort to every corner.
Step 36. Organize Notebooks and Stationery
Stack notebooks and stationery items on the desk or bookshelf. These school supplies should be neatly organized and easily accessible for homework in Dreamy Room Level 88.
Step 37. Add Pen Holder to Desk
Place the pen holder on the desk surface near other writing supplies. This organizational tool keeps pens, markers, and other writing implements upright and ready to use.
Step 38. Install Wall Decorations Throughout
Add various wall decorations to blank wall spaces. These could include posters, decals, or hanging ornaments that reflect Emma's interests and personality in Dreamy Room Level 88.
Step 39. Complete Ceiling Holes Windows
Ensure all ceiling holes or circular windows in the dome are properly positioned. These openings allow starlight to filter in, creating magical lighting effects throughout the day.
Step 40. Add Pink Drawers and Final Details in Dreamy Room Level 88
Position the pink drawers for additional storage. Complete your reading nook and cozy corner arrangements by ensuring all items are perfectly aligned and the yellow gift box sits at the platform's front edge as a welcoming detail.
Notes and Practical Tips
Important Notes
- Watch for the yellow gift box at the platform's front edge - it's easy to miss during initial placement in Dreamy Room Level 88
- The dome structure's window holes must align properly before adding interior decorations, or items may clip through walls
- Bunny plush and alphabet blocks often overlap in the center rug area; place the bunny first, then arrange blocks around it carefully
- Upper bunk items like pillows and blankets can be blocked by the dome roof; ensure roof placement allows access to top bed
- Pendant lights require specific anchor points on the ceiling; find the subtle attachment markers before dragging lights upward
Practical Tips
- For tight shelf spaces, drag books at a slight angle rather than straight on - they'll snap into place more easily
- When placing multiple small items like blocks or cups, zoom in slightly for precision placement in cramped areas
- The yellow ball chair has a strong "snap" point - drag it near the left side and it will automatically align perfectly
- To avoid items bouncing back, release the drag slightly before reaching the final position, allowing the item to settle naturally
- For the bunk bed ladder, place the bed frame first, then the ladder will magnetically attach to the correct side in Dreamy Room Level 88
- Use the floor stars as visual guides for room boundaries; they help identify where larger furniture pieces should not extend beyond
- Completing Dreamy Room Level 88 requires patience with overlapping decorations; layer items from back to front for best results