Dreamy Room Level 21
Level 21 guide walkthrough, helping players solve puzzles and explore the wonderful world of Dreamy Room.
Dreamy Room Level 21 Walkthrough Guide
Dreamy Room Level 21 Room Story
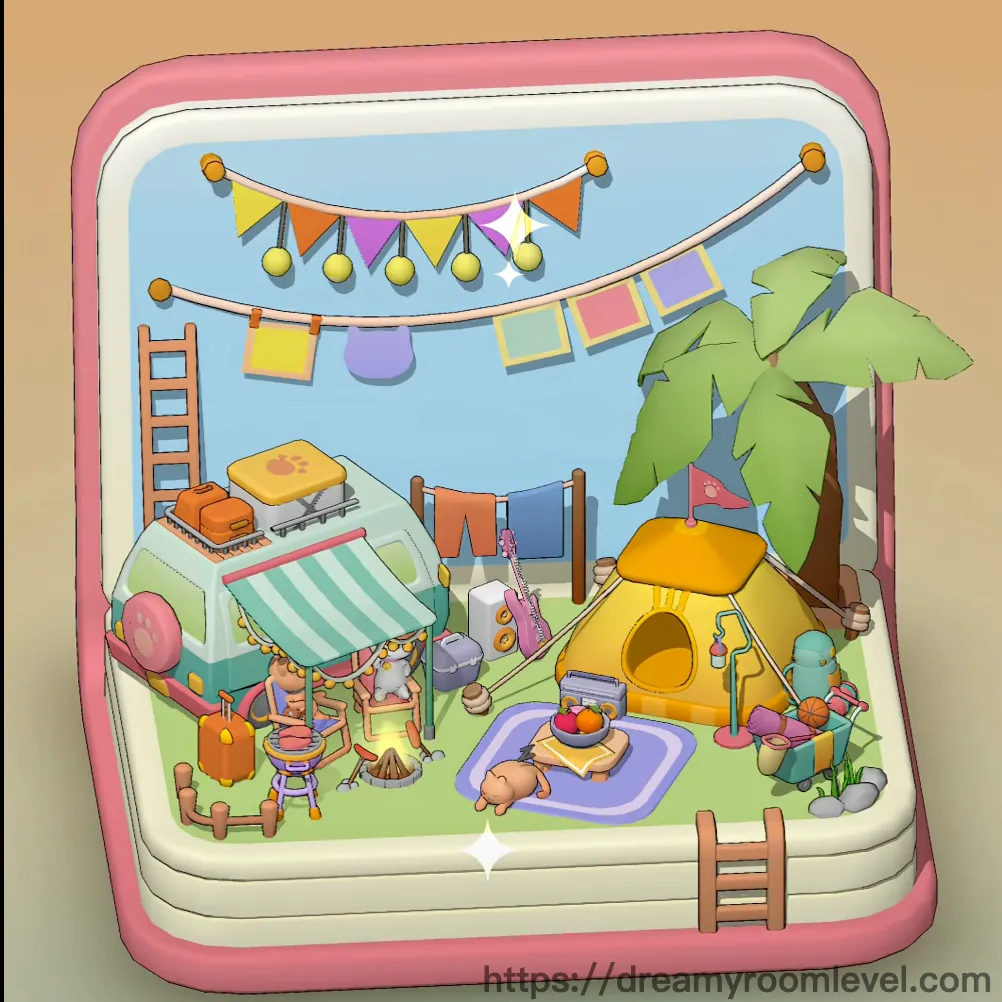
Under the starlit sky of Dreamy Room Level 21, a cozy camping adventure unfolds. The pink suitcase transforms into a magical camping ground where memories are made. With a vintage camper van, cheerful tent, and twinkling lights, this outdoor retreat brings the joy of nature right into your pocket. Friends gather around the campfire, sharing stories and songs under colorful bunting.
Dreamy Room Level 21 Step-by-Step Placement Guide
Step 1. Position the Pink Suitcase Base
Place the pink suitcase frame as your foundation. This creates the border for your entire camping scene in Dreamy Room Level 21.
Step 2. Add Natural Background Elements
Install the blue sky panel against the back wall, covering the entire upper backdrop area for an authentic outdoor atmosphere.
Step 3. Lay the Green Grass Foundation
Spread the green grass carpet across the entire floor surface. Ensure it covers from edge to edge in Dreamy Room Level 21's camping area.
Step 4. Position the Camper Van
Park the camper van on the left side of the grass, facing right. The mint-green vehicle should align with the left edge perfectly.
Step 5. Set Up the Yellow Tent in Dreamy Room Level 21
Place the yellow tent on the right side, leaving space between it and the camper van for the campfire area.
Step 6. Install the Green Striped Awning
Attach the green striped awning to the camper van's side, extending it outward to create shade coverage.
Step 7. Create the Campfire Setup
Position the campfire in the center area between the van and tent. This focal point is essential for Dreamy Room Level 21's cozy atmosphere.
Step 8. Place Storage Items
Arrange the wooden chest near the bottom left corner, serving as a rustic storage solution.
Step 9. Add Luggage Pieces in Dreamy Room Level 21
Stack the yellow luggage and orange suitcase on top of the camper van roof for travel-ready decoration.
Step 10. Set Up the Ladder
Lean the orange ladder against the camper van's side, providing access to the roof storage area.
Step 11. String the Party Bunting
Hang the colorful party bunting across the sky area, stretching from left to right for festive charm in Dreamy Room Level 21.
Step 12. Install the Clothesline
String the clothesline in the middle sky area, positioned below the party bunting for a practical touch.
Step 13. Hang the Laundry in Dreamy Room Level 21
Attach the hanging laundry pieces to the clothesline, creating a lived-in camping atmosphere.
Step 14. Add the Palm Tree
Plant the palm tree behind the tent on the right side, adding tropical vibes to your camping scene.
Step 15. Spread the Purple Picnic Blanket
Lay the purple picnic blanket in front of the tent, creating a cozy dining area for Dreamy Room Level 21.
Step 16. Place the Food Plate
Set the food plate on the picnic blanket, adding realistic camping meal details.
Step 17. Position Character Elements
Place the pink character near the campfire, bringing life to Dreamy Room Level 21's scene.
Step 18. Add Musical Entertainment
Lean the guitar against the tent or near the campfire for evening entertainment in this cozy setup.
Step 19. Set Up Camping Furniture in Dreamy Room Level 21
Position the camping chair near the campfire or picnic area for comfortable seating.
Step 20. Place the Tree Stump
Add the tree stump as natural seating near the campfire circle.
Step 21. Install Lantern Lights
Hang the lantern lights along the bunting line or tent area for evening illumination in Dreamy Room Level 21.
Step 22. Position the Kettle
Place the kettle near the campfire or on the picnic blanket for hot beverage preparation.
Step 23. Add the Picnic Basket in Dreamy Room Level 21
Set the picnic basket beside the blanket, completing your outdoor dining setup.
Step 24. Place the Blue Bucket
Position the blue bucket near the tent entrance for camping utility purposes.
Step 25. Add the Backpack
Lean the backpack against the tent or place it near the entrance for adventure gear storage.
Step 26. Position Small Plants
Scatter the small plant decorations around the grass for natural detail in Dreamy Room Level 21.
Step 27. Add Wooden Stakes and Posts
Insert wooden stakes and wooden posts around the tent and camping area for authentic setup details.
Step 28. Lay the Camping Mat in Dreamy Room Level 21
Place the camping mat inside or near the tent entrance for comfort.
Step 29. Scatter Small Rocks
Distribute small rocks around the campfire and grass edges for natural texture.
Step 30. Add Grass Patches
Place additional grass patches for varied ground texture throughout Dreamy Room Level 21.
Step 31. Position the Brown Pot
Set the brown pot near the camping area as a decorative or functional element.
Step 32. Add the White Star Detail
Place the white star decoration in the sky area for a magical night sky effect in Dreamy Room Level 21.
Notes and Tips
Important Notes
- The camper van door must face the center camping area for proper alignment
- Party bunting needs precise height adjustment to avoid overlapping with laundry line
- Small items like rocks and plants should be placed after all major furniture
- The campfire must be centered between van and tent for balanced composition
- Ladder angle is crucial for natural leaning effect against the van
Practical Tips
- Start with large items like van and tent to establish the main layout
- Use the picnic blanket as a guide for placing dining accessories
- Group luggage items on the van roof for efficient space usage
- Place decorative bunting before functional clothesline to layer properly
- Save small details like rocks and plants for final touches
- The perfect camping atmosphere in Dreamy Room Level 21 comes from balanced item placement