Dreamy Room Level 93
Level 93 guide walkthrough, helping players solve puzzles and explore the wonderful world of Dreamy Room.
Dreamy Room Level 93 Walkthrough Guide
Dreamy Room Level 93 Room Story
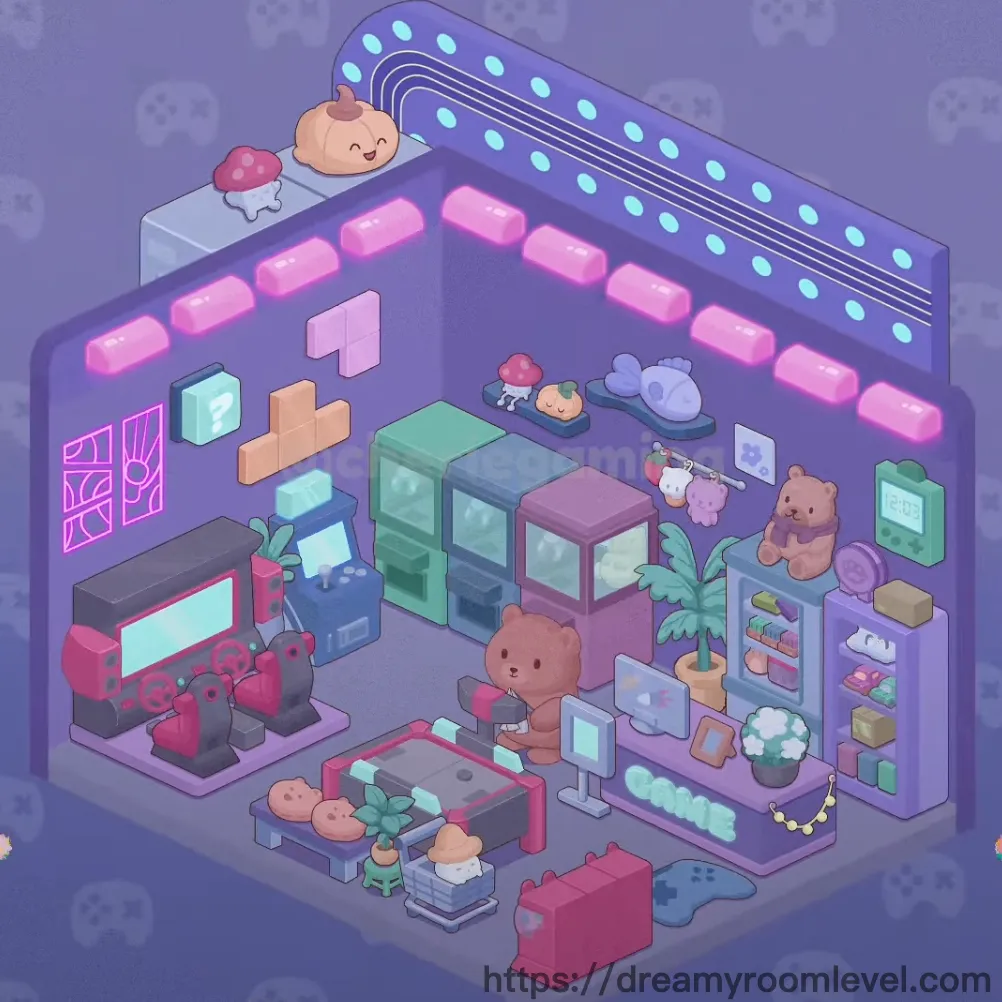
In a cozy corner of the city, a passionate gamer has transformed their space into the ultimate gaming sanctuary. Soft purple walls embrace colorful neon lights, while adorable bear plushies watch over intense gaming sessions. The room blends cutting-edge gaming equipment with charming kawaii decorations - pink keyboards clash beautifully with arcade machines, and tiny vegetable characters peek from shelves. This is where virtual adventures meet real-world comfort, a space designed for both competitive gaming marathons and peaceful tea breaks with friends.
Dreamy Room Level 93: Step-by-Step Placement Guide
Step 1. Position the Desk in the Room Center
Place the desk in the central-right area of the room, creating your main gaming station. This desk serves as the foundation for all your gaming equipment in Dreamy Room Level 93, so ensure it's positioned with enough space around it for additional furniture and decorations.
Step 2. Set Up Gaming Chair at the Desk
Drag the gaming chair directly in front of the desk, aligning it perfectly with where the keyboard will go. The chair should face the desk squarely, allowing comfortable access to all gaming peripherals throughout Dreamy Room Level 93.
Step 3. Install Computer Monitor on Desk Surface
Place the computer monitor on the desk's back edge, centered for optimal viewing. Position it at eye level when seated in the gaming chair, which is essential for completing Dreamy Room Level 93 successfully.
Step 4. Add Pink Keyboard and Mouse Setup
Position the pink keyboard in front of the monitor, placing the mouse pad to its right side. Add the keyboard mat underneath the keyboard for that extra gaming aesthetic touch.
Step 5. Place Arcade Machine in Left Corner
Drag the arcade machine to the left side of the room against the wall. This retro gaming centerpiece should be easily accessible while not blocking the main gaming area in Dreamy Room Level 93.
Step 6. Mount Neon Sign Panel Above Gaming Area
Attach the neon sign panel on the wall above and behind the desk area. The curved panel with cyan dots should be positioned horizontally to create an ambient gaming atmosphere.
Step 7. Install LED Strip Lights Below Neon Panel
Place the LED strip lights directly below the neon sign panel, creating a stunning pink glow effect. These lights should run horizontally across the wall, illuminating your gaming setup beautifully.
Step 8. Arrange Storage Cabinets in Room Center
Position the storage cabinet green, storage cabinet pink, and third cabinet unit in a row in the center of the room. These transparent-front cabinets create perfect display storage for your collectibles.
Step 9. Add Shelf Units for Additional Storage
Place the shelf unit green on the right side near the wall, followed by the shelf unit blue and shelf unit pink in nearby positions. These modular storage units help organize gaming accessories throughout Dreamy Room Level 93.
Step 10. Position Large Bear Plushie on Purple Chair
Place the bear plushie large on the purple seating area in the right section of the room. This adorable mascot should be sitting comfortably, adding warmth to your gaming space.
Step 11. Add Small Bear Plushies Around the Room
Scatter the bear plushie small companions in various spots - one near the desk, another on a shelf. These cute guardians watch over your gaming sessions in Dreamy Room Level 93.
Step 12. Create Tea Corner with Kettle and Teacup
Set up the kettle and teacup on one of the storage cabinets or shelves, creating a cozy refreshment station. Add the plate nearby for snacks during gaming breaks.
Step 13. Place Potted Plants for Natural Touch
Position the potted plant medium on top of a tall cabinet or shelf, then place the potted plant small and succulent plant in smaller spaces around the room for a fresh atmosphere.
Step 14. Add Cute Vegetable Characters Display
Arrange the onion character, broccoli character, and carrot character on the storage cabinets. These kawaii food friends should be visible and add personality to your gaming setup.
Step 15. Place Mushroom Decorations on Shelves
Add the mushroom decoration red and mushroom decoration pink on upper shelves or cabinet tops. These whimsical decorations enhance the dreamy aesthetic of Dreamy Room Level 93.
Step 16. Display Strawberry and Apple Items
Position the strawberry item and apple item near the food characters or on small shelves. These cute fruit decorations complement the vegetable characters perfectly.
Step 17. Organize Gaming Peripherals on Desk
Place the game controller on the desk within easy reach, positioning the headphones on a dedicated stand or hook nearby. Add the speaker on the desk corner for quality audio.
Step 18. Install Floating Shelves on Wall
Mount the floating shelves on the wall space above or beside your main gaming area. These shelves should display smaller collectibles and decorations throughout Dreamy Room Level 93.
Step 19. Add Wall Shelf with Decorative Items
Position the wall shelf on an empty wall section, using it to display the clock and picture frame for both function and decoration.
Step 20. Hang Wall Art Pink on Prominent Wall
Mount the wall art pink on the left wall area near the arcade machine. This neon-style artwork should be at eye level, adding a vibrant pop of color to your gaming room.
Step 21. Place Drawer Units for Organization
Position the drawer unit pink and drawer unit green beneath the main desk area or against a wall. These storage units keep cables and small items organized in Dreamy Room Level 93.
Step 22. Add Bean Bag and Pink Cushion
Place the bean bag pink in a cozy corner for alternative seating, then add the pink cushion either on the bean bag or gaming chair for extra comfort.
Step 23. Lay Out Yoga Mat in Open Space
Unroll the yoga mat blue in an open floor area near the right side of the room. This mat provides a space for stretching between gaming sessions, essential for maintaining health while completing Dreamy Room Level 93.
Step 24. Position Dumbbells Near Exercise Area
Place the dumbbells beside the yoga mat or in a corner near the exercise space. These fitness tools help balance gaming time with physical activity.
Step 25. Organize Books Stack on Shelf
Arrange the books stack on one of the storage cabinets or floating shelves. Stack them neatly to display your gaming guides and manga collection.
Step 26. Add Star Decorations Around the Room
Scatter the star decoration items in various locations - some floating near the neon lights, others on shelves. These golden stars create a magical atmosphere in Dreamy Room Level 93.
Step 27. Hang Decorative Chain on Shelf Edge
Drape the decorative chain along the front edge of one of your shelves or cabinets. This subtle detail adds a charming touch to your storage units.
Step 28. Place Tissue Box on Accessible Surface
Position the tissue box on the desk corner or nearby shelf where it's easily reachable during gaming sessions. Following Dreamy Room Level 93 design principles, practical items should be within arm's reach.
Step 29. Add Drink Cup to Gaming Station
Place the drink cup on a coaster on your desk or a nearby shelf. Keep it positioned safely away from electronic equipment while remaining accessible.
Step 30. Position Snack Bowl Near Seating Area
Set the snack bowl on a stable surface near your gaming chair or on the storage cabinet. This placement ensures easy access to snacks during marathon gaming sessions.
Step 31. Install Cable Organizer Behind Desk
Attach the cable organizer to the back or underside of your desk. This essential item keeps all your gaming cables tidy and prevents tangling throughout Dreamy Room Level 93.
Step 32. Arrange Cute Food Items Display
Group the cute food items together on a shelf or cabinet top, creating an adorable food-themed corner. These collectibles should be arranged with the other character decorations.
Step 33. Unpack Cardboard Box Last
Finally, interact with the cardboard box to reveal the final items for placement. This box typically appears in the corner and may contain surprise decorative elements to complete your Dreamy Room Level 93 gaming paradise.
Tips and Tricks
Common Pitfalls
- The neon sign panel and LED strip lights must be placed in the correct order - panel first, then lights below - or they won't align properly on the wall
- Small decorative items like mushrooms and star decorations can be easily hidden behind larger furniture; place them after positioning all major pieces
- The three storage cabinets in the center need precise spacing; if placed too close together, you won't be able to add items on top of them
- Cable organizer placement is tricky - attach it to the desk's back edge before adding monitors and keyboards to avoid obstruction
- Vegetable characters and food items are small and can overlap; zoom in when placing these kawaii collectibles to ensure accurate positioning
Expert Strategies
- Start with the desk and gaming chair first to establish your main gaming zone, then build outward from this central hub for optimal Dreamy Room Level 93 completion
- Place the arcade machine early as it's a large item that determines traffic flow in the room
- Group similar items together: all bear plushies in one area, all food characters in another for a cohesive aesthetic
- The pink keyboard and gaming peripherals have magnetic snap points on the desk surface; drag them slowly until you feel the "pull" indicating correct placement
- Save small decorative items like stars and chains for last when you can see gaps that need filling
- Use the transparent storage cabinets strategically to display your cutest collectibles where they'll be most visible
- The yoga mat and dumbbells should be positioned with enough clearance around them to suggest actual usable exercise space