Dreamy Room Level 63
Level 63 guide walkthrough, helping players solve puzzles and explore the wonderful world of Dreamy Room.
Dreamy Room Level 63 Walkthrough Guide
Dreamy Room Level 63 Room Story
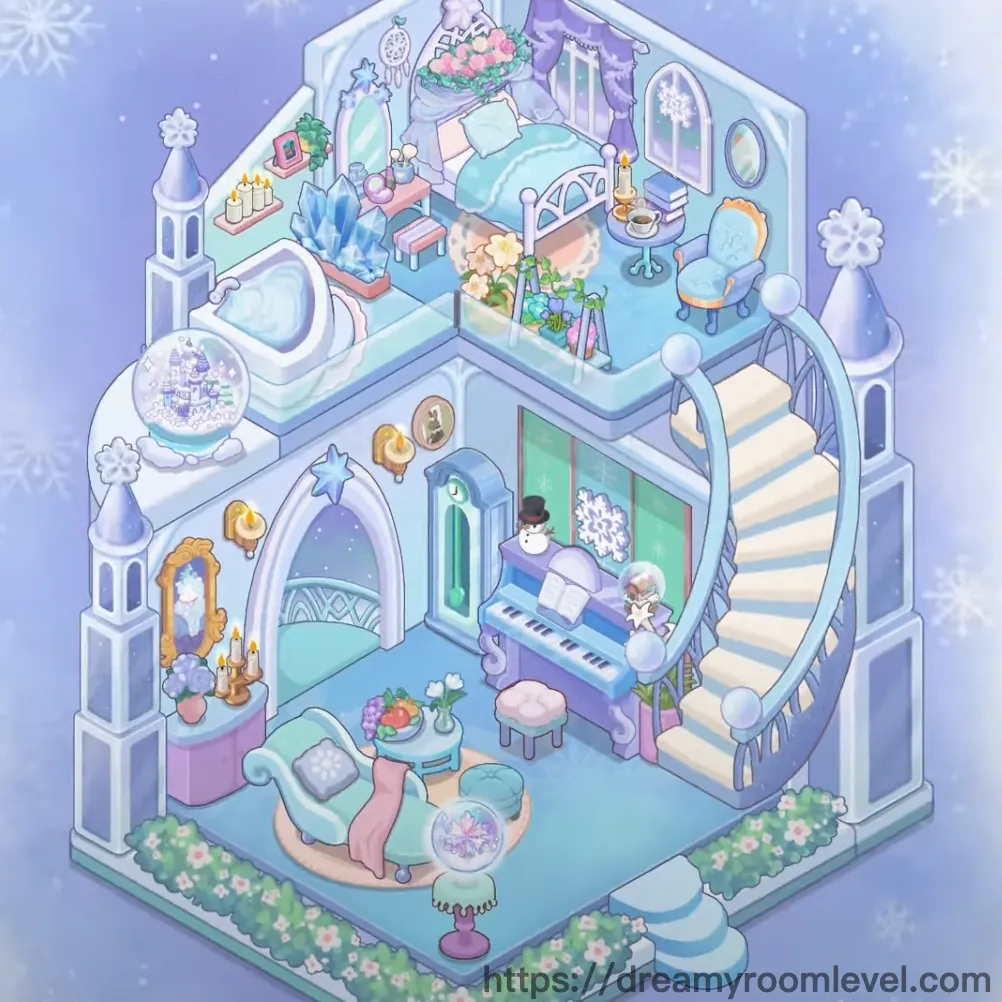
In a magical winter castle where snowflakes dance eternally, lives a young musician who dreams in shades of ice blue and lavender. Every morning, she wakes beneath her purple canopy to practice piano melodies that echo through crystal towers. The room sparkles with frozen beauty—blue crystals catching light, disco balls spinning gentle rainbows, while fresh flowers bloom impossibly in winter's embrace. This enchanted space in Dreamy Room Level 63 perfectly captures the harmony between artistic passion and frozen fantasy, where every corner tells a story of dreams crystallized into reality.
Dreamy Room Level 63 Complete Walkthrough
Step 1. Install the Spiral Staircase with Stair Railing
Begin Dreamy Room Level 63 by placing the spiral staircase on the right side of the room, connecting the upper and lower levels. The elegant curved design serves as the room's architectural centerpiece. Attach the stair railing along the staircase edges, featuring decorative pearl-like spheres that match the winter theme. The railing should align perfectly with each step for both safety and aesthetic appeal.
Step 2. Set Up the White Bed Frame in Dreamy Room Level 63
Position the white bed frame in the upper-left corner area, featuring an ornate arched headboard design. This elegant piece should be placed at a slight angle to create visual interest. The frame's pristine white color complements the icy palace theme and serves as the foundation for the sleeping area.
Step 3. Add Blue Bedding and Pink Pillows
Dress the bed with soft blue bedding that matches the winter color scheme. Layer it with multiple pink pillows in varying sizes at the headboard area. The contrast between cool blue and warm pink creates a cozy yet elegant sleeping space that defines Dreamy Room Level 63's color palette.
Step 4. Hang the Purple Bed Canopy
Suspend the flowing purple bed canopy above the bed from the ceiling attachment point. The sheer fabric should drape gracefully on both sides of the bed frame, creating a royal and dreamy atmosphere. Ensure the canopy flows naturally and doesn't obstruct the decorative elements on the bedside area.
Step 5. Place the Flower Basket Above the Bed
Position the delicate flower basket on the wall shelf directly above the bed's headboard. This hanging arrangement filled with pink and white blooms adds a touch of natural beauty to Dreamy Room Level 63. The elevated placement prevents it from being obstructed by the canopy while creating vertical visual interest.
Step 6. Install Dream Catcher and Crystal Decorations
Hang the ethereal dream catcher on the left wall near the bed, featuring intricate webbing and feather details. Place the stunning blue crystal cluster on the lower bedside shelf area. These mystical elements enhance the magical winter atmosphere while catching and reflecting light throughout the room.
Step 7. Set Up Vanity Table with Round Mirror in Dreamy Room Level 63
Position the elegant vanity table near the bedroom area, featuring curved legs and a light-colored surface. Mount the round mirror directly above it on the wall, ensuring proper height for comfortable use. Place the matching blue chair in front of the vanity, creating a functional beauty station.
Step 8. Arrange Candles and Books Stack
Display decorative candles on the vanity table surface, creating ambient lighting potential. Stack the collection of books stack on the bedside shelf or small table, adding an intellectual and cozy element to the space. The varied heights of candles and books create visual rhythm in Dreamy Room Level 63.
Step 9. Place Small Round Table with Tea Set
Position the charming small round table near the seating area on the upper level. Arrange the delicate tea set on its surface, including teapot, cups, and saucers. This creates an intimate spot for afternoon refreshments while maintaining the elegant atmosphere of the winter palace.
Step 10. Install the White Piano with Piano Bench
Place the beautiful white piano in the lower-level music corner, positioning it against the wall with the keyboard facing outward. Set the matching piano bench directly in front of the keys at the proper distance for playing. This musical centerpiece defines Dreamy Room Level 63's artistic character and provides the room's focal point.
Step 11. Position Bathtub in the Bathroom Area
Install the elegant bathtub in the designated bathroom corner on the left side. The freestanding design with curved edges should be placed to maximize space while maintaining accessibility. The pristine finish complements the winter palace aesthetic throughout Dreamy Room Level 63.
Step 12. Add Tower Decorations and Lanterns
Place the decorative tower decoration elements on both sides of the room exterior, creating the castle architecture effect. Install tower lanterns at various heights on these structures, providing atmospheric lighting. These architectural details establish the winter palace theme and frame the interior space beautifully.
Step 13. Set Up Pink Blue Sofa with Ottoman in Dreamy Room Level 63
Position the comfortable pink blue sofa in the lower-level lounge area, creating a cozy reading or relaxation spot. Place the matching blue ottoman in front of it, serving as both footrest and additional seating. Add coordinating throw pillows on the sofa for extra comfort and color accent.
Step 14. Place Coffee Table with Decorative Items
Position the elegant coffee table in front of the sofa, featuring a transparent or crystal-like top surface. Display the mystical crystal ball on its surface as a centerpiece. This arrangement creates a functional yet decorative focal point in the lounge area of Dreamy Room Level 63.
Step 15. Install Purple Archway and Door Frame
Set up the ornate purple archway as an entrance element, featuring decorative molding and elegant curves. Install the complementary door frame elements to define room boundaries. These architectural features add depth and structure while maintaining the royal winter palace theme.
Step 16. Hang Arched Window and Window Frames
Mount the elegant arched window on the wall, allowing natural light to filter through. Add detailed window frames around multiple windows throughout the room. Install hanging curtains in complementary colors to frame the windows, adding softness and privacy control to Dreamy Room Level 63.
Step 17. Arrange Gold Framed Mirror and Wall Paintings in Dreamy Room Level 63
Hang the ornate gold framed mirror on a prominent wall section, adding elegance and reflecting light throughout the space. Display various wall paintings at strategic locations, featuring winter or artistic themes that complement the room's aesthetic. These decorative pieces add personality and sophistication.
Step 18. Position Purple Side Table with Lamp
Place the decorative purple side table beside the seating area or bed, providing surface space for essentials. Set a graceful lamp on it to provide task and ambient lighting. The purple tones maintain color harmony while the lamp adds practical functionality to Dreamy Room Level 63.
Step 19. Add Disco Ball and Ceiling Decorations
Suspend the sparkling disco ball from the ceiling near the music area, creating dynamic light reflections when illuminated. Install various ceiling decorations throughout the room, including snowflake motifs and hanging ornaments that enhance the winter wonderland atmosphere.
Step 20. Install Snowflake Wall Decor and Pattern Floor in Dreamy Room Level 63
Attach multiple snowflake wall decor pieces across various walls at different heights, creating a falling snow effect. The snowflake pattern floor should cover the base surface with icy crystalline designs. These coordinated elements unify the winter theme throughout the space.
Step 21. Place Star Decoration and Crystal Ornaments
Position the glowing star decoration at a prominent location, possibly on a tower or high shelf. Arrange delicate crystal ornaments on various surfaces and shelves, catching and refracting light. Add pearl decorations to complement the icy aesthetic throughout Dreamy Room Level 63.
Step 22. Arrange Ice Crystal Decorations and Tree Decorations
Display multiple ice crystal decorations throughout the room, particularly near windows and on upper shelves where they catch light. Add whimsical tree decorations to any decorative trees or branches, featuring winter-themed ornaments that enhance the frozen palace atmosphere.
Step 23. Add Potted Plants and Floor Flowers in Dreamy Room Level 63
Place various potted plants with winter-hardy greenery on shelves, tables, and floor areas. Arrange floor flowers along the base of walls and in corners, creating beautiful blooming displays that contrast with the icy theme. These natural elements add life and color to the magical space.
Step 24. Position Garden Border and Outdoor Plants
Install the decorative garden border along the exterior base of the room, defining the transition between indoor and outdoor spaces. Plant various outdoor plants along this border, featuring winter-blooming flowers and greenery that extend the magical garden feeling beyond the walls.
Step 25. Place Circular Rug and Candle Holder
Lay the soft circular rug in the central floor area, featuring patterns that complement the room's color scheme. Position the elegant candle holder on a table or shelf, providing additional ambient lighting options. These elements add warmth and comfort to Dreamy Room Level 63's hard surfaces.
Step 26. Add Snowman Figure and Music Notes Decor
Place the cheerful snowman figure near the piano or in a corner, bringing playful winter character to the space. Display music notes decor on walls or shelves near the musical area, celebrating the room's artistic purpose and adding thematic detail.
Step 27. Arrange Flower Vase and Fruit Bowl in Dreamy Room Level 63
Display a decorative flower vase filled with fresh blooms on a table or shelf, adding natural beauty and fragrance. Set a fruit bowl on the coffee table or kitchen counter, filled with colorful fruits that provide both decoration and refreshment. These living elements add vitality to the frozen palace setting.
Tips and Precautions
Precautions
- The spiral staircase area contains many small decorative elements that can be easily missed; check the railing spheres and step edges carefully before proceeding
- The bed canopy fabric can obstruct placement of items on the headboard shelf; install wall decorations before draping the canopy fully in Dreamy Room Level 63
- Multiple similar crystal and glass elements (crystal ball, crystal ornaments, ice decorations) can be confused; pay attention to their specific sizes and placement locations
- The tower decorations on exterior walls can block access to window decorations; place lanterns and exterior elements before adding curtains and window frames
- Piano area items must be placed in specific order: piano first, then bench, then nearby decorative elements to avoid overlapping issues
Practical Tips
- When placing small items on narrow shelves near the bed, drag from a lower angle to ensure precise positioning in tight spaces
- For overlapping decorative elements like the canopy and flower basket, place the basket first then adjust the canopy draping to avoid covering important details
- Use the disco ball's reflection as a reference point when positioning ceiling decorations; items should be evenly distributed around this central focal point
- To prevent items from "bouncing back," hold the drag slightly longer on small surfaces like the vanity table until you feel the item "snap" into place
- When arranging multiple similar items (candles, plants, pillows), place them in groups of odd numbers for more natural-looking composition
- Utilize the item "magnetism" feature when placing the tea set pieces by hovering near the table center; they will automatically align to the correct positions
- Complete Dreamy Room Level 63 efficiently by working from back to front—place wallpaper and window elements before furniture to avoid perspective issues