Dreamy Room Level 3
Level 3 guide walkthrough, helping players solve puzzles and explore the wonderful world of Dreamy Room.
Dreamy Room Level 3 Walkthrough Guide
Room Story
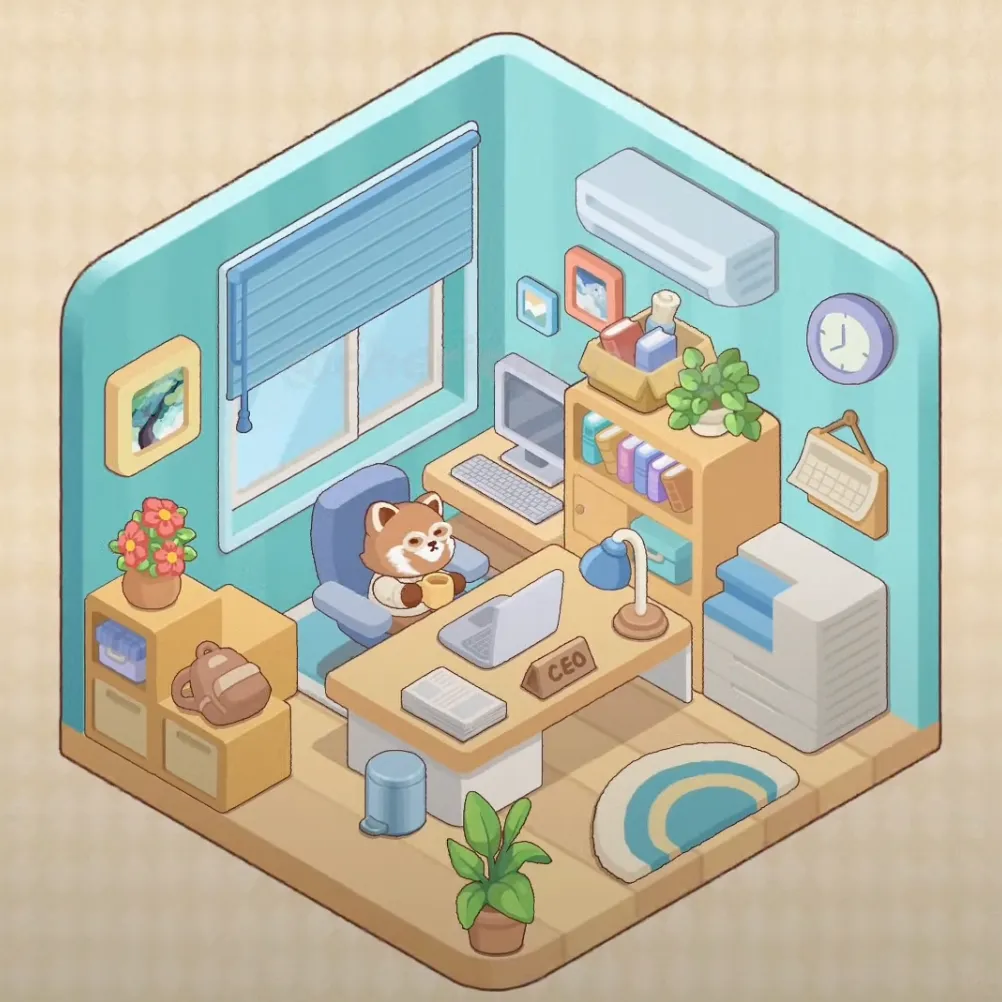
In this charming mint-green sanctuary, Maya starts each morning with her faithful companion—a plump bear hamster plushie who watches over her creative endeavors. Sunlight filters through the blue blinds, casting gentle patterns across her wooden desk where colorful succulents thrive alongside well-loved books. The soft circular rug cushions her feet as she settles into the azure chair, surrounded by the gentle hum of productivity. Here, deadlines feel less daunting with her furry friend's encouraging smile, and the carefully chosen plants seem to whisper "you've got this" with every gentle rustle. It's a workspace where dreams take digital form, nurtured by natural light and boundless imagination.
Step-by-Step Placement Guide
Step 1. Install the Wall structure for the foundation
Set up the Wall with its beautiful mint-green color that creates a calming and inspiring atmosphere. This soft turquoise shade serves as the perfect backdrop for a productive home office, reflecting natural light beautifully and creating a sense of openness. The wall color is crucial for setting the mood of the entire workspace.
Step 2. Lay down the Floor as the base surface
Place the Floor with its warm wooden texture that adds natural warmth to the space. The light wood flooring provides a perfect contrast to the mint walls while maintaining the room's bright and airy feel. This flooring choice creates a stable foundation for all furniture placement.
Step 3. Install the Ceiling to complete the room structure
Position the Ceiling to enclose the cozy workspace. The clean white ceiling helps reflect light throughout the room and creates the perfect canvas for hanging any future lighting fixtures. It complements the wall and floor combination beautifully.
Step 4. Mount the Air Conditioner on the upper wall
Install the Air Conditioner unit high on the wall to ensure optimal temperature control in the workspace. This white rectangular unit provides essential climate comfort during long working hours and is strategically positioned to distribute cool air evenly throughout the office space.
Step 5. Install the Window for natural lighting
Place the Window on the left wall to bring in beautiful natural light. This large window with white frames allows plenty of sunlight to illuminate the workspace, reducing the need for artificial lighting during daytime and creating a connection with the outside world, which is essential for a healthy work environment.
Step 6. Hang the Blinds to control light levels
Install the Blinds with horizontal slats to provide adjustable light control. These light blue blinds complement the room's color scheme while offering privacy and glare reduction when needed. They can be easily adjusted throughout the day to maintain optimal lighting conditions for computer work.
Step 7. Position the Large Computer Desk as the main workspace
Place the Large Computer Desk in the right corner of the room to create the primary work area. This spacious wooden desk provides ample surface area for multiple monitors, documents, and office supplies, making it perfect for productive work sessions and creative projects.
Step 8. Add the Small Computer Desk for additional workspace
Position the Small Computer Desk adjacent to the main desk to create an extended L-shaped workspace. This secondary surface provides extra room for peripherals, reference materials, or a dedicated space for different tasks, enhancing workflow efficiency.
Step 9. Place the Office Chair for comfortable seating
Position the Office Chair with its beautiful blue upholstery in front of the main desk. This ergonomic chair provides essential support for long working hours and its calming blue color adds to the room's serene atmosphere. The chair's design promotes good posture and comfort during extended work periods.
Step 10. Install the Computer Monitor for display
Mount the Computer Monitor on the main desk at an optimal viewing height and angle. This sleek display screen is essential for all computer work and digital tasks. Position it at arm's length from the chair to maintain proper ergonomics and reduce eye strain.
Step 11. Place the Keyboard for input functionality
Position the Keyboard directly in front of the monitor at a comfortable typing height. This essential input device should be placed where your wrists can remain straight while typing, ensuring comfort during long work sessions and maintaining productivity.
Step 12. Add the Bookshelf for storage and display
Install the Bookshelf with its warm wooden finish along the wall to provide both functional storage and decorative display space. This multi-level shelving unit creates opportunities to organize books, display decorative items, and add personality to the workspace while maintaining easy access to reference materials.
Step 13. Arrange Books on the shelves
Place various Books with colorful spines on the bookshelf to create an intellectual and inspiring atmosphere. These books serve both functional and decorative purposes, providing reference materials while adding visual interest through their varied colors and sizes, contributing to the room's scholarly ambiance.
Step 14. Position the Storage Cabinet for organization
Place the Storage Cabinet with its clean white finish to provide essential storage for office supplies and equipment. This cabinet helps maintain a clutter-free workspace by offering hidden storage solutions while its neutral color complements the overall design scheme.
Step 15. Add the Filing Cabinet for document storage
Position the Filing Cabinet with its gray finish to provide organized storage for important documents and files. This essential office furniture piece ensures that paperwork remains accessible yet neatly stored, contributing to a professional and organized workspace atmosphere.
Step 16. Install the Desk Lamp for task lighting
Place the Desk Lamp with its flexible arm on the desk to provide focused lighting for detailed work. This adjustable lamp with its warm light helps reduce eye strain during reading and writing tasks, while its modern design adds a professional touch to the workspace.
Step 17. Place the Desk for additional surface area
Position the additional Desk to complement the existing workspace setup. This surface provides extra room for projects, reference materials, or decorative items, helping to create a more spacious and functional work environment.
Step 18. Add the Bear Hamster as a delightful companion
Place the adorable Bear Hamster plush toy on the office chair to add warmth and personality to the workspace. This cute brown furry companion with its friendly expression brings joy and comfort to the work environment, serving as a stress-relief element during busy work days.
Step 19. Mount the Clock on the wall
Hang the Clock with its purple frame on the wall to help maintain time awareness during work sessions. This functional timepiece with its clear dial ensures you stay on schedule while adding a pop of color to the workspace decor.
Step 20. Display the Picture Frame for personal touch
Mount the Picture Frame on the wall to add personal memories or inspirational images to the workspace. This decorative element helps personalize the office environment and can serve as motivation during challenging work periods.
Step 21. Hang the Decorative Painting for artistic flair
Position the Decorative Painting on the wall to add artistic beauty and visual interest to the space. This framed artwork contributes to the room's aesthetic appeal while providing a pleasant focal point that can inspire creativity during work.
Step 22. Place the Succulent Plant for natural beauty
Position the Succulent Plant with its vibrant green leaves on the desk or shelf to bring natural life into the workspace. This low-maintenance plant adds a fresh, organic element while helping to purify the air and create a more pleasant work environment.
Step 23. Add the Potted Plant for greenery
Place the Potted Plant in a strategic location to enhance the room's natural ambiance. This larger plant specimen contributes to better air quality while adding a refreshing green element that helps reduce stress and increase productivity in the workspace.
Step 24. Position the Flower Pot with decorative plant
Arrange the Flower Pot containing a colorful flowering plant to add natural beauty and vibrancy to the office space. This decorative element brings life and color to the workspace while contributing to a more pleasant and inspiring work environment.
Step 25. Add the Drawer for small item storage
Install the Drawer as part of the desk system to provide convenient storage for small office supplies and personal items. This organizational feature helps maintain a clean workspace by keeping frequently used items within easy reach yet neatly stored away.
Step 26. Place the Trash Can for waste management
Position the Trash Can near the desk area for convenient waste disposal. This essential office accessory helps maintain cleanliness and organization in the workspace, ensuring that the environment remains tidy and professional throughout the workday.
Step 27. Lay the Rug for comfort and style
Spread the Rug with its soft circular pattern on the floor beneath the desk area to add warmth and comfort underfoot. This decorative floor covering in light blue and cream tones complements the room's color scheme while providing a cozy foundation for the workspace.
Step 28. Organize Office Supplies for functionality
Arrange various Office Supplies throughout the workspace to ensure all necessary tools are easily accessible. These essential items including pens, papers, and other work materials should be organized in containers and drawers to maintain efficiency and productivity in daily tasks.
Notes and Tips
Important Notes
- Ensure each furniture piece is properly "snapped" into position before releasing
- Maintain adequate spacing around the chair for comfortable movement
- Position the monitor at eye level to prevent neck strain during long work sessions
- Keep frequently used supplies within arm's reach of the chair
Practical Tips
- Create distinct zones: computer work area, reference area, and relaxation corner with the bear hamster
- Use the mint-green wall color to create a calming atmosphere that promotes focus
- Balance artificial and natural lighting by positioning the desk lamp to complement window light
- Incorporate plants strategically to improve air quality and add natural beauty
- Organize books and supplies by frequency of use, keeping daily items most accessible