Dreamy Room Level 112
Level 112 guide walkthrough, helping players solve puzzles and explore the wonderful world of Dreamy Room.
Dreamy Room Level 112 Walkthrough Guide
Dreamy Room Level 112 Room Story
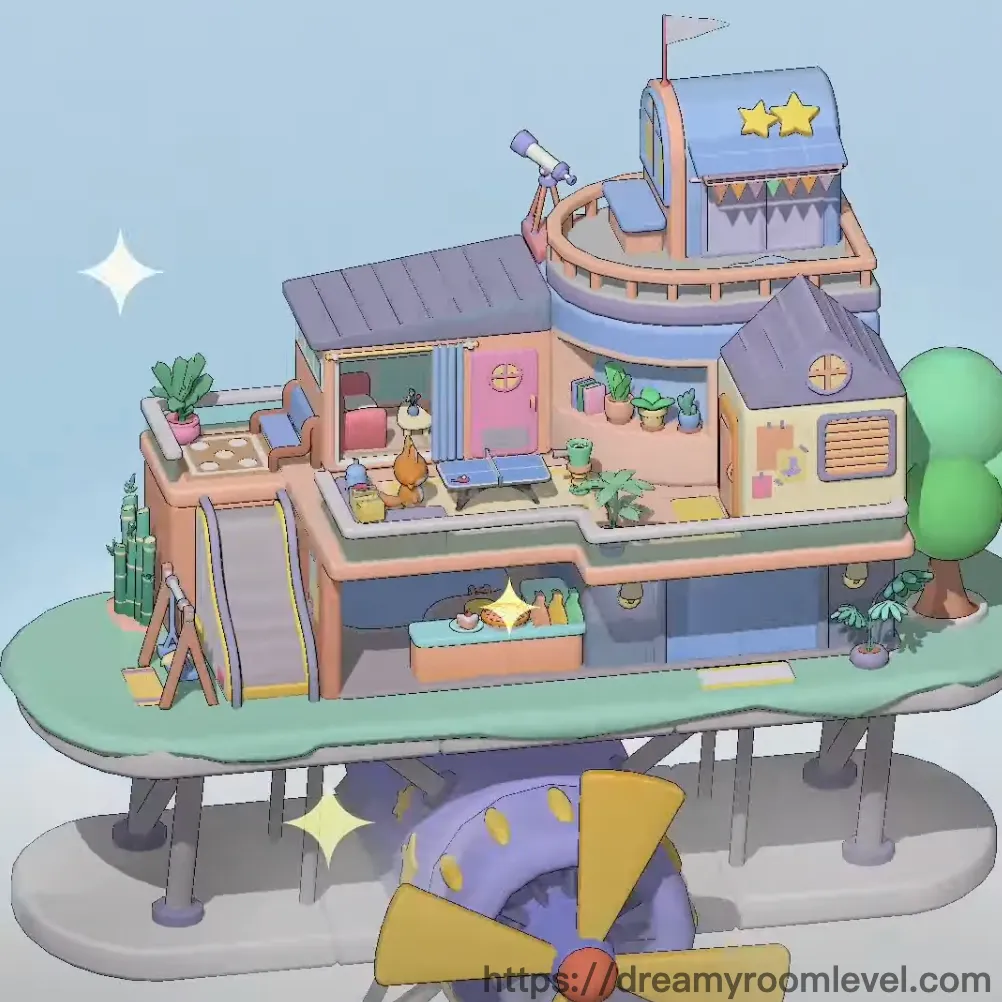
Luna, a young dreamer who loves aviation and stargazing, transformed an old airplane into her magical sky home. In Dreamy Room Level 112, she created multi-level living spaces with cozy bedrooms, a rooftop observatory with her beloved telescope, and colorful gardens floating among the clouds. Her orange cat companion enjoys lounging on the blue sofas while she watches stars twinkle through the night sky.
Dreamy Room Level 112: Step-by-Step Placement Guide
Step 1. Place Airplane Base
Drag the airplane with purple body and yellow wings to the bottom center of the screen. Attach the propeller to the front nose of the airplane, ensuring it faces forward. This forms the foundation structure for Dreamy Room Level 112.
Step 2. Install Support Structure
Position the metal legs beneath the airplane body. Add the support pillars connecting from the airplane to the main platform above. Place wheels at the bottom of the metal legs for mobility effect.
Step 3. Build Green Base Platform
Attach the large green base platform above the airplane structure. This platform serves as the foundation for the multi-level house in Dreamy Room Level 112, spanning the entire width of the construction.
Step 4. Construct Main House Structure
Place the main house with peach-colored walls on the right side of the green platform. Add the side house on the left side, creating a connected two-section home according to Dreamy Room Level 112 design.
Step 5. Install Roofs in Dreamy Room Level 112
Position the purple roof on the left side house section. Place the peach roof on the middle section. Add the blue roof on the tower structure at the top right area.
Step 6. Build Tower Observatory
Construct the tower structure on the upper right section with circular platform. Install the observation deck at the highest level. Place the rooftop terrace with railing surrounding the tower for stargazing activities.
Step 7. Add Entrance Doors
Install the yellow door on the lower right wall of the main house. Place the pink door on the middle level pink wall section. Add the wooden door at another entrance point in Dreamy Room Level 112.
Step 8. Install Windows Throughout
Position the arched window on the tower structure with yellow frame. Add the square window on the left side house wall. Place the round window on the lower level gray wall section.
Step 9. Create Balcony Areas in Dreamy Room Level 112
Build the upper balcony on the tower level with circular railing. Add the middle balcony on the main house level. Install the lower balcony on the ground level of the structure.
Step 10. Add Railings for Safety
Install the wooden railing along the staircases and platforms. Place the circular railing around the tower observation deck. This ensures safety while maintaining aesthetic appeal in Dreamy Room Level 112.
Step 11. Install Bedroom Furniture
Position the pink bed in the upper level bedroom with pink walls. Place the blue bed in the middle level room. Add the baby cradle near the bedroom area for the nursery corner.
Step 12. Arrange Living Room Sofas in Dreamy Room Level 112
Place the blue sofa in the main living area facing the center. Position the gray sofa on the lower level lounge area. These seating arrangements create cozy conversation spaces throughout the house.
Step 13. Position Tables
Place the coffee table in front of the blue sofa in the center living room. Add the low table on the middle platform near seating areas for functional use in Dreamy Room Level 112.
Step 14. Add Seating Chairs
Position the wooden chair near the table on the left platform. Place the blue chair on the upper level near the desk area. Add the wooden bench on the outdoor garden section.
Step 15. Build Staircases in Dreamy Room Level 112
Install the wooden stairs connecting the lower platform to middle level on the left side. Add the striped stairs with purple and white pattern connecting middle to upper levels on the right section.
Step 16. Install Play Equipment
Position the yellow slide on the left platform extending downward. Place the curved slide with striped pattern as an alternative play feature. Install the swing hanging from the platform edge for outdoor fun.
Step 17. Lay Floor Sections
Cover areas with wooden floor in the main living spaces. Add gray floor sections in utility areas. Place the grass patch on outdoor platform sections to create garden areas in Dreamy Room Level 112.
Step 18. Paint Wall Sections in Dreamy Room Level 112
Apply peach walls to the main house exterior. Add pink walls to the bedroom interior. Paint gray walls on lower utility sections, blue walls on side areas, and yellow walls on accent sections.
Step 19. Add Large Trees
Plant the round tree with green spherical foliage on the right edge of the platform. Position the palm tree on the lower left platform corner for tropical atmosphere in Dreamy Room Level 112.
Step 20. Place Standing Plants
Position the bamboo stalks on the left garden area near the stairs. Add the cactus on the middle platform for desert decoration. Place the leafy plant on the lower right garden section.
Step 21. Arrange Potted Plants in Dreamy Room Level 112
Set multiple potted plant containers on balconies and indoor shelves throughout the house. Add succulent plant in small pots on window sills and table surfaces for decorative touches.
Step 22. Position Orange Cat
Place the orange cat lounging on the blue sofa in the main living area. This adorable pet adds life and warmth to the Dreamy Room Level 112 home environment.
Step 23. Add Gift Decorations
Position the gift box on the middle level shelf near the bedroom. Place the wrapped present on the lower platform as decorative elements celebrating special occasions in Dreamy Room Level 112.
Step 24. Install Telescope Equipment
Mount the telescope on the observation deck pointing toward the sky. Attach it to the telescope stand for stability. This allows stargazing activities from the rooftop terrace.
Step 25. Add Flags in Dreamy Room Level 112
Position the flag on the tower peak at the highest point. Hang the pink triangle flag on the observation deck railing for decorative flair and identification.
Step 26. Install Awnings
Add the striped awning above the lower level entrance for shade and weather protection in Dreamy Room Level 112 outdoor areas.
Step 27. Hang Window Curtains
Drape the blue curtain on the tower arched window. Install the pink curtain on the bedroom window for privacy and soft lighting effects in Dreamy Room Level 112.
Step 28. Add Star Decorations
Attach yellow star decals on the purple airplane body and roof sections. Place white star sparkle effects around the scene. Add star decoration elements on walls and furniture.
Step 29. Install Utility Features in Dreamy Room Level 112
Mount the vent grate on the gray wall section for ventilation. Hang the round clock on the wall in the living area for timekeeping purposes.
Step 30. Place Pet Bowls
Position the food bowl on the lower level floor near the kitchen area. Place the water bowl beside it for the orange cat's dining station in Dreamy Room Level 112.
Step 31. Add Reading Materials
Stack the stack of books on the coffee table and bedroom shelves for leisure reading and decoration throughout the house.
Step 32. Place Cushions in Dreamy Room Level 112
Add yellow cushion on the wooden chair for comfort. Place blue cushion on the sofa and bench seating areas for extra coziness.
Step 33. Add Storage Containers
Position the yellow box on the lower platform for storage. Place the orange box near it, and add the basket on shelves for organizing items in Dreamy Room Level 112.
Step 34. Install Decorative Elements
Add circle decoration elements on walls and doors. Place red decoration accents on railings and furniture edges for color pops.
Step 35. Hang Bunting Flags in Dreamy Room Level 112
String the bunting flags across the observation deck and balcony areas for festive atmosphere and visual interest throughout the sky house.
Step 36. Add Wooden Planks
Install wooden planks as flooring texture on platforms and walkways, creating rustic charm in outdoor sections of Dreamy Room Level 112.
Step 37. Define Garden Area
Establish the complete garden area by arranging all plants, grass patches, and outdoor furniture on the designated green platforms surrounding the house.
Step 38. Final Lighting Check
Ensure all windows allow natural light penetration. Verify decorative stars create a magical glow effect during evening scenes in Dreamy Room Level 112.
Step 39. Verify Structural Integrity
Confirm all support pillars and metal legs properly stabilize the multi-level structure. Check that railings secure all elevated platforms and staircases for safe navigation.
Step 40. Complete Final Details in Dreamy Room Level 112
Review all element placements ensuring proper alignment and spacing. Adjust any items slightly off-position to achieve the perfect balanced composition for this whimsical sky house design.
Tips and Precautions
Precautions
- The airplane propeller at the front is small and easily overlooked during initial setup. Attach it before adding the main house structure to avoid obstruction issues in Dreamy Room Level 112.
- Multiple small potted plants and succulents scatter across various platforms. Track each placement carefully to ensure none are missed on balconies or window sills.
- The tower observation deck has limited space. Place the telescope and telescope stand first before adding railings and flags to prevent overlapping placement errors.
- Window placements vary between arched, square, and round styles on different walls. Verify the correct window type matches each designated wall section to maintain design consistency.
- Roof sections must align precisely with wall edges. Misaligned roofs create visual gaps affecting the overall aesthetic appeal of Dreamy Room Level 112.
Useful Tips
- When placing the multi-level platforms, start from bottom to top. Establish the airplane base and green platform foundation before building upward to ensure structural stability throughout Dreamy Room Level 112.
- For small decorative items like stars and cushions, zoom in closely to identify exact placement spots. This prevents misplacement in crowded furniture areas.
- The swing and slides attach to platform edges with specific anchor points. Drag these items slowly until you feel the magnetic snap indicating correct attachment.
- Group similar plants together when arranging the garden area. Place tall trees first as landmarks, then fill surrounding spaces with potted plants and succulents for natural layering.
- When installing railings around balconies and stairs, align them parallel to platform edges. This ensures clean lines and proper safety barrier visualization in the final Dreamy Room Level 112 scene.
- Pet bowls and small accessories often hide beneath furniture. Complete all large furniture placement before adding these tiny details to avoid losing track of their positions.