Dreamy Room Level 125
Level 125 guide walkthrough, helping players solve puzzles and explore the wonderful world of Dreamy Room.
Dreamy Room Level 125 Walkthrough Guide
Dreamy Room Level 125 Room Story
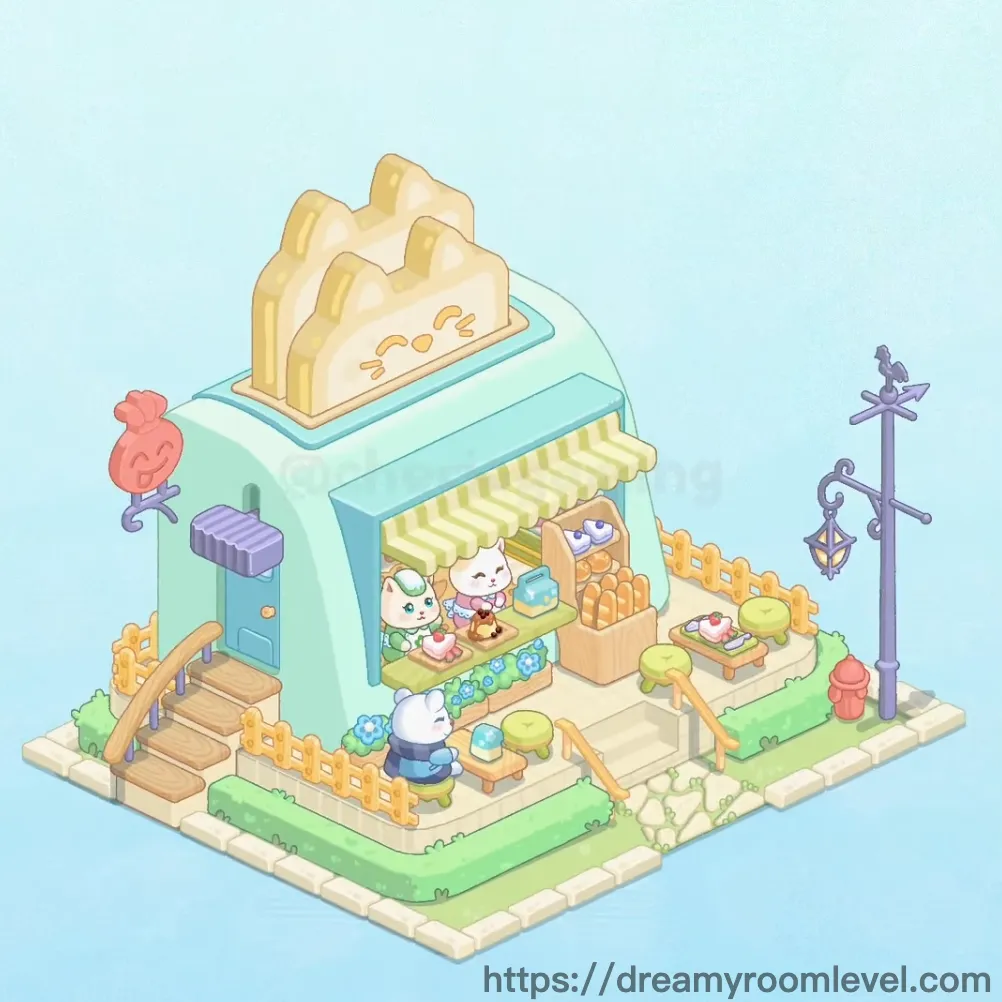
Welcome to the heartwarming world of Dreamy Room Level 125, where two adorable feline friends run their dream bakery together. The white cat and cyan cat have transformed this charming corner shop into a cozy haven filled with freshly baked bread, sweet donuts, and delightful treats. With mint-green walls, wooden accents, and cheerful decorations, this bakery radiates warmth and comfort. A friendly panda occasionally visits to help, while outdoor seating invites customers to enjoy their treats under a striped awning. Every detail reflects the cats' passion for baking and creating a welcoming space.
Dreamy Room Level 125: Step-by-Step Placement Guide
Step 1. Place the Foundation Elements
Start by establishing the basic structure. Position the wall sections to form the shop's interior boundaries, then lay down the floor tiles inside and wooden floor in the main bakery area. These foundational elements create the base layout for Dreamy Room Level 125.
Step 2. Install the Window and Door
Add the window on the back wall to bring natural light into the bakery. Then place the blue door on the left exterior wall as the shop's entrance, ensuring proper alignment with the wall structure for Dreamy Room Level 125.
Step 3. Position the Stairs
Drag the stairs to the right side of the interior space, connecting the ground level to an upper platform. This creates vertical dimension and additional display space in Dreamy Room Level 125.
Step 4. Set Up the Bread Shelf
Place the bread shelf against the back wall near the window. This tall wooden rack will hold the bakery's fresh bread display, becoming a focal point in Dreamy Room Level 125.
Step 5. Arrange Bread Products
Fill the bread shelf with bread loaves on the lower levels and position the baguette on the upper shelf. The golden-brown baked goods should be evenly distributed for an appealing display.
Step 6. Install the Glass Display Dome
Place the glass display dome on the central counter area. This transparent dome will showcase special treats and protect them while maintaining visibility, essential for Dreamy Room Level 125 presentation.
Step 7. Add the Storage Drawer
Position the storage drawer beneath the counter or near the stairs. This light wood unit provides essential storage for bakery supplies and ingredients.
Step 8. Place the Wooden Box
Set the wooden box near the storage area or counter. This simple container adds rustic charm while offering additional storage functionality in Dreamy Room Level 125.
Step 9. Set Up the Coffee Machine
Install the coffee machine on the counter near the back area. This essential equipment allows the cats to serve hot beverages alongside their baked goods, completing Dreamy Room Level 125 beverage service.
Step 10. Position the Milk Box
Place the milk box next to the coffee machine. This blue and white container stores fresh milk for coffee and baking needs.
Step 11. Arrange Interior Seating
Set the wooden table in the center-left area of the shop floor. Place a dining chair beside it for customer seating, creating a cozy spot in Dreamy Room Level 125.
Step 12. Add the Wooden Bench
Position the wooden bench against the wall or near the seating area. This provides additional seating capacity with a rustic wooden design.
Step 13. Place Green Cushion Stools
Arrange the green cushion stool pieces around the shop. These comfortable lime-green seats offer flexible seating options throughout Dreamy Room Level 125.
Step 14. Hang the Green Curtain
Attach the green curtain to the window frame. The striped fabric adds privacy while maintaining the shop's cheerful mint-green color scheme in Dreamy Room Level 125.
Step 15. Position the White Cat
Place the white cat character behind the counter or near the display area. This adorable feline is one of the main shopkeepers managing Dreamy Room Level 125.
Step 16. Position the Cyan Cat
Set the cyan cat character next to the white cat or in the customer area. The turquoise-colored cat with bright eyes works alongside their white companion.
Step 17. Add the Panda Character
Place the panda near the outdoor seating or counter area. This friendly helper adds diversity to the staff in Dreamy Room Level 125.
Step 18. Dress the Characters in Aprons
Equip the white cat with the pink apron, the cyan cat with the green apron, and the panda with the blue apron. These colorful aprons distinguish each character's role in Dreamy Room Level 125.
Step 19. Place the Teddy Bear
Position the teddy bear on the upper platform near the stairs. This cute plush toy adds warmth and decorative charm to the elevated space.
Step 20. Hang the Picture Frame
Mount the picture frame on the wall above the counter or seating area. This small decorative element personalizes the bakery interior in Dreamy Room Level 125.
Step 21. Lay the Cookie Rug
Place the on the floor in the main customer area. This adorable floor covering with cookie-like patterns adds comfort and whimsy to Dreamy Room Level 125.
Step 22. Display Donuts
Arrange the pink donut treats on the donut plate and position them on the display counter or table. These sweet treats should be prominently visible in Dreamy Room Level 125.
Step 23. Install the Striped Awning
Attach the striped awning above the outdoor seating area. The yellow and white striped canopy provides shade and creates an inviting entrance for Dreamy Room Level 125.
Step 24. Add the Cat Ear Sign
Mount the cat ear sign above the awning or on the building exterior. This large cream-colored sign with cat ears serves as the bakery's signature branding element.
Step 25. Set Up Outdoor Seating Area
Create the seating area by positioning the outdoor table beneath the awning. This wooden furniture provides comfortable outdoor dining space in Dreamy Room Level 125.
Step 26. Install the Wooden Fence
Place sections of wooden fence around the perimeter of the outdoor area. The yellow picket fence defines the property boundaries and adds charm to Dreamy Room Level 125.
Step 27. Position the Wooden Steps
Set the wooden steps leading up to the entrance or connecting different ground levels. These stairs provide access and structure to the outdoor layout.
Step 28. Add the Bread Basket
Place the bread basket on the outdoor counter or table. This woven container displays fresh bread for customers browsing outside in Dreamy Room Level 125.
Step 29. Display Fresh Produce
Arrange the carrot and other items in the vegetable display area on the outdoor counter. Fresh vegetables add color and complement the bakery offerings.
Step 30. Showcase the Cake
Position the cake prominently on the outdoor display or counter. This special dessert should be visible to attract customers passing by Dreamy Room Level 125.
Step 31. Install Outdoor Lighting
Place the lamp post near the entrance or along the pathway. Also position the street lamp to provide evening illumination around Dreamy Room Level 125.
Step 32. Add Decorative Elements
Install the ice cream decoration, heart decoration, and cotton candy decoration on poles or walls around the exterior. These whimsical elements enhance the playful atmosphere of Dreamy Room Level 125.
Step 33. Position the Purple Mailbox
Place the purple mailbox near the entrance or along the fence line. This functional and decorative element adds a pop of color to the exterior.
Step 34. Add Wall Decorations
Mount the pink decoration sign and purple decoration on the building's exterior walls. These accent pieces add visual interest to Dreamy Room Level 125.
Step 35. Place the White Globe Decoration
Position the white globe decoration centrally in the display or on a counter. This spherical ornament adds a touch of elegance to the presentation.
Step 36. Add Potted Plants
Distribute the potted plant pieces throughout the interior and place the flower pot containers in strategic locations. These green elements bring life to Dreamy Room Level 125.
Step 37. Arrange Flowers
Place the red flower and blue flower in pots or displays around the shop and outdoor area. The colorful blooms add natural beauty throughout Dreamy Room Level 125.
Step 38. Position Green Plants
Scatter additional green plant elements around both interior and exterior spaces. These foliage pieces create a fresh, welcoming environment in Dreamy Room Level 125.
Step 39. Create Garden Patch
Establish the garden patch in the outdoor area with sections of grass area. This greenery softens the hardscape and adds natural beauty to Dreamy Room Level 125.
Step 40. Add Final Touches
Place the blue bucket near the garden or storage area as a practical and decorative final element. This completes the cozy cat bakery setup in Dreamy Room Level 125.
Tips and Important Notes
Important Notes
- The two cats and panda can be positioned flexibly, but ensure they appear to be actively working in the bakery rather than blocking customer pathways in Dreamy Room Level 125.
- Small decorative items like flowers and plants are easy to miss in corners near the fence and mailbox area - check these spots carefully to achieve 100% completion.
- The glass display dome must be placed before surrounding items to avoid obstruction issues, as larger objects can prevent proper placement in tight counter spaces.
- Outdoor and indoor furniture pieces have specific orientation requirements - the wooden bench and chairs should face toward tables or counters for logical seating arrangements.
- Elements like the striped awning and cat ear sign need to be placed in correct sequence with the building structure, as they attach to specific wall sections and won't properly align if placed out of order.
Practical Tips
- When placing small items like donuts and carrots under the glass dome or on display surfaces, zoom in and drag from a slight angle to hit the precise placement point without items bouncing back.
- For the wooden fence sections, start from corners and work along the perimeter systematically to maintain even spacing and avoid gaps in Dreamy Room Level 125.
- The stairs area often has multiple small items to place on different levels - place larger items first, then fill in decorative pieces to avoid blocked placements.
- Use the snap function by hovering items near their intended spots until you feel slight resistance or see subtle visual cues indicating correct alignment before releasing.
- For outdoor seating arrangement, place the awning and larger furniture first to establish the area, then add decorative elements like lamps and plants around the perimeter for optimal layout in Dreamy Room Level 125.
- Character placement works best when you position the cats at counter height and the panda near ground-level service areas, creating natural workflow throughout Dreamy Room Level 125.