Dreamy Room Level 17
Level 17 guide walkthrough, helping players solve puzzles and explore the wonderful world of Dreamy Room.
Dreamy Room Level 17 Walkthrough Guide
Dreamy Room Level 17 Complete Guide
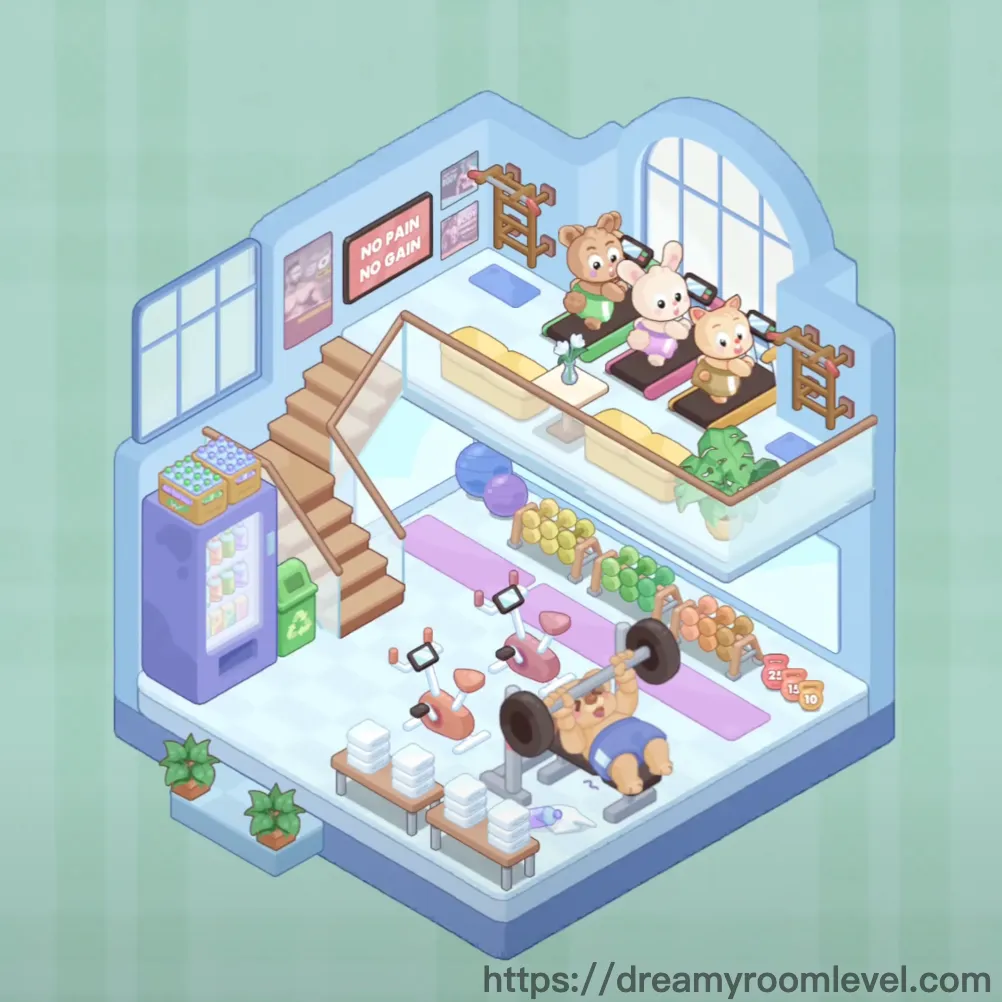
Welcome to this comprehensive guide for Dreamy Room Level 17! This fitness-themed room challenge requires careful placement of gym equipment and adorable animal companions. Let's transform this space into the perfect workout sanctuary.
Dreamy Room Level 17 Room Story
In this cozy gym corner, three adorable animal friends gather every morning for their fitness routine. The bunny leads yoga sessions on the pink mat while the hamster powers through treadmill runs. Together in Dreamy Room Level 17, they've created a motivating space where "No Pain, No Gain" meets cuteness overload.
Dreamy Room Level 17 Step-by-Step Placement Guide
Step 1. Place the cardboard box foundation
Position the cardboard box at the bottom left corner of the lower platform. This golden-brown storage box serves as the base organizational element in Dreamy Room Level 17.
Step 2. Install wooden stairs in Dreamy Room Level 17
Drag the wooden stairs to connect the lower and upper platforms on the left side. Ensure perfect alignment with platform edges for seamless transition.
Step 3. Position the brown wheel
Place the brown wheel on the lower platform near the stairs. This vintage-style wheel adds rustic charm to Dreamy Room Level 17's modern gym aesthetic.
Step 4. Set up the bench
Position the bench on the lower level for seating between workout sets. Align it parallel to the platform edge for optimal space usage.
Step 5. Establish the ice platform in Dreamy Room Level 17
Lay down the ice platform as the distinctive blue-tinted flooring. This creates the cool, refreshing atmosphere essential for comfortable workouts.
Step 6. Mount the motivational wall sign
Install the wall sign "No Pain No Gain" on the back wall centered position. This red motivational message defines Dreamy Room Level 17's fitness philosophy.
Step 7. Place the green recycle bin
Position the green recycle bin on the stair landing midway up. This eco-friendly placement maximizes the transitional space usage.
Step 8. Add potted plants in Dreamy Room Level 17
Set the potted plant on the upper platform near the window area. Green foliage brings natural elements into the athletic environment.
Step 9. Install the pink treadmill
Position the pink treadmill on the upper platform's right section. Face it outward for the best viewing angle during cardio sessions.
Step 10. Place yellow butter decoration
Add the yellow butter prop on the upper platform shelf. This quirky element adds personality to Dreamy Room Level 17's design.
Step 11. Set up water bucket in Dreamy Room Level 17
Position the water bucket near the workout area for equipment cleaning. Place it against the wall to avoid tripping hazards.
Step 12. Arrange orange weights
Distribute the orange weights around the lower platform exercise area. Create accessible clusters for circuit training in Dreamy Room Level 17.
Step 13. Stack plates properly
Place the stacked plates on the designated shelf area. These white ceramic plates add domestic touches to the fitness space.
Step 14. Install purple vending machine in Dreamy Room Level 17
Position the purple vending machine in the left corner near the stairs. This provides convenient post-workout refreshment access.
Step 15. Lay down pink yoga mat
Unfold the pink yoga mat on the lower platform's open area. Orient it parallel to the main exercise bench for flexibility training.
Step 16. Place the pink piggy
Add the adorable pink piggy decoration near the yoga area. This cute mascot enhances Dreamy Room Level 17's playful atmosphere.
Step 17. Position hamster on equipment in Dreamy Room Level 17
Place the energetic hamster figure on the pink treadmill. This creates an adorable workout scene centerpiece.
Step 18. Arrange bunny plushie
Set the bunny plushie on the upper platform as a cheerleader. Position it where it won't obstruct equipment access.
Step 19. Add cat plushie
Place the cat plushie near the yoga mat area. This feline friend supervises floor exercises in Dreamy Room Level 17.
Step 20. Position dog plushie in Dreamy Room Level 17
Set the dog plushie by the weight training zone. This loyal companion motivates during strength sessions.
Step 21. Install wooden ladder
Lean the wooden ladder against the back wall securely. This adds vertical climbing exercise options to the room.
Step 22. Mount the window
Install the window on the right wall for natural lighting. Proper illumination is crucial for Dreamy Room Level 17's ambiance.
Step 23. Hang wall picture in Dreamy Room Level 17
Position the wall picture frame on an empty wall section. This artistic element breaks up the athletic equipment visually.
Step 24. Place green weights
Distribute green weights near the orange ones for color coordination. Create an organized weight station setup.
Step 25. Add yellow weights
Position yellow weights to complete the colorful weight collection. Arrange them by size for easy selection during Dreamy Room Level 17 workouts.
Step 26. Set up red weights in Dreamy Room Level 17
Place red weights in the remaining weight area spots. Maintain consistent spacing between different weight sets.
Step 27. Install the barbell
Position the barbell on the exercise bench supports properly. Center it for balanced lifting in this Dreamy Room Level 17 setup.
Step 28. Place exercise bench
Set the exercise bench in the lower platform's center area. Orient it for easy barbell access and spotting positions.
Step 29. Install dumbbell rack in Dreamy Room Level 17
Mount the dumbbell rack against the wall for organized storage. This keeps free weights accessible yet tidy.
Step 30. Lay floor mat
Position the floor mat under the main exercise area. This protective layer prevents floor damage during intense Dreamy Room Level 17 sessions.
Step 31. Set up water dispenser
Install the water dispenser in an easily accessible corner. Hydration station placement is vital for workout efficiency.
Step 32. Arrange towel stack in Dreamy Room Level 17
Place the towel stack on a shelf near the exercise area. White towels should be within arm's reach during workouts.
Step 33. Mount motivational poster
Hang the motivational poster on an available wall space. Inspirational messages enhance mental focus during training.
Step 34. Install mirror
Mount the large mirror on the main wall for form checking. Proper positioning helps monitor exercise technique in Dreamy Room Level 17.
Step 35. Place foam roller in Dreamy Room Level 17
Position the foam roller near the stretching area. This recovery tool should be easily accessible post-workout.
Step 36. Hang resistance bands
Install resistance bands on wall hooks or equipment. These versatile tools expand exercise options significantly.
Step 37. Store jump rope
Hang the jump rope on a designated hook or shelf. Quick access enables seamless cardio transitions in Dreamy Room Level 17.
Step 38. Position medicine ball in Dreamy Room Level 17
Place the medicine ball in the functional training zone. This weighted sphere enhances core workout variety.
Step 39. Add kettlebell
Set the kettlebell near other free weights logically. Group similar equipment for efficient circuit training.
Step 40. Install pull up bar
Mount the pull up bar in a doorway or ceiling position. Upper body training requires secure installation in Dreamy Room Level 17.
Step 41. Place protein shake in Dreamy Room Level 17
Position the protein shake bottle on the vending machine shelf. Post-workout nutrition should be conveniently located.
Step 42. Store gym bag
Place the gym bag in the corner storage area neatly. Keep personal items organized yet accessible.
Step 43. Position water bottle
Set the water bottle on the bench or equipment tray. Individual hydration tools complement Dreamy Room Level 17's setup.
Step 44. Arrange sweat towel in Dreamy Room Level 17
Drape the sweat towel over equipment or keep nearby. Quick access during intense sessions is essential.
Step 45. Install exercise bike
Position the exercise bike in the cardio zone if space allows. Alternative cardio equipment diversifies workout options.
Step 46. Set up rowing machine
Place the rowing machine parallel to other cardio equipment. Full-body cardio stations complete Dreamy Room Level 17's offerings.
Step 47. Stack weight plates in Dreamy Room Level 17
Organize weight plates on the barbell or storage rack. Proper arrangement prevents equipment damage.
Step 48. Mount gym clock
Install the gym clock on the wall at eye level. Time tracking helps maintain workout intensity.
Step 49. Lay floor tiles
Position decorative floor tiles to define workout zones. Visual boundaries organize Dreamy Room Level 17's space effectively.
Step 50. Install wall padding in Dreamy Room Level 17
Mount protective wall padding behind equipment areas. Safety features prevent wall damage during exercises.
Step 51. Set up ceiling lights
Ensure ceiling lights illuminate all workout areas properly. Good lighting prevents accidents during training sessions.
Step 52. Check air vent placement
Verify the air vent provides adequate ventilation. Air circulation is crucial for comfortable Dreamy Room Level 17 workouts.
Step 53. Align door frame in Dreamy Room Level 17
Ensure the door frame allows easy equipment movement. Entry/exit accessibility matters for large gym equipment.
Step 54. Install baseboard
Position the baseboard along wall bottoms properly. These finishing touches protect walls during equipment placement.
Step 55. Place corner pieces
Install corner pieces for a polished room finish. These final details complete Dreamy Room Level 17's professional appearance.
Important Notes and Tips
Key Considerations
- Large equipment like treadmills must be placed before smaller decorative items
- Animal plushies need specific positioning to avoid blocking exercise equipment access
- Weight equipment should be distributed evenly for visual balance across the room
- The stairs installation requires precise alignment with platform edges
- Vending machine placement near stairs optimizes corner space utilization
Pro Tips
- Start with platform pieces and stairs to establish the room's basic structure
- Use the "No Pain No Gain" sign as a centering reference for upper items
- Group similar weights by color for an organized, visually appealing setup
- Place all cardio equipment before adding decorative animal companions
- Drag items from their center point for precise placement control
- Completing Dreamy Room Level 17 successfully requires patience with small item positioning
Remember, success in Dreamy Room Level 17 comes from balancing functionality with adorable aesthetics. Take your time with each placement, and enjoy creating this unique fitness sanctuary where cute animals and exercise equipment coexist harmoniously!