Dreamy Room Level 83
Level 83 guide walkthrough, helping players solve puzzles and explore the wonderful world of Dreamy Room.
Dreamy Room Level 83 Walkthrough Guide
Dreamy Room Level 83 Room Story
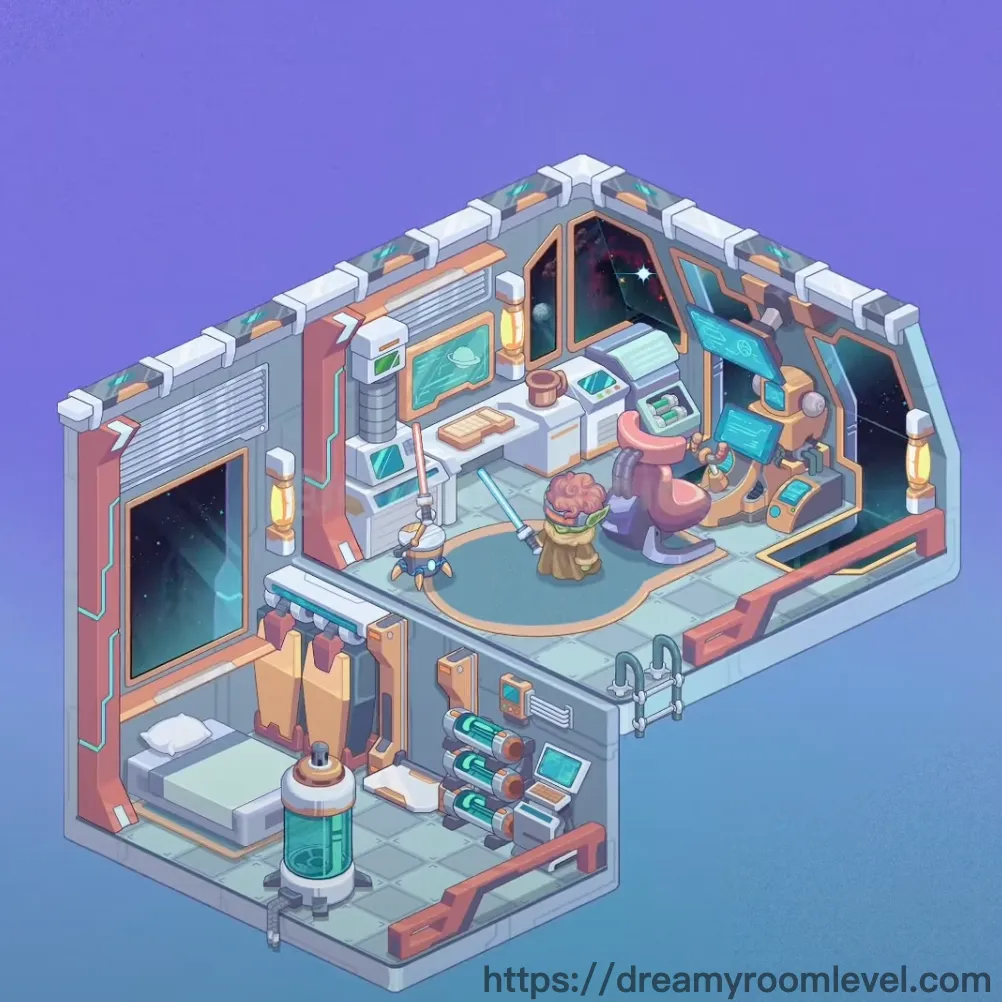
Commander Elena awakens in her compact space station quarters, where technology and comfort merge seamlessly. Outside the panoramic windows, distant galaxies shimmer in eternal darkness. Her loyal robot companion beeps softly while monitoring life support systems. The holographic displays cast a cyan glow across her workspace, where yesterday's research notes still float in mid-air. This sanctuary in the void represents humanity's dreams among the stars - a cozy corner of home in Dreamy Room Level 83's futuristic habitat.
Dreamy Room Level 83: Step-by-Step Placement Guide
Step 1. Install Orange Wall Panels and Gray Panels
Begin Dreamy Room Level 83 by placing the orange wall panels along the upper portions of the walls, creating the primary color scheme. Add gray panels to the lower wall sections. These panels should align flush with the wall surface, covering the entire perimeter except window areas.
Step 2. Attach White Railings and Corner Connectors
Install the white railings along the top edge of the room where walls meet the ceiling. Position corner connectors at each corner junction to secure the railing system. Following Dreamy Room Level 83 design principles, ensure railings sit perfectly level.
Step 3. Add Decorative Frames and Orange Trim
Place decorative frames around window areas and key wall sections. Install orange trim along panel edges to accentuate the architectural lines. This placement is essential for Dreamy Room Level 83 success.
Step 4. Install Floor Tiles
Drag the floor tiles to cover the entire floor area, creating the light cyan-green tiled surface. Align tiles in a grid pattern, ensuring all seams connect properly across both the main level and lower platform.
Step 5. Mount Large Window Left and Large Window Right
Position the large window left on the left wall section, centered vertically. Place the large window right on the upper right wall area. According to Dreamy Room Level 83 layout requirements, windows should frame the exterior view perfectly.
Step 6. Add Space View
Insert the space view visible through both windows, displaying the starry cosmos beyond. This creates the immersive space station atmosphere that defines this level.
Step 7. Install Door Frame and Hinges
Attach the door frame in the lower left section of the room. Add hinges to the door frame for functional detail. Completing Dreamy Room Level 83 requires proper door installation.
Step 8. Mount Wall Lamp Left and Wall Lamp Right
Position the wall lamp left on the left wall near the workspace area. Place the wall lamp right symmetrically on the right side. Both yellow cylindrical lamps should align at equal heights.
Step 9. Install Ceiling Light
Attach the ceiling light to the top center of the room, providing overhead illumination. This fixture is crucial for Dreamy Room Level 83's lighting system.
Step 10. Add Cyan Lights Throughout
Install cyan lights along panel edges and equipment areas, creating the characteristic blue glow. These accent lights should appear on screens, displays, and decorative elements throughout the space.
Step 11. Mount Ventilation Grilles
Place ventilation grilles on the left wall and other wall sections. These white louvered panels should sit flush with the wall surface, positioned at strategic intervals for air circulation.
Step 12. Position Work Desk in Center
Drag the work desk to the center-right area of the main floor. This white L-shaped workstation forms the primary workspace hub in Dreamy Room Level 83.
Step 13. Place Desk Chair at Workstation
Position the desk chair directly in front of the work desk. The chair should face the holographic displays, allowing easy access to all workspace elements.
Step 14. Add Wooden Stool Near Work Area
Place the wooden stool beside the work desk on the right side. This barrel-shaped seat provides additional seating in Dreamy Room Level 83's workspace.
Step 15. Install Holographic Screen Wall, Holographic Screen Desk, and Holographic Screen Right
Mount the holographic screen wall on the back wall behind the workspace. Position the holographic screen desk on the desk surface. Place the holographic screen right on the right wall area. All three cyan displays should show active interfaces.
Step 16. Set Up Desktop Monitor and Laptop
Place the desktop monitor on the right side of the work desk. Position the laptop on the desk surface near the center. According to Dreamy Room Level 83 layout requirements, these devices should be easily accessible.
Step 17. Add Tablet Device to Workspace
Place the tablet device on the work desk surface among other equipment. This handheld screen should rest at a convenient angle for quick reference.
Step 18. Position Character at Workstation
Place the character sitting in the desk chair, facing the holographic displays. The pink spacesuit figure should appear engaged with the workspace technology in Dreamy Room Level 83.
Step 19. Deploy Robot Assistant
Position the robot assistant on the floor near the work desk. This blue-white companion robot should stand ready to assist with tasks.
Step 20. Install Brain Device on Wooden Stool
Place the brain device on top of the wooden stool. This pink-purple neural interface should be prominently displayed as a key research element.
Step 21. Add Food Items - Toast, Food Bowl, and Cup
Place the toast on the work desk surface. Position the food bowl nearby containing meal items. Add the cup next to the food items. Following Dreamy Room Level 83 design principles, these create a lived-in atmosphere.
Step 22. Place Wooden Container on Desk
Position the wooden container on the workspace surface. This small storage vessel should sit among the desk items.
Step 23. Install Storage Cabinet on Wall
Mount the storage cabinet on the wall near the workspace. This white unit should be securely attached at a convenient height for access.
Step 24. Position Cargo Box and Yellow Crate
Place the cargo box in the lower right corner of the room. Add the yellow crate in front of the platform edge. This placement is essential for Dreamy Room Level 83 success.
Step 25. Install Storage Rack in Lower Section
Position the storage rack in the lower right platform area. This shelving unit should stand against the wall, ready to hold equipment.
Step 26. Add Storage Units and Tech Modules to Rack
Place storage units on the storage rack shelves. Add tech modules to the rack as well. According to Dreamy Room Level 83 layout requirements, these should be organized efficiently.
Step 27. Position Bed in Lower Left Quarter
Drag the bed to the lower left section of the room. This sleeping pod should rest on the lower platform against the left wall.
Step 28. Add Pillow to Bed
Place the pillow on the bed surface at the head position. The white cushion completes the sleeping area in Dreamy Room Level 83.
Step 29. Install Bed Platform Base
Position the bed platform beneath the bed as its foundation. This wooden base should support the entire sleeping pod structure.
Step 30. Install Green Cylinder Center
Place the green cylinder center in the middle of the lower platform. This tall cylindrical life support device should stand prominently with glowing indicators.
Step 31. Add Green Storage Tank in Front
Position the green storage tank on the lower front section of the platform. This transparent container should be visible from the main floor area.
Step 32. Install Wall Pipes and Cables
Attach wall pipes along various wall sections, connecting different systems. Run cables alongside pipes and between equipment. Completing Dreamy Room Level 83 requires proper utility installation.
Step 33. Add Metal Locks and Brackets
Install metal locks on storage units and the platform edge. Attach brackets at structural connection points throughout the room.
Step 34. Mount Control Panel
Position the control panel on the lower right platform area. This interface screen should be easily accessible for system monitoring in Dreamy Room Level 83.
Step 35. Install Analysis Equipment
Place the analysis equipment on the storage rack or nearby surface. This scientific apparatus should be ready for research tasks.
Step 36. Add Sample Containers
Position sample containers on work surfaces or storage areas. These vessels should be accessible for specimen handling.
Step 37. Place Equipment Modules
Install equipment modules throughout the room on appropriate surfaces. These technical components integrate into the room's systems.
Step 38. Add Wall Plants
Position wall plants in the railing planters along the top wall edge. These green plants bring life to the space station environment in Dreamy Room Level 83.
Step 39. Attach Wall Labels
Place wall labels on various wall sections and equipment. These identification markers provide important information throughout the space.
Step 40. Final Inspection
Review all placements to ensure every element sits correctly. Check that all items from the Dreamy Room Level 83 inventory have been placed and the room achieves the complete space station aesthetic.
Tips and Tricks
Important Notes
- The holographic screens can be tricky to position correctly - look for cyan glowing markers on walls and desk surfaces that indicate exact placement zones
- The green cylinder center and green storage tank are easy to confuse; the center cylinder is taller and stands on the platform middle, while the storage tank is shorter and positioned toward the front edge
- Wall pipes and cables often overlap with other elements; place larger items first, then thread the utility lines around them to avoid conflicts
- The lower platform area becomes crowded quickly; install the bed and green cylinder center first before adding smaller storage items to prevent placement blocking
- Window placement requires precise alignment with the decorative frames; if windows don't snap into place, adjust the frame position first then retry the window installation
Practical Tips
- Start with structural elements (walls, floors, railings) before adding furniture to establish the room foundation for Dreamy Room Level 83
- Work from back to front and top to bottom; install wall-mounted items before floor items to minimize obstruction issues
- The robot assistant has a small footprint but specific placement - drag it close to the desk's left side until it snaps into position
- For densely packed workspace items, place the desk first, then chair, then add devices moving from largest to smallest to optimize space
- Storage rack items should be placed one shelf at a time starting from bottom to top; this prevents items from blocking access to lower shelves
- Utilize the "magnetic snap" feature for Dreamy Room Level 83 by hovering items near their intended spots until you see a subtle glow indicating the correct placement zone