Dreamy Room Level 131
Level 131 guide walkthrough, helping players solve puzzles and explore the wonderful world of Dreamy Room.
Dreamy Room Level 131 Walkthrough Guide
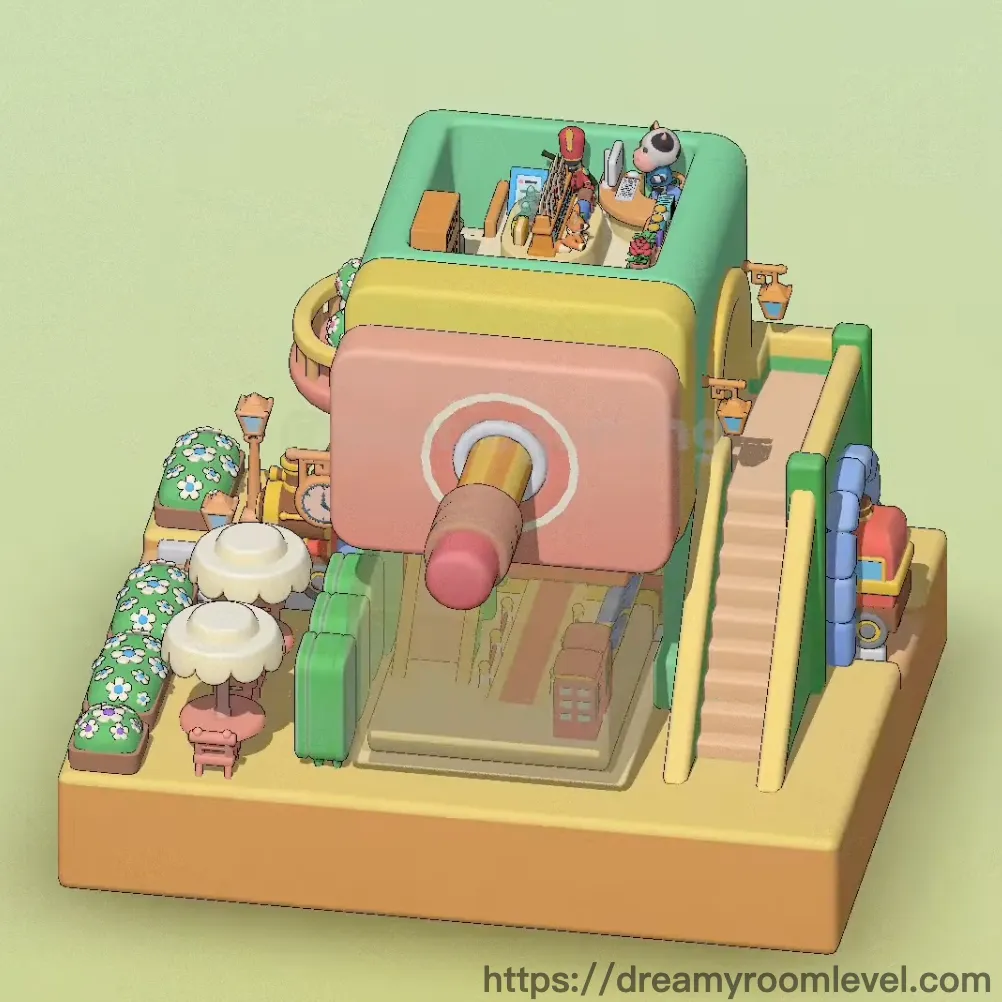
Dreamy Room Level 131 Room Story
In this charming creative studio, a young artist transforms their passion into reality. Soft pastel walls embrace a cozy bed draped with a sunny yellow blanket, while the mint-green workspace holds tools of imagination - from the pink vintage camera capturing life's moments to colorful paint palettes waiting for the next masterpiece. The eyeball camera watches over this dreamy sanctuary where creativity blooms like the flowering bushes in the tiny garden below. Every corner of Dreamy Room Level 131 tells a story of artistic dedication, from scattered pencils to architectural models, creating a perfect harmony between rest and inspiration in this multi-level creative haven.
Dreamy Room Level 131: Step-by-Step Placement Guide
Step 1. Position the Platform Base and Green Frame Structure
Start by placing the platform base at the bottom foundation level, which forms the ground floor. Then attach the green frame structure on top, creating the main architectural skeleton. These two pieces form the core structure for Dreamy Room Level 131.
Step 2. Install the Mint Cabinet in Dreamy Room Level 131
Place the mint cabinet on the left side of the green frame structure. The cabinet should fit snugly into the designated slot, with its open top facing upward to create the sleeping area space above.
Step 3. Attach the Stairs and Yellow Railing
Position the stairs on the right side of the structure, leading upward from the ground level. Add the yellow railing along the staircase edge for safety, ensuring it aligns perfectly with the stair treads in Dreamy Room Level 131.
Step 4. Place the Arch Door
Install the arch door at the entrance of the upper level workspace area. The yellow-framed arch should face outward, creating an inviting gateway to the creative studio space.
Step 5. Position the Large Bed
Drag the bed into the mint cabinet's upper open area. The bed should rest securely with its headboard against the back wall, centered within the cabinet space for optimal comfort in Dreamy Room Level 131.
Step 6. Add Yellow Blanket and White Pillow
Drape the yellow blanket over the bed's surface, covering most of the mattress. Place the white pillow at the bed's head, creating a cozy sleeping arrangement.
Step 7. Set Up the Desk in Dreamy Room Level 131
Position the desk on the ground level floor, towards the center-right area. The desk surface should be level and stable, ready to hold computer equipment and creative tools.
Step 8. Install Computer Equipment
Place the orange monitor at the back-left corner of the desk surface. Add the keyboard directly in front of the monitor, and position the computer mouse to the right of the keyboard for Dreamy Room Level 131's digital workspace.
Step 9. Position the Bookshelf
Install the bookshelf against the upper level's back wall, to the left of the workspace entrance. The shelving unit should stand upright with multiple compartments visible.
Step 10. Fill Bookshelf with Items
Arrange books on shelf across various shelf levels, creating a colorful display. Add the storage box to one of the lower compartments for organized storage in Dreamy Room Level 131.
Step 11. Place the Blue Chair
Position the blue chair behind the desk area, facing the monitor. The chair should be angled slightly to suggest recent use in this creative workspace.
Step 12. Add Pencil and Blue Pen in Dreamy Room Level 131
Place the pencil on the ground level floor near the desk, with its pink eraser visible. Position the blue pen nearby, both suggesting active creative work in progress.
Step 13. Position Notebook and Papers
Lay the notebook flat on the desk surface or floor area. Scatter papers nearby, creating an authentic workspace atmosphere for Dreamy Room Level 131.
Step 14. Place Orange Book and File Folders
Set the orange book on a shelf or near the desk. Add file folders to the bookshelf or desk area for document organization.
Step 15. Add Papers Stack in Dreamy Room Level 131
Position the papers stack on the upper level floor or bookshelf, showing active project work. The stack should appear neatly arranged but accessible.
Step 16. Place Wooden Ruler and Sticks
Position the wooden ruler on the desk or floor near other art supplies. Add wooden sticks nearby, both essential for precise measurements and creative projects in Dreamy Room Level 131.
Step 17. Install Pencil Holder and Brushes
Place the pencil holder on the upper workspace area, filled with tools. Position brushes either in the holder or laid out on the work surface for painting activities.
Step 18. Position the Pink Camera in Dreamy Room Level 131
Set the pink camera on the mint cabinet's top edge or desk area. The camera's lens should face forward, ready to capture creative moments.
Step 19. Add Paint Can and Color Palette
Place the paint can near the art supplies area on the upper level. Position the color palette nearby, showing various paint colors ready for use in Dreamy Room Level 131.
Step 20. Set Up Small Easel
Position the small easel on the upper workspace floor, angled for painting. The easel should stand upright with its canvas surface visible and accessible.
Step 21. Place Hand Sculpture and Golden Jar in Dreamy Room Level 131
Position the hand sculpture on the lower level as a decorative art piece. Add the golden jar nearby, both serving as inspiration objects for the artist.
Step 22. Add Pink Phone
Place the pink phone on the desk surface or shelf, within easy reach. The phone should lie flat or stand upright, matching the room's aesthetic in Dreamy Room Level 131.
Step 23. Position Character Figure and Eyeball Camera
Place the character figure on the upper level workspace. Position the eyeball camera nearby, creating a quirky artistic atmosphere for Dreamy Room Level 131.
Step 24. Install Hanging Lamp and Light Fixture in Dreamy Room Level 131
Attach the hanging lamp to the ceiling area above the workspace, providing illumination. Add the light fixture in another area for balanced lighting throughout the space.
Step 25. Add Wall Decoration and Window Frame
Place the wall decoration on the upper level walls for visual interest. Install the window frame on the appropriate wall section, allowing natural light into Dreamy Room Level 131.
Step 26. Position Door Entrance
Install the door entrance at the designated wall opening on the upper level. The door should open inward or outward as designed for the creative studio space.
Step 27. Place Building Models in Dreamy Room Level 131
Position the building model on the lower platform level, creating a miniature cityscape. Add the pink building nearby, forming an architectural display area.
Step 28. Install Fence Elements
Place the fence around the lower level garden area perimeter. The fence should stand upright, defining the outdoor space boundaries in Dreamy Room Level 131.
Step 29. Add Green Tree and Flowering Bush
Position the green tree in the lower garden area, providing greenery. Place the flowering bush nearby with visible flowers, creating a natural garden atmosphere for Dreamy Room Level 131.
Step 30. Place Potted Plant and Flowers in Dreamy Room Level 131
Set the potted plant in the garden section or on a surface. Arrange flowers around the garden area, adding colorful blooms to the landscape.
Step 31. Position Garden Furniture
Place the small table in the lower garden area. Add the bench and garden chair nearby, creating a cozy outdoor seating arrangement in Dreamy Room Level 131.
Step 32. Install Blue Pipes and Water Pipes
Attach the blue pipes along the structure's exterior walls, running vertically. Add water pipes connecting various levels, showing the room's functional plumbing system for Dreamy Room Level 131.
Step 33. Add Final Detail with Dice
Place the dice on the desk or upper level floor as a playful finishing touch. The dice adds personality and suggests recreational breaks during creative work sessions in Dreamy Room Level 131.
Tips and Strategies for Completing Dreamy Room Level 131
Common Mistakes to Avoid
- The mint cabinet's interior can be tricky - ensure the bed fits completely inside the open top section before releasing
- Small items like the pencil and blue pen often get overlooked on the ground level near furniture legs
- The eyeball camera and character figure are easy to miss among the colorful workspace clutter
- Multiple similar items like papers, papers stack, and notebook can cause confusion - verify each placement carefully
- The arch door requires precise alignment with the upper level entrance opening in Dreamy Room Level 131
Expert Placement Tips
- Start with large structural pieces to establish the room layout before adding smaller decorative items
- When placing books on shelf, drag items one at a time to different shelf levels for varied visual interest
- The garden area items snap together more easily when placed in order: fence first, then plants, then furniture
- For overlapping desk items, place the monitor and keyboard first, then add smaller accessories around them
- The blue pipes and water pipes have specific attachment points - look for slight indentations on the structure walls
- Successfully completing Dreamy Room Level 131 requires patience with the multi-level layout and attention to tiny details in both workspace and garden areas