Dreamy Room Level 52
Level 52 guide walkthrough, helping players solve puzzles and explore the wonderful world of Dreamy Room.
Dreamy Room Level 52 Walkthrough Guide
Dreamy Room Level 52 Room Story
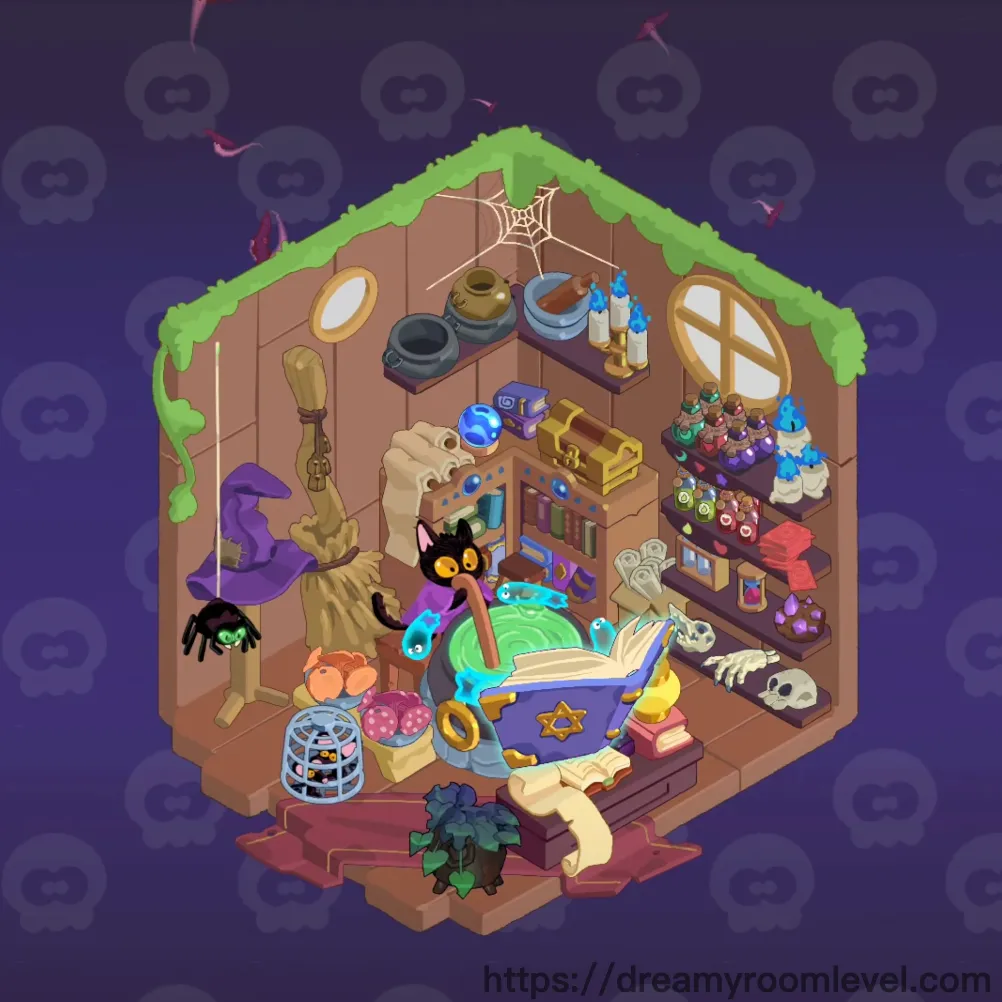
In the heart of Dreamy Room Level 52, a little witch’s workshop glows softly under the purple night sky. This cozy magical space belongs to a curious black cat learning the art of potion making. Surrounded by glowing blue flames, mysterious books, and ancient treasures, every corner tells a story of gentle curiosity and whimsical wonder. The room breathes with life, where cobwebs whisper secrets and candles flicker like memories.
Complete Guide for Dreamy Room Level 52
Step 1. Place Wooden Floor and Wooden Walls
Start by laying the Wooden Floor and positioning the Wooden Walls to form the base of this level. Align them tightly for a clean structure. According to Dreamy Room Level 52 layout, they provide the foundation for all further decorations.
Step 2. Add Green Moss Roof Trim on the top edge
Gently attach the Green Moss Roof Trim along the upper edge. Following Dreamy Room Level 52 design, make sure the greenery drapes naturally across the roof for a soft enchanted look.
Step 3. Hang Spider Web in the corner
Place the Spider Web at the corner of the wall. This gives the witchy room a charming aged feel, essential for this level’s mysterious tone.
Step 4. Set Purple Night Sky Background
Attach the Purple Night Sky Background behind the walls to create depth and atmosphere. The sky defines Dreamy Room Level 52’s magical night setting.
Step 5. Add Flying Bat near the top corner
Position the Flying Bat in the upper background. Its subtle motion enhances this level’s whimsical energy and night-time charm.
Step 6. Place Yellow Box on floor corner
Drag the Yellow Box to the bottom left corner. This box anchors the floor visually and prepares balance for later items in Dreamy Room Level 52.
Step 7. Hang Purple Witch Hat beside the broom
Place the Purple Witch Hat on the left wall above the floor. According to Dreamy Room Level 52 layout, it must align with the broom’s handle for symmetry.
Step 8. Lean Straw Broom and attach Broom Bells
Set the Straw Broom upright near the left side, then hang Broom Bells to its handle. Following this level’s theme, it symbolizes readiness for flight.
Step 9. Add Hanging Green Spider near left edge
Attach the Hanging Green Spider below the web. According to Dreamy Room Level 52, this gives subtle animation to the upper-left area.
Step 10. Drape Purple Cloak on chair
Place the Purple Cloak over a chair base near the cauldron. This placement reflects the cat’s apprentice vibe, as required in this level.
Step 11. Set Black Cat beside Cauldron
Add the Black Cat on the stool facing the cauldron. In Dreamy Room Level 52, this character is central—align it with the pot for storytelling balance.
Step 12. Position Bubbling Cauldron at center
Drag the Bubbling Cauldron to the room’s middle. Its green potion swirl should face forward; this is the magical core of this level.
Step 13. Add Green Potion Swirl effect
Ensure the Green Potion Swirl floats above the cauldron. This completes the illusion of active brewing per Dreamy Room Level 52 atmosphere.
Step 14. Insert Wooden Stirring Paddle
Place the Wooden Stirring Paddle into the cauldron, angled slightly left. This detail is crucial for the brewing animation.
Step 15. Add Blue Magic Fish near cauldron
Set Blue Magic Fish figures around the cauldron, floating above the potion surface for visual effect in Dreamy Room Level 52.
Step 16. Open Magic Book on desk
Position the Open Magic Book in front of the cauldron. The text should face outward—key for player recognition.
Step 17. Place Book with Star Emblem near book stand
Set the Book with Star Emblem upright beside the cauldron. According to Dreamy Room Level 52’s mystical design, it radiates learning energy.
Step 18. Extend Long Parchment Scroll on table
Roll out the Long Parchment Scroll beside the open book, aligning its tail toward the floor edge.
Step 19. Add Small Open Book near edge
Put the Small Open Book below the scroll. In this level, it shows notes or incantations.
Step 20. Place Yellow Urn beside books
Add Yellow Urn to the right of the desk. Following Dreamy Room Level 52 layout, it complements the potion setup.
Step 21. Stack of Books under cauldron
Position Stack of Books under the main cauldron table. Ensure their spines face forward for detail.
Step 22. Add Crystal Orb on shelf
Place Crystal Orb on the shelf above scrolls. Its glow fits Dreamy Room Level 52’s enchanted atmosphere.
Step 23. Arrange Purple Spell Books near orb
Align Purple Spell Books next to the orb. This grouping reinforces the study theme.
Step 24. Add Treasure Chest below orb
Set the Treasure Chest near the middle shelf. Keep it closed; this level values hidden treasures.
Step 25. Build Bookshelf on back wall
Position the Bookshelf along the back wall under the orb for symmetry.
Step 26. Insert Rolled Parchments on shelf
Slide Rolled Parchments into the bookshelf’s right compartment.
Step 27. Place Mortar and Pestle on upper shelf
Add Mortar and Pestle next to the blue candle flames, following Dreamy Room Level 52 placement cues.
Step 28. Add Golden Pot beside pestle
Set Golden Pot to the left. Ensure it aligns evenly with the shelf edge.
Step 29. Place Black Pot adjacent to golden one
Add Black Pot nearby to balance metallic colors in this level’s palette.
Step 30. Candleholder with Blue Flame Candles
Put Candleholder with Blue Flame Candles on the top-right shelf to illuminate Dreamy Room Level 52 scene.
Step 31. Set Potion Rack on right wall
Attach Potion Rack along the right wall above scrolls. It should face forward for clarity.
Step 32. Place Assorted Potion Bottles
Add Assorted Potion Bottles of various colors on the rack, balancing symmetry and contrast.
Step 33. Include Skull and Skeletal Hand on shelf
Place Skull and Skeletal Hand together to enhance the spooky vibe of this level.
Step 34. Set Potted Plant below cauldron
Put Potted Plant at the base. It adds natural balance to Dreamy Room Level 52 layout.
Step 35. Add Caged Critters on floor left
Position Caged Critters to the bottom-left. Their presence adds playful mystery.
Step 36. Polka Dot Mushroom beside critters
Set Polka Dot Mushroom next to the cage. In this level, it contributes to the forest theme.
Step 37. Orange Slices Bowl under chair
Add Orange Slices Bowl under the stool. Align carefully to avoid overlap.
Step 38. Place Gold Ring near scrolls
Set Gold Ring on the table near the parchment. Small details like this enhance Dreamy Room Level 52 aesthetics.
Step 39. Add Round Wall Mirror
Hang Round Wall Mirror on the left wall to reflect light and depth.
Step 40. Place Small Purple Box with Spiral
Position Small Purple Box with Spiral beside books on shelf.
Step 41. Add Test Tube Rack and Hourglass
Place Test Tube Rack and Hourglass on the right shelf under the potions.
Step 42. Include Green Droplet Potion Bottle and Red Heart Potion Bottle
Arrange Green Droplet Potion Bottle and Red Heart Potion Bottle among others for balance.
Step 43. Bookshelf Arch with Blue Gems
Add Bookshelf Arch with Blue Gems at the top center to complete structure.
Step 44. Install Round Window on right wall
Set Round Window beside the potions. This defines light direction for Dreamy Room Level 52.
Step 45. Add Red Cloth Stack on shelf corner
Place Red Cloth Stack at bottom right, finalizing the layered visual texture.
Tips and Precautions
Common Mistakes
- Some shelf items like potion bottles and scrolls overlap; zoom for precise alignment.
- The skull and skeletal hand can block smaller items if placed early.
- Candleholders should be positioned before the orb to avoid visual clipping.
- Hanging items like spider and hat require wall anchor points; place after roof trim.
Placement Strategies
- Use grid alignment for shelves in Dreamy Room Level 52 to ensure symmetry.
- For small items, drop them slowly to let the auto-snap assist.
- Rotate scrolls slightly for a natural placement effect.
- To prevent potion bottles bouncing back, drag from their center.
- Stack similar-colored objects together to enhance magical cohesion.