Dreamy Room Level 73
Level 73 guide walkthrough, helping players solve puzzles and explore the wonderful world of Dreamy Room.
Dreamy Room Level 73 Walkthrough Guide
Dreamy Room Level 73 Room Story
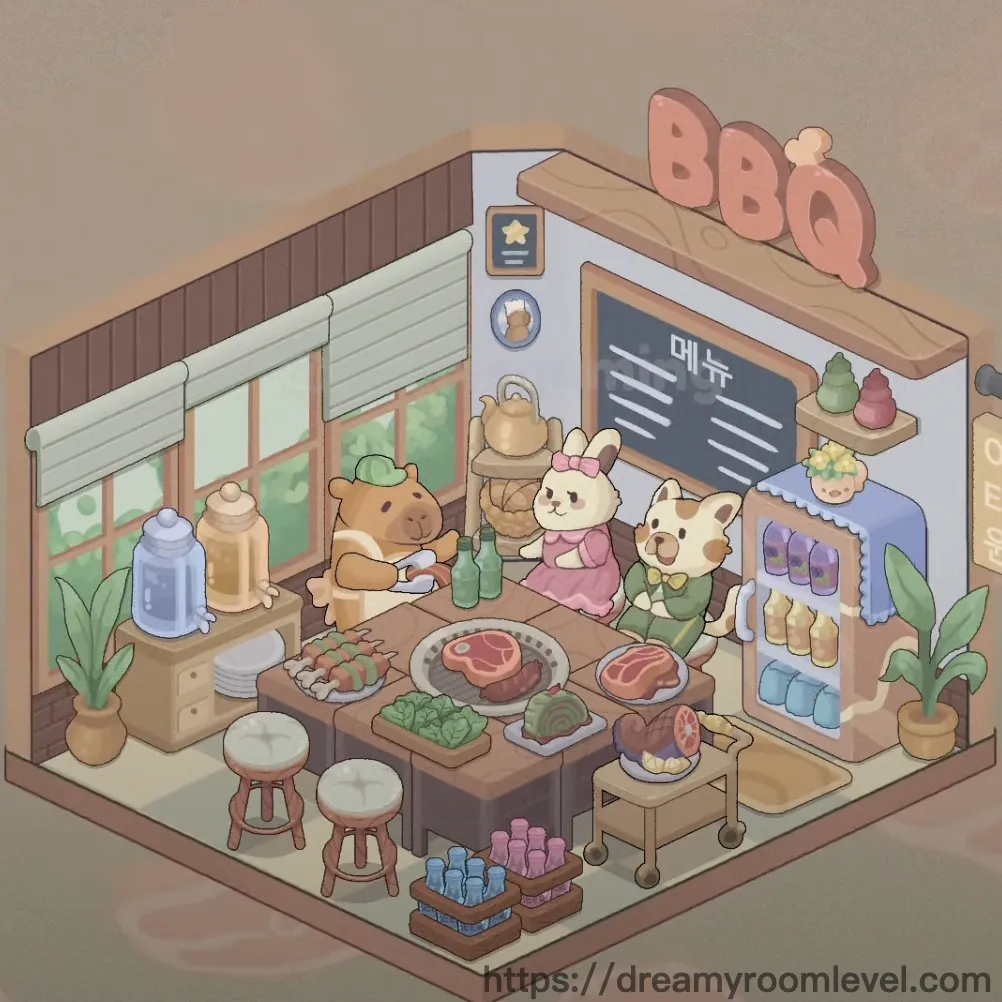
Welcome to the cozy BBQ restaurant where three adorable animal friends gather for their weekly feast. The brown hamster chef proudly displays his signature grilled meats, while the white bunny waitress serves with a gentle smile. Outside the window, lush greenery creates a peaceful dining atmosphere. Every corner of Dreamy Room Level 73 tells a heartwarming tale of friendship, delicious food, and the simple joy of sharing meals together in this charming wooden establishment.
Step-by-Step Placement Guide
Step 1. Install Brown Wood Paneling on Lower Walls
Position the brown wood paneling along the entire lower section of the back and side walls. This creates the restaurant's rustic foundation and should cover approximately the bottom third of the wall space. Align it horizontally to establish the classic BBQ restaurant aesthetic in Dreamy Room Level 73.
Step 2. Paint White Upper Wall Section
Apply the white upper wall covering to the upper two-thirds of all walls, creating a clean contrast with the wood paneling below. This bright surface will reflect light throughout the space and provide the perfect backdrop for menu boards and decorations in Dreamy Room Level 73.
Step 3. Lay Checkered Floor Throughout Space
Install the checkered floor in an alternating beige and gray pattern across the entire floor area. Ensure the tiles align in straight rows and columns to create the classic diner-style flooring that defines this Dreamy Room Level 73 restaurant layout.
Step 4. Mount Ceiling Beam Across Top
Attach the ceiling beam horizontally across the upper edge where walls meet the ceiling. This structural element adds architectural character and frames the space perfectly in Dreamy Room Level 73.
Step 5. Install Top Wooden Beam Above Store Sign
Place the top wooden beam directly above where the BBQ sign will go, creating a natural header for the restaurant's storefront presentation. Following Dreamy Room Level 73 design principles, this beam should span the width of the main service counter area.
Step 6. Add Window with Green View on Left Wall
Position the window with green view on the upper left wall section, showing the outdoor scenery. The window should sit comfortably within the white wall area, bringing natural light into this Dreamy Room Level 73 establishment.
Step 7. Attach Green Awning Above Window
Mount the green awning directly above the window frame, extending slightly beyond the window's width on both sides. This decorative element adds outdoor cafe charm to the Dreamy Room Level 73 restaurant.
Step 8. Hang BBQ Wooden Sign on Top Beam
Secure the BBQ wooden sign to the top wooden beam in the center-right area. The sign should display prominently as the restaurant's main identifier, essential for completing Dreamy Room Level 73 successfully.
Step 9. Mount Menu Board on Back Wall in Dreamy Room Level 73
Install the on the back wall to the right of the kitchen area, positioned at eye level for customers. The dark chalkboard surface with white text should be clearly visible from the dining area in this Dreamy Room Level 73 setup.
Step 10. Build Wooden Counter Along Right Side
Construct the main wooden counter along the right wall, extending from the front to back. This serves as the primary service and preparation area, crucial for the Dreamy Room Level 73 restaurant workflow.
Step 11. Place Wooden Dining Table in Center
Position the wooden dining table in the center-left floor area, creating the main dining spot. The table should be easily accessible from all sides, allowing comfortable seating according to Dreamy Room Level 73 layout requirements.
Step 12. Set Two Round Wooden Stools at Dining Table
Arrange both round wooden stools around the dining table, placing one on each side to create balanced seating. These stools should be positioned to allow characters to sit comfortably in Dreamy Room Level 73.
Step 13. Install Wooden Shelf Unit on Back Wall
Mount the wooden shelf unit on the back wall near the window, providing storage and display space for supplies. This multi-level shelving is essential for the restaurant's organization in Dreamy Room Level 73.
Step 14. Position Food Cart in Front-Right Corner
Place the food cart in the front-right corner near the counter entrance. The wheeled cart should be easily movable while staying close to the service area in Dreamy Room Level 73.
Step 15. Add Wall Hooks Between Windows and Counter
Install wall hooks on the wall space between the window and the counter area. These hooks will hold utensils and kitchen tools, maintaining the authentic restaurant feel of Dreamy Room Level 73.
Step 16. Place Brown Hamster Chef Behind Counter in Dreamy Room Level 73
Position the brown hamster chef behind the right-side counter, facing the dining area. The chef should stand in the food preparation zone, ready to serve in this Dreamy Room Level 73 restaurant.
Step 17. Set White Bunny Waitress at Center Table
Place the white bunny waitress on the left side of the dining table, wearing her pink dress. She should be positioned as if taking orders or serving customers in Dreamy Room Level 73.
Step 18. Seat Calico Cat Customer at Table
Position the calico cat customer on the right side of the dining table, sitting on one of the stools. This character completes the dining scene in Dreamy Room Level 73.
Step 19. Display Raw Steak on Dining Table
Place the raw steak on the front-left section of the dining table on a serving plate. This fresh cut should look appetizing and ready for grilling in Dreamy Room Level 73.
Step 20. Set Large Meat Cut on Center Plate
Position the large meat cut on the central plate at the dining table, displayed as the main course. This premium cut is the star attraction of the Dreamy Room Level 73 BBQ menu.
Step 21. Arrange Cooked Ribs on Table Plate
Place the cooked ribs on a plate toward the back-right of the dining table, showing the finished BBQ specialty. The glazed ribs should look delicious and ready to eat in Dreamy Room Level 73.
Step 22. Add Meat Skewers to Food Display
Position meat skewers either on the counter or food cart, displaying the grilled kebab options. These skewers add variety to the meat selection in Dreamy Room Level 73.
Step 23. Place Fresh Vegetables on Dining Table in Dreamy Room Level 73
Arrange broccoli, lettuce, and cabbage in wooden bowls or trays on the left-front section of the dining table. These fresh vegetables provide healthy side options following Dreamy Room Level 73 balanced menu design.
Step 24. Set Tomatoes and Cucumber on Table
Position tomatoes and cucumber in small dishes on the dining table, completing the vegetable selection. These fresh ingredients enhance the meal presentation in Dreamy Room Level 73.
Step 25. Create Side Vegetables Display Area
Arrange the side vegetables display on the counter or shelf, showing additional produce options. This display should be visually appealing and accessible in Dreamy Room Level 73.
Step 26. Place Rice Bowl and Fried Eggs on Table
Set the rice bowl and fried eggs on the back section of the dining table, providing classic side dishes. These staples complete the meal spread in Dreamy Room Level 73.
Step 27. Position Golden Teapot on Shelf Unit
Place the golden teapot on the middle shelf of the wooden shelf unit near the window. This decorative teapot adds warmth and traditional charm to Dreamy Room Level 73.
Step 28. Arrange Bottles Throughout Restaurant in Dreamy Room Level 73
Distribute the green bottle, blue bottles, clear water bottle, and brown sauce bottle on the shelf unit and counter areas. According to Dreamy Room Level 73 layout requirements, these beverage containers should be easily accessible.
Step 29. Set Serving Dishes and Plates
Position the wooden serving tray, white dinner plate, and round serving plate on the counter and table. These essential serving pieces support the restaurant operations in Dreamy Room Level 73.
Step 30. Place Potted Plants for Ambiance
Set potted plant left and potted plant right on the counter edges or floor corners, bringing natural greenery indoors. These plants enhance the cozy atmosphere of Dreamy Room Level 73.
Step 31. Add Green Tree Decoration on Counter
Position the green tree decoration on the right side of the counter top, adding a touch of nature. This decorative element brightens the service area in Dreamy Room Level 73.
Step 32. Install Decorative Items on Shelves and Walls
Mount the star badge, circular portrait, and lock decoration on the wall and shelf areas. These decorative pieces add personality to the Dreamy Room Level 73 restaurant.
Step 33. Arrange Colorful Shelf Decorations
Place the purple decoration shelf, yellow cream decoration, purple bottles shelf, and colorful beads shelf on the upper counter shelving. Completing Dreamy Room Level 73 requires these decorative displays for visual appeal.
Step 34. Store Supply Crates on Floor
Position the pink bottle crate and blue bottle crate on the floor near the front-right corner. These storage crates should stack neatly according to Dreamy Room Level 73 space management.
Step 35. Place Wooden Storage Box in Corner
Set the wooden storage box on the floor in an accessible corner location. This final storage element completes the functional layout of Dreamy Room Level 73 restaurant.
Tips and Tricks
Important Notes
- Check behind the counter and under the shelf unit for small bottles and containers that are easily overlooked in tight spaces
- The dining table area has multiple overlapping plates and food items - place larger dishes first before adding smaller vegetables and side dishes
- The wooden shelf unit has multiple levels - work from bottom to top to avoid accidentally knocking items off higher shelves
- Some decorative items on the counter can block access to placing bottles and plants - install wall decorations before setting counter items
- The two wooden stools must be positioned with enough space between them for the cat customer to sit comfortably at the table
Practical Techniques
- For bottles on narrow shelves, drag them slowly from directly above rather than from the side to ensure precise placement
- When arranging multiple vegetables on the table, place them in clusters by type to avoid confusion between similar green items
- The food cart wheels make it mobile - align it parallel to the counter edge for the most stable placement in Dreamy Room Level 73
- If meat plates bounce back, try rotating them slightly before placing to find the correct angle that triggers the snap-to-grid effect
- Stack the bottle crates by placing the bottom crate first, then carefully lowering the second crate directly above it for perfect alignment
- Use the checkered floor pattern as a visual guide for centering the dining table - position it where tile lines create natural symmetry for Dreamy Room Level 73 success